That warm, sharp scent of ginger and cloves hitting you before you even get through the kitchen door. It still takes me straight to my grandmother’s tiny apartment every October, where the air was always thick with something baking and the windows were perpetually fogged up. I can picture her now, pulling a tray of these mini cheesecakes from the oven, the little paper liners crinkling as she set them on the wire rack. She never used a water bath, never fussed with a springform pan—just a standard muffin tin and a box of gingersnaps she’d crush with a rolling pin while muttering about the neighbor’s cat. It was a specific, unglamorous kind of magic, and honestly, I think that’s why it stuck.
These little bites are the perfect fall dessert. They have that rich, tangy cream cheese filling we all crave, but they’re portion-controlled so you don’t feel like you need a nap after one. And the crust? It’s not just any crust. That deep, molasses-y snap from the gingersnaps is the only thing that can stand up to the creamy pumpkin spice filling. I’ve tried them with graham crackers, and it’s just not the same. It’s like wearing sneakers with a ball gown—technically it works, but you know it’s wrong.
I started making these mini pumpkin cheesecakes years ago when I realized I didn’t have the patience for a full-sized cheesecake. The wait time alone was enough to drive me crazy. These little guys bake in half the time, cool down faster, and honestly, they’re way cuter. Plus, there’s something so satisfying about handing someone their own personal cheesecake. It feels special without being pretentious. Trust me, this is the recipe that will get you invited to every fall gathering.
Why You’ll Love This Recipe
I’ve tested this recipe more times than I care to admit, and each batch taught me something new. The first time I made them, the filling cracked like a dry riverbed. The second time, the crust was so hard I could have used it as a hockey puck. But now? This version is bulletproof, and I’m so excited to share it with you.
- Quick & Easy : These come together in about 30 minutes of active time. No water bath, no complicated techniques, no stress. Perfect for a weeknight baking session or a last-minute dessert emergency.
- Simple Ingredients : You probably have most of these in your kitchen right now. Cream cheese, pumpkin puree, eggs, sugar, and a box of gingersnaps. That’s it. No fancy grocery store runs required.
- Perfect for Fall Gatherings : These are a hit at Thanksgiving, Friendsgiving, Halloween parties, or just a cozy night in. They’re easy to transport and even easier to serve.
- Crowd-Pleaser : I’ve served these to everyone from my picky nephew to my food-snob uncle, and they always disappear. The combination of spicy gingersnap and creamy pumpkin is just irresistible.
- Unbelievably Delicious : The texture is what gets me every time. The filling is silky smooth with that slight tang from the cream cheese, and the crust has that perfect snap. It’s comfort food in a tiny, perfect package.
What makes these different from every other pumpkin cheesecake recipe out there? It’s the technique. I’ve figured out the exact ratio of pumpkin to cream cheese so the filling stays dense and creamy, not watery. And the secret to the crust? You don’t just press it in—you pre-bake it for five minutes. That little step makes all the difference between a soggy bottom and a perfectly crisp crust.
This isn’t just another pumpkin recipe. It’s the kind that makes you close your eyes after the first bite. It’s fall on a plate, and it’s honestly the easiest way to impress people without breaking a sweat.
What Ingredients You Will Need
This recipe uses simple, wholesome ingredients to deliver that rich, comforting flavor we all crave in the fall. Most of these are pantry staples, which makes this recipe perfect for spontaneous baking.
For the Gingersnap Crust
- 1 ½ cups gingersnap cookie crumbs (about 24 cookies, crushed finely) – I prefer the Nabisco brand for their consistent spice level, but any brand works. You want that deep molasses and ginger flavor to stand up to the creamy filling.
- ¼ cup unsalted butter, melted – This binds the crust and adds richness. Use real butter here, not margarine. The flavor difference is noticeable.
- 1 tablespoon granulated sugar – Just a touch to balance the spice. If your gingersnaps are already very sweet, you can skip this.
- Pinch of salt – This enhances all the flavors. Don’t skip it.
For the Pumpkin Cheesecake Filling
- 16 ounces cream cheese, softened to room temperature – This is non-negotiable. Cold cream cheese will give you lumpy filling. I recommend Philadelphia for the best texture and tang.
- ½ cup granulated sugar – Enough to sweeten without overpowering the pumpkin and spice.
- ¼ cup packed light brown sugar – Adds a subtle molasses note that pairs beautifully with the crust.
- 2 large eggs, room temperature – Room temperature eggs incorporate more smoothly and create a creamier texture.
- 1 cup pumpkin puree – Not pumpkin pie filling! Make sure you’re getting 100% pure pumpkin. I like Libby’s for its consistent thickness and color.
- 1 teaspoon vanilla extract – Pure vanilla, not imitation. It makes a difference.
- 1 ½ teaspoons pumpkin pie spice – Or make your own with ½ teaspoon cinnamon, ½ teaspoon ginger, ¼ teaspoon nutmeg, and ¼ teaspoon cloves.
- ¼ teaspoon salt – Balances the sweetness and enhances the spice.
- 1 tablespoon all-purpose flour – This helps stabilize the filling and prevents cracking. Trust me on this one.
- ¼ cup sour cream, room temperature – Adds moisture and tang, making the filling extra creamy. Greek yogurt works as a substitute if needed.
For the Topping (Optional but Recommended)
- ½ cup heavy cream – For a simple whipped cream topping.
- 1 tablespoon powdered sugar – To sweeten the cream.
- ½ teaspoon vanilla extract – For flavor.
- Pinch of cinnamon or pumpkin pie spice – For garnish.
- Caramel sauce – A drizzle of homemade or store-bought caramel takes these over the top.
Equipment Needed
You don’t need a lot of fancy equipment for these mini cheesecakes, which is one of the reasons I love them. Here’s what you’ll need:
- Standard 12-cup muffin tin – This is essential. You could use a mini muffin tin for even smaller bites, but the baking time will change significantly.
- Paper or foil cupcake liners – I prefer foil liners because they hold their shape better and peel off more easily. If you use paper liners, consider doubling them up for extra support.
- Food processor or rolling pin – For crushing the gingersnaps. A food processor gives you the most consistent crumbs, but a rolling pin and a ziplock bag work just fine. I’ve done it both ways.
- Medium mixing bowls – One for the crust, one for the filling.
- Electric hand mixer or stand mixer – A hand mixer works perfectly here. You don’t need a stand mixer for this small batch.
- Rubber spatula – For scraping down the bowl and folding ingredients.
- Measuring cups and spoons – For accuracy.
- Small cookie scoop or spoon – For evenly distributing the crust and filling.
- Wire cooling rack – Essential for cooling the cheesecakes properly to prevent condensation.
If you don’t have a food processor, don’t worry. Place the gingersnaps in a sturdy ziplock bag, seal it, and go to town with a rolling pin. It’s oddly satisfying and takes about two minutes. Plus, you get to release a little stress while you’re at it.
Preparation Method
Let’s get baking! I’ve broken this down into clear steps so you can follow along without any confusion. Take your time, and remember—baking is supposed to be fun, not stressful.
Step 1: Prepare the Crust
Preheat your oven to 325°F (160°C). Line your muffin tin with 12 paper or foil liners. If you’re using paper liners, I recommend doubling them up for extra support—these cheesecakes are sturdy, but the liners can sometimes buckle.
In a food processor, pulse the gingersnaps until they become fine crumbs. You should have about 1 ½ cups. If you’re using the rolling pin method, crush them until no large pieces remain. Transfer the crumbs to a medium bowl.
Add the melted butter, sugar, and salt to the crumbs. Stir with a fork until the mixture looks like wet sand and holds together when you squeeze it. Every crumb should be coated in butter—this is what gives you that perfect, crunchy crust.
Divide the crust mixture evenly among the 12 liners. Use about 2 tablespoons per cup. Press the crumbs down firmly using the bottom of a small glass or a shot glass. I like to use a flat-bottomed measuring cup—it fits perfectly. Make sure the crust is compact and even, going slightly up the sides of the liner if possible.
Bake the crusts for 5 minutes at 325°F (160°C). This pre-bake is crucial—it sets the crust and prevents it from getting soggy when you add the filling. The crusts should be fragrant and just slightly darker around the edges. Set them aside to cool while you make the filling.
Step 2: Make the Filling
In a large mixing bowl, beat the softened cream cheese with an electric mixer on medium speed until it’s smooth and creamy. This should take about 2 minutes. Scrape down the sides and bottom of the bowl with a rubber spatula—you don’t want any lumps.
Add the granulated sugar and brown sugar. Beat on medium speed until well combined, about 1 minute. Again, scrape down the bowl. It’s important not to overmix at this stage—you don’t want to incorporate too much air, which can cause cracking later.
Add the eggs one at a time, beating on low speed after each addition until just combined. The mixture should look smooth and silky. If you overbeat the eggs, you’ll incorporate air bubbles that can cause your cheesecakes to puff up and crack.
Add the pumpkin puree, vanilla extract, pumpkin pie spice, and salt. Beat on low speed until everything is well combined and the mixture is a uniform orange color. The smell at this point is incredible—like autumn in a bowl.
Finally, add the sour cream and flour. Mix on low speed until just combined. The flour helps stabilize the filling and prevents cracking, so don’t skip it. The batter should be smooth, creamy, and slightly thick.
Step 3: Fill and Bake
Divide the filling evenly among the 12 crusts. I use a small cookie scoop to make this easier—it gives you about 3 tablespoons per cup. Fill each liner almost to the top, leaving just a tiny bit of room. The cheesecakes won’t rise much, so you can fill them generously.
Gently tap the muffin tin on the counter a few times to release any air bubbles. This is one of those small steps that makes a big difference in the final texture.
Bake at 325°F (160°C) for 18-22 minutes. The edges should look set and slightly puffed, but the centers should still jiggle slightly when you gently shake the pan. This is the sweet spot—overbaking will give you dry, cracked cheesecakes. I usually start checking at 18 minutes and go from there.
Remove the pan from the oven and let it cool on a wire rack for 30 minutes. During this time, the residual heat will finish cooking the centers. Don’t skip this step—cooling gradually prevents cracking.
Step 4: Chill and Serve
After 30 minutes, transfer the pan to the refrigerator and chill for at least 4 hours, but overnight is even better. This is the hardest part of the whole recipe, I know. But trust me, the wait is worth it. Chilling allows the flavors to meld and the texture to become perfectly creamy.
When you’re ready to serve, carefully peel away the paper liners. If you used foil liners, they should come off easily. If you used paper liners and they’re sticking, pop the cheesecakes in the freezer for 10 minutes—that usually does the trick.
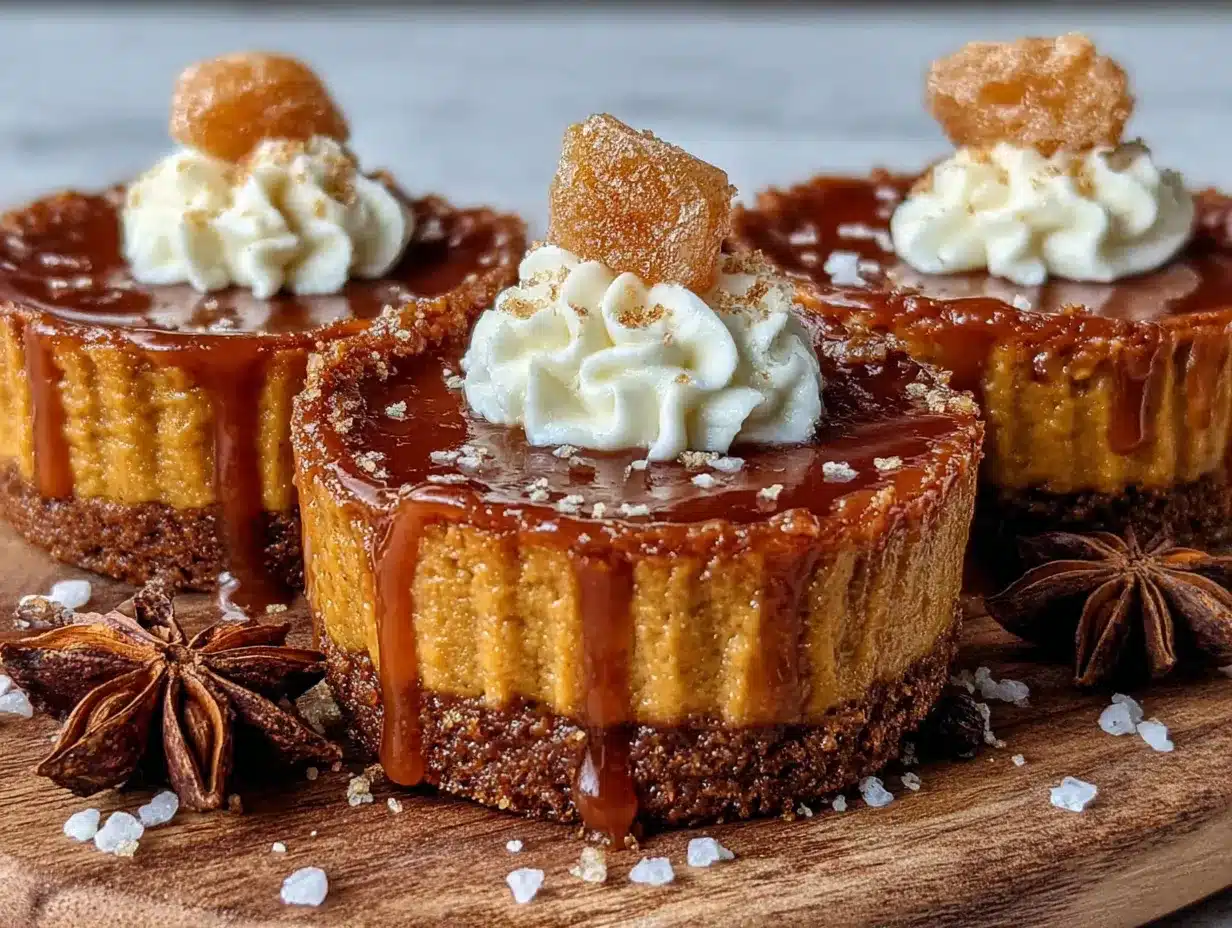
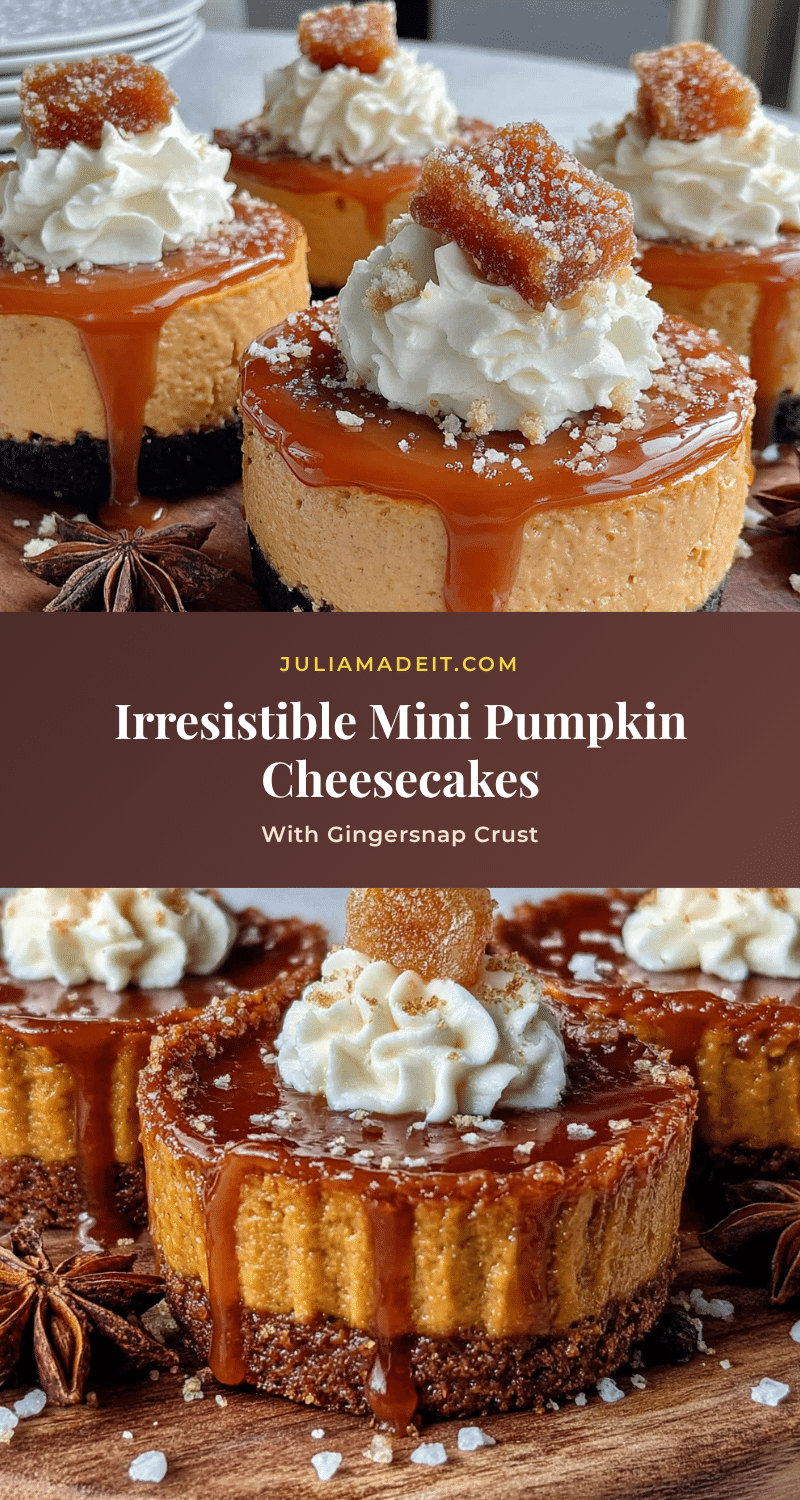
Top with whipped cream, a drizzle of caramel sauce, and a sprinkle of cinnamon or pumpkin pie spice. Serve cold or at room temperature—both are delicious.
Cooking Tips & Techniques
I’ve made these mini pumpkin cheesecakes more times than I can count, and I’ve learned a few things along the way. Here are my best tips for guaranteed success:
Room temperature ingredients are not optional. I know, I know—it feels like an unnecessary step. But cold cream cheese doesn’t blend smoothly, and cold eggs can cause the batter to curdle. Take everything out of the fridge at least 30 minutes before you start. Your future self will thank you.
Don’t overmix the batter. This was my biggest mistake early on. I thought more mixing meant a smoother texture, but it actually incorporates too much air. Those air bubbles expand in the oven and then collapse, leaving you with cracked cheesecakes. Mix until everything is just combined, then stop.
The jiggle test is your best friend. When you’re checking for doneness, ignore the timer and trust your instincts. The edges should be set, but the center should have a slight wobble—like Jell-O, not soup. If the center is completely firm, you’ve overbaked them.
Crush the gingersnaps consistently. If you have big chunks of cookie in your crust, it won’t hold together properly. Aim for a fine, sandy texture. And press the crust down firmly—a loose crust will crumble when you try to eat it.
Use a water bath alternative. Traditional cheesecakes need a water bath to prevent cracking, but these mini versions are forgiving enough to skip it. The key is the low baking temperature and the tablespoon of flour in the batter. If you’re still worried, place a small pan of hot water on the lower rack of your oven while the cheesecakes bake. The steam will help keep them moist.
Plan ahead. These cheesecakes need at least 4 hours to chill, so don’t try to make them the same day you’re serving them. I always make mine the night before. The flavor actually improves overnight as the pumpkin and spices meld with the cream cheese.
Variations & Adaptations
One of the best things about this recipe is how adaptable it is. Here are some of my favorite variations:
Gluten-Free Version: Use gluten-free gingersnaps for the crust. Most major brands offer a gluten-free option, or you can make your own. The rest of the ingredients are naturally gluten-free, so this is an easy swap.
Dairy-Free Version: Use dairy-free cream cheese and a plant-based butter substitute. I’ve tried several brands, and Kite Hill works best for the cream cheese. For the sour cream, use a plain dairy-free yogurt. The texture will be slightly different, but still delicious.
Low-Carb/Keto Version: Replace the gingersnap crust with an almond flour and butter crust. Use a sugar substitute like Swerve in the filling. The pumpkin puree does have some carbs, but it’s still manageable for a keto-friendly treat in moderation.
Flavor Variations: Swap the pumpkin pie spice for chai spice or apple pie spice for a different flavor profile. You can also add a tablespoon of bourbon or dark rum to the filling for an adult twist. Or fold in some mini chocolate chips for a pumpkin-chocolate combo that’s absolutely killer.
Topping Variations: Instead of whipped cream, try a dollop of vanilla bean pastry cream, a spoonful of cranberry compote, or a sprinkle of candied pecans. Each topping brings something different to the table.
Mini Version: Use a mini muffin tin for bite-sized cheesecakes. Reduce the baking time to 10-12 minutes, and keep a close eye on them. These are perfect for parties or holiday cookie trays.
I once made a batch with a bourbon caramel sauce and candied bacon crumbles on top for a friendsgiving party. They were gone in five minutes. Sometimes the best variations come from happy accidents and a little bit of courage.
Serving & Storage Suggestions
These mini pumpkin cheesecakes are best served cold or at room temperature. I like to take them out of the fridge about 15 minutes before serving to take the chill off—it allows the flavors to open up a bit more.
For presentation, arrange the cheesecakes on a beautiful platter or cake stand. Top each one with a generous dollop of whipped cream, a drizzle of caramel sauce, and a light dusting of cinnamon or pumpkin pie spice. If you’re feeling fancy, add a small candied pecan or a crystallized ginger piece on top.
Storage: Store any leftover cheesecakes in an airtight container in the refrigerator for up to 5 days. They actually get better after a day or two as the flavors continue to meld. Just keep them covered so they don’t absorb any fridge odors.
Freezing: These freeze beautifully! Place the cooled, un-topped cheesecakes on a baking sheet and freeze until solid, about 2 hours. Then transfer them to a freezer-safe container or ziplock bag, separating layers with parchment paper. They’ll keep for up to 3 months. To serve, thaw in the refrigerator overnight and add toppings just before serving.
Reheating: I don’t recommend reheating these—they’re meant to be enjoyed cold or at room temperature. But if you really want a warm cheesecake, pop one in the microwave for about 10 seconds. Just don’t overdo it, or the texture will suffer.
These cheesecakes also make fantastic gifts. Pack them in a decorative box or tin with some parchment paper between layers. They travel well and are always appreciated.
Nutritional Information & Benefits
While these mini pumpkin cheesecakes are definitely a treat, they do offer some nutritional benefits. Here’s the estimated nutritional breakdown for one cheesecake (without toppings):
- Calories: Approximately 280-320
- Fat: 18-22g
- Carbohydrates: 26-30g
- Protein: 5-7g
- Fiber: 1-2g
- Sugar: 18-22g
Health Benefits: Pumpkin is packed with vitamin A, which is great for eye health and immune function. It’s also a good source of fiber and antioxidants. The cream cheese provides calcium and protein, while the ginger in the crust has anti-inflammatory properties. Plus, portion control is built right in—one mini cheesecake is the perfect serving size.
Dietary Considerations: This recipe contains dairy, gluten, and eggs. For dairy-free and gluten-free options, see the variations section above. These cheesecakes are not low-carb, but they can be adapted for a keto diet with the right substitutions.
I’m not a nutritionist, but I believe in balance. These cheesecakes are a delicious way to enjoy the flavors of fall without overdoing it. One is satisfying. Two is a party. And that’s perfectly okay.
Frequently Asked Questions
Can I use fresh pumpkin instead of canned?
Yes, you can use fresh pumpkin puree, but you’ll need to roast and puree it first. The main difference is that fresh pumpkin has more water content, which can make the filling slightly less firm. To compensate, cook the puree down on the stove for 5-10 minutes to thicken it before using. Canned pumpkin is more consistent and easier, but fresh works in a pinch.
Why did my cheesecakes crack?
Cracking is usually caused by overbaking or overmixing. If the centers are completely firm when you take them out of the oven, they’re overbaked. Remember, the centers should still jiggle slightly. Overmixing incorporates too much air, which expands and then collapses, causing cracks. Next time, mix on low speed and stop as soon as the ingredients are combined.
Can I make these without a food processor?
Absolutely! Place the gingersnaps in a sturdy ziplock bag, seal it, and crush them with a rolling pin or the bottom of a heavy skillet. It takes a little more effort, but it works perfectly. You can also use a blender in short pulses, just be careful not to overdo it.
How far in advance can I make these?
These cheesecakes are actually better when made ahead of time. You can prepare them up to 3 days in advance and store them in the refrigerator. They also freeze beautifully for up to 3 months. Just add the toppings right before serving for the best presentation.
Can I use a different type of cookie for the crust?
Yes, but the flavor will change. Graham crackers, vanilla wafers, or shortbread cookies all work well. If you use a less spicy cookie, consider adding a teaspoon of ground ginger and a pinch of cloves to the crust mixture to replicate that gingersnap flavor. For a chocolate twist, try chocolate wafer cookies—the combination of chocolate and pumpkin is surprisingly good.
Conclusion
These mini pumpkin cheesecakes with gingersnap crust are everything I love about fall baking. They’re cozy, comforting, and just the right amount of indulgent. The spicy, crunchy crust paired with the silky, creamy filling is a combination that never gets old. And the best part? They’re so much easier than a full-sized cheesecake. No water bath, no complicated techniques, no stress.
I hope you give this recipe a try. Make them for Thanksgiving, make them for a cozy night in, make them just because it’s Tuesday and you deserve something delicious. And don’t be afraid to make them your own—add your favorite toppings, experiment with different spices, and have fun with it.
If you’re looking for more fall-inspired treats, you might enjoy my creamy pumpkin pie cheesecake or these easy pumpkin cream cheese muffins. And for a cozy breakfast option, these creamy pumpkin overnight oats are a game-changer.
I’d love to hear how your mini pumpkin cheesecakes turn out! Leave a comment below and let me know what toppings you used or if you tried any fun variations. And if you loved this recipe, don’t forget to share it with your friends and family. Happy baking, friends!
Pin This Recipe!
Perfect Mini Pumpkin Cheesecakes Recipe: Easy Gingersnap Crust
These mini pumpkin cheesecakes feature a rich, tangy cream cheese filling and a crunchy gingersnap crust. They’re portion-controlled, easy to make, and perfect for fall gatherings.
- Prep Time: 30 minutes
- Cook Time: 22 minutes
- Total Time: 5 hours (including chilling)
- Yield: 12 servings 1x
- Category: Dessert
- Cuisine: American
Ingredients
- 1 ½ cups gingersnap cookie crumbs (about 24 cookies, crushed finely)
- ¼ cup unsalted butter, melted
- 1 tablespoon granulated sugar
- Pinch of salt
- 16 ounces cream cheese, softened to room temperature
- ½ cup granulated sugar
- ¼ cup packed light brown sugar
- 2 large eggs, room temperature
- 1 cup pumpkin puree (not pumpkin pie filling)
- 1 teaspoon vanilla extract
- 1 ½ teaspoons pumpkin pie spice
- ¼ teaspoon salt
- 1 tablespoon all-purpose flour
- ¼ cup sour cream, room temperature
- ½ cup heavy cream (for topping)
- 1 tablespoon powdered sugar (for topping)
- ½ teaspoon vanilla extract (for topping)
- Pinch of cinnamon or pumpkin pie spice (for garnish)
- Caramel sauce (for topping, optional)
Instructions
- Preheat oven to 325°F (160°C). Line a 12-cup muffin tin with paper or foil liners.
- In a food processor, pulse gingersnaps into fine crumbs. Transfer to a medium bowl and stir in melted butter, 1 tablespoon sugar, and a pinch of salt until mixture resembles wet sand.
- Divide crust mixture evenly among the 12 liners (about 2 tablespoons each). Press firmly using the bottom of a small glass or measuring cup.
- Bake crusts for 5 minutes at 325°F. Set aside to cool.
- In a large bowl, beat softened cream cheese with an electric mixer on medium speed until smooth, about 2 minutes. Scrape down bowl.
- Add granulated sugar and brown sugar; beat on medium until combined, about 1 minute. Scrape bowl.
- Add eggs one at a time, beating on low after each addition until just combined.
- Add pumpkin puree, vanilla extract, pumpkin pie spice, and ¼ teaspoon salt. Beat on low until uniform.
- Add sour cream and flour; mix on low until just combined. Batter should be smooth and slightly thick.
- Divide filling evenly among the crusts (about 3 tablespoons each). Tap pan gently to release air bubbles.
- Bake at 325°F for 18-22 minutes, until edges are set but centers jiggle slightly.
- Cool pan on a wire rack for 30 minutes, then refrigerate for at least 4 hours or overnight.
- To serve, peel away liners. Top with whipped cream, caramel sauce, and a sprinkle of cinnamon or pumpkin pie spice if desired.
Notes
Room temperature ingredients are essential for a smooth filling. Don’t overmix the batter to prevent cracking. The jiggle test is key: centers should wobble slightly when done. Pre-baking the crust prevents sogginess. Chill for at least 4 hours, preferably overnight, for best texture.
Nutrition
- Serving Size: 1 mini cheesecake
- Calories: 300
- Sugar: 20
- Sodium: 220
- Fat: 20
- Saturated Fat: 11
- Carbohydrates: 28
- Fiber: 1.5
- Protein: 6
Keywords: mini pumpkin cheesecakes, gingersnap crust, fall dessert, pumpkin dessert, cheesecake recipe, easy cheesecake, Thanksgiving dessert