I was standing in the grocery store aisle last October, staring at a display of pre-made Halloween treats, when the smell of marshmallow and butter hit me from the bakery section. And just like that, I was seven years old again, sitting on my Aunt Carol’s sticky kitchen floor, my fingers covered in melted marshmallow, trying to shape a lopsided orange ball that was supposed to be a pumpkin. She laughed at my messy attempt, handed me a green M&M for the stem, and said, “Honey, the best pumpkins are the ones that look like they’ve been through a windstorm.” I can still feel the warmth of that tiny kitchen, the way the radio played oldies in the background, and the sound of her humming while she worked. She passed away a few years back, and every Halloween since, I find myself chasing that exact feeling — the joy, the mess, the simple magic of making something with your own hands. These Easy Halloween Rice Krispie Treat Pumpkins are my way of bringing her back to the table, one sticky little pumpkin at a time.
Honestly, I’ve tried other versions over the years — the ones that require fondant, special cutters, and a level of patience I simply do not possess. But this recipe? It’s the one that stuck. It’s the one my kids beg for every October, the one that makes a complete mess of my kitchen and leaves me with a smile on my face. Maybe you’ve been there, standing in the candy aisle, feeling the pressure to create something Pinterest-perfect for your kids’ classroom party or family gathering. Let me tell you, these pumpkins are the answer. They’re forgiving, they’re fun, and they taste exactly like childhood.
The first time I made these for my own kids, I forgot to butter my hands before shaping the balls. Big mistake. I spent the next ten minutes peeling marshmallow goo off my fingers while my daughter giggled uncontrollably. But you know what? Those lopsided, slightly deformed pumpkins were the best ones we ever made. And that’s the thing about this recipe — it doesn’t need to be perfect to be wonderful. It just needs to be made with love, a little bit of orange food coloring, and maybe a few extra marshmallows for snacking along the way.
Why You’ll Love This Recipe
Let me tell you why these Easy Halloween Rice Krispie Treat Pumpkins have become a non-negotiable tradition in our house. I’ve tested this recipe at least a dozen times across different kitchens, different humidity levels, and with varying degrees of toddler interference. It works every single time.
- Kid-Approved Fun : This is the kind of recipe that gets little hands involved without causing a meltdown (well, mostly). Rolling the balls, adding the stems, and decorating faces is pure joy for kids ages 3 to 103.
- Simple Ingredients : You probably have everything in your pantry right now. Rice Krispies cereal, marshmallows, butter, orange food coloring, and some green candy for the stems. No fancy baking supplies required.
- Budget-Friendly : For under $10, you can make a whole platter of these pumpkins. Compare that to the cost of store-bought Halloween treats, and it’s a no-brainer for families watching their grocery budget.
- Perfect for Halloween Parties : Whether it’s a school classroom party, a trunk-or-treat event, or just a cozy family movie night, these pumpkins are always the star of the show.
- No Baking Required : The stovetop does all the work. No oven, no complicated techniques, just a saucepan and a little bit of patience.
- Crowd-Pleaser : I’ve brought these to four different Halloween gatherings now, and every single time, they disappear before the cupcakes. Kids love them, adults sneak them, and nobody can eat just one.
What makes this recipe different from all the other Halloween treats out there? It’s the texture, honestly. The combination of the crispy cereal with the soft, chewy marshmallow creates this incredible bite that’s both satisfying and nostalgic. And the orange color? I use a gel food coloring that gives them that perfect pumpkin hue without making the mixture too wet. It’s not just another version — it’s the version I’ve perfected through trial, error, and a few sticky disasters.
This recipe is the kind that makes you close your eyes after the first bite. It’s comfort food reimagined for the Halloween season — simpler, faster, but with the same soul-soothing satisfaction that only childhood treats can bring. Perfect for impressing your kids without stressing yourself out.
What Ingredients You Will Need
This recipe uses simple, everyday ingredients that come together to create something truly special. The beauty of these Easy Halloween Rice Krispie Treat Pumpkins is that you don’t need to hunt down obscure items or spend a fortune at specialty stores. Here’s everything you’ll need:
For the Pumpkin Base
- 6 cups Rice Krispies cereal (or any crispy rice cereal — I’ve used generic brands and they work fine, though the name brand tends to stay crunchier longer)
- 4 tablespoons unsalted butter (salted butter works too, just reduce any additional salt. I prefer unsalted to control the flavor)
- 1 package (10 oz) marshmallows (standard size, not mini — though mini work in a pinch. Jet-Puffed is my go-to brand for consistent melting)
- 1/2 teaspoon vanilla extract (pure vanilla is best, but imitation works in a budget pinch)
- Orange gel food coloring (I recommend Wilton or AmeriColor — liquid coloring can make the mixture too wet and affect the texture)
- Pinch of salt (balances the sweetness and enhances the buttery flavor)
For Decorating
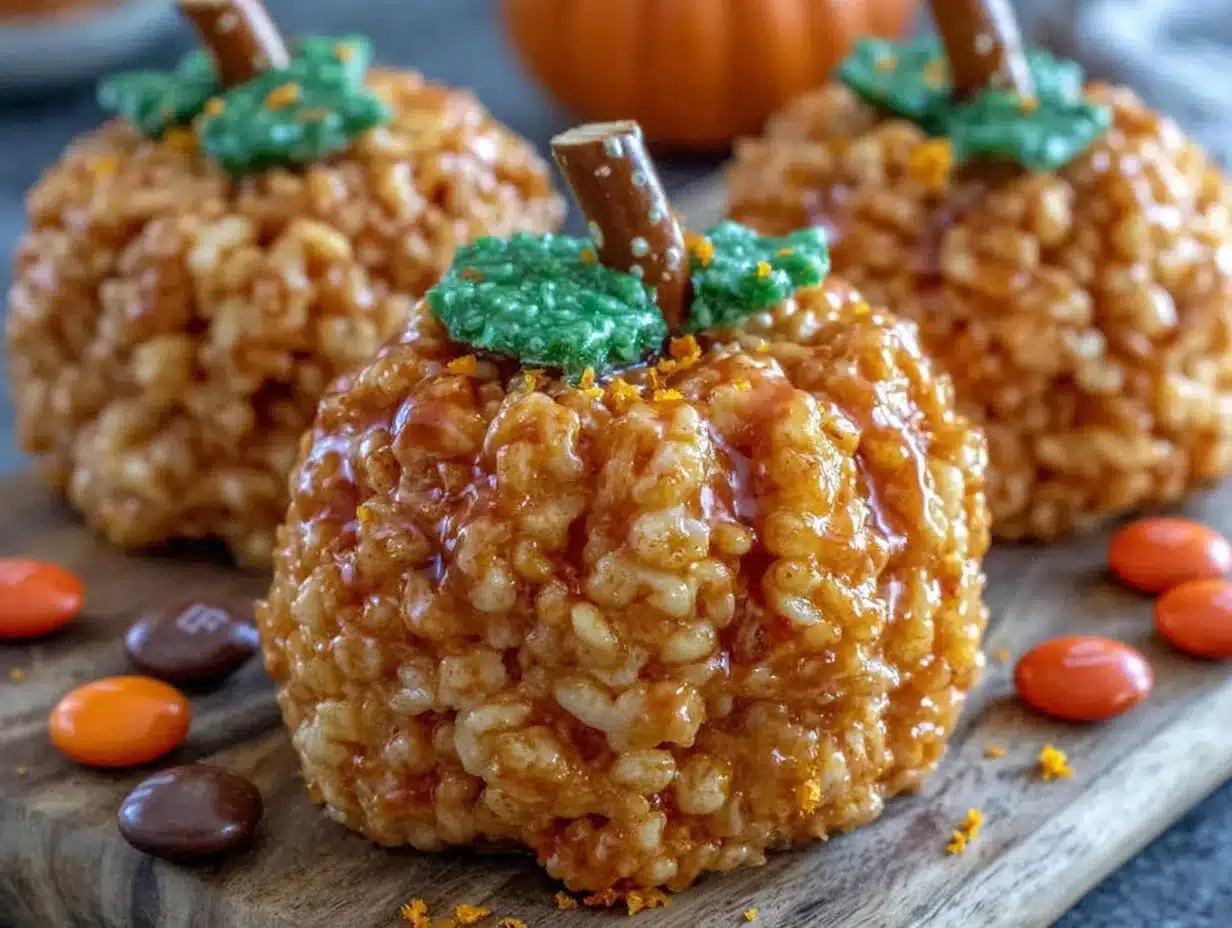
- Green candy melts or green M&Ms (for the pumpkin stems — I’ve used both, and M&Ms are easier for little hands to handle)
- Black licorice strings or black decorating gel (for making jack-o-lantern faces. The gel is less messy for kids)
- Pretzel sticks (optional — they make great stems too, and add a salty contrast)
Ingredient Tips and Substitutions
For the marshmallows, I’ve learned through trial and error that fresh marshmallows melt much better than ones that have been sitting in your pantry for months. If your marshmallows feel hard or stale, they won’t melt into that silky smooth mixture you need. Trust me, I learned this the hard way when I tried to use a bag that had been open since last Halloween — it was a sticky, lumpy disaster.
If you need a gluten-free option, most Rice Krispies cereals are now gluten-free, but always check the label to be sure. The original recipe is naturally gluten-free as long as you use certified gluten-free cereal.
For a dairy-free version, use vegan butter and check that your marshmallows are vegan-friendly (Dandies brand makes excellent vegan marshmallows that melt beautifully). The texture will be slightly different, but still delicious.
You can also experiment with different cereals. Fruity Pebbles gives them a fun flavor twist, though the color might be a bit wild. Cocoa Pebbles would make chocolate pumpkins — how fun would that be for a Halloween party?
Equipment Needed
You don’t need a professional kitchen to make these Easy Halloween Rice Krispie Treat Pumpkins. Here’s what you’ll need:
- Large saucepan (at least 4-quart capacity — you need room to stir without spilling marshmallow everywhere)
- Large mixing bowl (for combining the cereal with the marshmallow mixture)
- Spatula (a silicone spatula is ideal — it won’t scratch your pan and makes scraping every last bit of marshmallow easy)
- Butter or cooking spray (for greasing your hands and the pan — this is non-negotiable, trust me)
- Parchment paper or wax paper (for setting the finished pumpkins on)
- Cookie sheet or large platter (to hold the pumpkins while they set)
- Small bowl of water (for dipping your fingers while shaping — it helps prevent sticking)
- Measuring cups and spoons
I’ve made these with just a wooden spoon and a microwave before (yes, you can melt marshmallows in the microwave), and they turned out fine. The stovetop method gives you more control, but if you’re in a pinch, microwave the butter and marshmallows in 30-second intervals, stirring between each, until smooth.
A tip from experience: if you don’t have a silicone spatula, butter your wooden spoon before stirring the marshmallow mixture. It makes cleanup so much easier. I learned this after spending twenty minutes scrubbing hardened marshmallow off a regular spoon.
Preparation Method
Let’s get to the fun part — making these adorable Easy Halloween Rice Krispie Treat Pumpkins! I’ve broken this down into clear steps with all the little details that make the difference between good pumpkins and great ones.
- Prepare your workspace. Before you start, line a large cookie sheet with parchment paper. Lightly spray it with cooking spray or rub it with a thin layer of butter. This step is crucial — without it, your pumpkins will stick to the paper and you’ll be peeling them off in pieces. Also, fill a small bowl with warm water and set it aside for dipping your fingers.
- Melt the butter. In your large saucepan, melt the 4 tablespoons of unsalted butter over medium-low heat. Don’t rush this — if the butter burns, it will affect the flavor of your entire batch. Swirl the pan occasionally and watch for the butter to become fully liquid and slightly foamy. This takes about 2-3 minutes.
- Add the marshmallows. Pour the entire 10-ounce bag of marshmallows into the melted butter. Stir continuously with your silicone spatula until the marshmallows are completely melted and the mixture is smooth. This should take about 5-7 minutes. Keep the heat on medium-low — too high and the marshmallows will scorch. You’ll know it’s ready when the mixture is glossy and stretches when you lift the spatula.
- Add vanilla and salt. Remove the pan from the heat. Stir in the 1/2 teaspoon of vanilla extract and a pinch of salt. The vanilla will sizzle a bit when it hits the hot mixture — that’s normal and actually releases more flavor. Stir until everything is well combined.
- Add the orange color. This is where the magic happens. Add your orange gel food coloring one drop at a time, stirring well after each drop. I usually use about 5-7 drops for a nice pumpkin orange. The color will look slightly lighter in the pan than it will once mixed with the cereal, so go a shade darker than you think you want. If you’re using liquid food coloring, you’ll need more drops, but be careful — too much liquid can make the mixture too wet to shape.
- Mix in the cereal. Pour the 6 cups of Rice Krispies cereal into the colored marshmallow mixture. Fold gently with your spatula until all the cereal is evenly coated. Work quickly here — the mixture starts to set as it cools. You want to make sure every piece of cereal gets some of that orange marshmallow goodness. Don’t overmix or you’ll crush the cereal and end up with dense, sad pumpkins.
- Let it cool slightly. Let the mixture sit in the pan for 2-3 minutes. It needs to be cool enough to handle but still warm enough to shape. If it cools too much, it will become hard and difficult to work with. This is the Goldilocks window — not too hot, not too cold.
- Butter your hands. This is the most important tip I can give you. Generously butter your hands or spray them with cooking spray. Dip your fingers in the bowl of warm water — the moisture helps prevent sticking even more. I cannot stress this enough. The first time I made these, I skipped this step and ended up with a marshmallow glove on each hand.
- Shape the pumpkins. Take about 1/4 cup of the mixture and roll it into a ball between your palms. Don’t squeeze too tightly or you’ll compress the cereal. You want a light, gentle touch. The ball should be about 2 inches in diameter. Place each ball on your prepared parchment-lined cookie sheet. Repeat until all the mixture is used. This recipe makes about 12-14 pumpkins, depending on size.
- Add the stems. While the pumpkins are still slightly warm, gently press a green M&M or a small piece of green candy melt into the top center of each pumpkin. If using pretzel sticks, break them in half and press one piece into the top. The warmth of the pumpkin will help the stem adhere. If the pumpkins have cooled too much, the stems won’t stick — just use a tiny dab of melted marshmallow as glue.
- Create the faces. Once the pumpkins have completely cooled and set (about 30 minutes at room temperature), it’s time to decorate. Use black decorating gel to draw jack-o-lantern faces — triangles for eyes, a little zigzag mouth. If using black licorice strings, cut small pieces and press them gently into the surface. For younger kids, I recommend the decorating gel — it’s much easier and less frustrating.
- Let them set completely. Allow the decorated pumpkins to sit for another 20-30 minutes so the gel or licorice sets firmly. Then they’re ready to serve!
Cooking Tips & Techniques
After making these Easy Halloween Rice Krispie Treat Pumpkins more times than I can count, I’ve collected a few tricks that make the process smoother and the results better. Let me share what I’ve learned the hard way so you don’t have to.
The marshmallow dilemma. Fresh marshmallows are key. I once used a bag that had been sitting in my baking cupboard for six months, and the mixture never got smooth. It stayed lumpy and weird. If your marshmallows feel hard, run to the store and buy fresh ones. It makes that much of a difference.
Color control. Gel food coloring is your best friend here. Liquid coloring adds too much moisture and can make your pumpkins sticky and difficult to shape. I’ve made that mistake exactly once. The gel gives you vibrant color without changing the texture. And remember — the color deepens as the mixture cools, so don’t panic if it looks a bit pale at first.
The temperature window. Working with marshmallow treats is all about timing. If the mixture is too hot, it will burn your hands and the pumpkins will flatten. Too cold, and you can’t shape them at all. I usually let mine cool for about 3 minutes after mixing, then start shaping. If the mixture starts getting too stiff while you’re working, pop it in the microwave for 10 seconds to soften it up.
Multitasking strategy. Get everything prepped before you start melting. Measure your cereal, line your pan, have your stems ready. Once you start, there’s no stopping, and you don’t want to be hunting for green M&Ms while your marshmallow mixture is cooling into a brick.
Consistency is key. If your mixture seems too dry, add a tablespoon of butter and reheat gently. If it’s too wet, add a handful more cereal. The perfect mixture should hold together when pressed but still have visible cereal pieces. You want structure, not a solid block.
Variations & Adaptations
One of the best things about this recipe is how easily it adapts to different tastes, dietary needs, and occasions. Here are some variations I’ve tried and loved:
Chocolate Pumpkin Patch. For chocolate lovers, melt 1/2 cup of chocolate chips with the butter and marshmallows. The orange color will turn a muddy brown, so skip the food coloring and call them chocolate pumpkins. My kids actually prefer this version — they say it tastes like Halloween and chocolate all in one bite.
Peanut Butter Pumpkins. Stir in 1/4 cup of creamy peanut butter along with the vanilla. The peanut butter adds richness and a subtle savory note that balances the sweetness. Just check for peanut allergies if you’re bringing these to a school event.
Spooky Spider Variation. Instead of making pumpkins, shape the mixture into round balls and use pretzel sticks for spider legs. Add candy eyes and a red M&M for the body. My daughter’s class went crazy for these last year.
Vegan Version. Use vegan butter and vegan marshmallows (Dandies brand works perfectly). The texture is slightly different — a bit softer — but the taste is just as good. I’ve served these alongside the regular version and nobody could tell the difference.
Mini Pumpkin Bites. For younger kids or portion control, use a tablespoon to scoop smaller balls. These are perfect for classroom parties where you want to stretch the batch further. Plus, they’re adorable — like a tiny pumpkin patch on a plate.
Gluten-Free Option. Most Rice Krispies are now gluten-free, but double-check the box. If you need an alternative, use any gluten-free crispy rice cereal. The texture might be slightly different, but the result is still delicious.
Serving & Storage Suggestions
These Easy Halloween Rice Krispie Treat Pumpkins are best served at room temperature — that’s when the texture is perfect: crispy on the outside, chewy on the inside. Arrange them on a platter lined with orange or black napkins for that festive Halloween vibe. I like to place them on a bed of green shredded coconut to look like grass in a pumpkin patch.
They’re perfect for classroom parties, Halloween movie nights, or as a fun activity at your Halloween gathering. Pair them with apple cider, hot chocolate, or a glass of cold milk. For a grown-up twist, serve them alongside coffee or a pumpkin spice latte.
Storage tips: These pumpkins will stay fresh for up to 3 days at room temperature in an airtight container. Don’t refrigerate them — the cold air makes them hard and stale. If you need to store them longer, wrap each pumpkin individually in plastic wrap and then place them in a freezer-safe bag. They’ll keep in the freezer for up to 2 months.
Reheating: To bring frozen pumpkins back to life, let them thaw at room temperature for about 30 minutes. If you want that just-made softness, microwave one pumpkin for 10 seconds. Don’t overdo it or the marshmallow will melt into a puddle. I speak from experience — I lost a whole batch to a 30-second microwave session once.
Flavor development: Honestly, these are best the day you make them. The cereal stays crunchiest on day one. By day two, they’re still delicious but softer. By day three, they’re more like a chewy bar than a crispy treat. That’s why I recommend making them no more than 24 hours before your event.
Nutritional Information & Benefits
Let’s be real — these are a treat, not a health food. But here’s the nutritional breakdown for one pumpkin (based on 12 servings):
- Calories: Approximately 180
- Total Fat: 5g
- Saturated Fat: 3g
- Carbohydrates: 34g
- Sugar: 18g
- Protein: 1g
- Sodium: 150mg
While these aren’t exactly health food, there are a few silver linings. Rice Krispies are fortified with iron and B vitamins, and the butter provides a small amount of vitamin A. Plus, making treats at home means you control exactly what goes into them — no preservatives, no artificial flavors, no high-fructose corn syrup.
For a slightly healthier twist, you can use brown rice cereal, which has more fiber. And if you’re watching sugar intake, there are sugar-free marshmallow options available, though the texture will be different.
From my personal perspective, these are about joy, not nutrition. They’re for special occasions, for making memories with your kids, for that moment when you hand your child a homemade pumpkin and watch their face light up. That’s the real benefit here — and honestly, that’s worth every calorie.
Conclusion
These Easy Halloween Rice Krispie Treat Pumpkins are more than just a recipe — they’re a tradition waiting to happen. They’re the kind of treat that brings people together, that makes a kitchen messy and a heart full. Whether you’re making them for a classroom party, a family gathering, or just because you want to feel that childhood magic again, I promise you won’t regret it.
I love this recipe because it’s forgiving. It doesn’t demand perfection. It lets you mess up, laugh about it, and try again. It lets kids get their hands sticky and their faces messy. It lets you create something beautiful without needing any special skills. And at the end, you get to eat the results — which is really the best part.
So go ahead — grab that bag of marshmallows, call your kids into the kitchen, and make some memories. And when you do, I’d love to hear about it. Drop a comment below and tell me how your pumpkins turned out. Did your kids love them? Did you make any fun variations? Share your photos on Pinterest and tag me — I can’t wait to see your pumpkin patch!
Happy Halloween, friends. May your kitchen be sticky and your hearts be full.
Frequently Asked Questions
Can I make these Rice Krispie Treat Pumpkins ahead of time?
Yes! You can make them up to 2 days in advance. Store them in an airtight container at room temperature. Just wait to add the faces until the day you serve them, as the decorating gel can smear over time.
Why are my Rice Krispie Treats hard instead of soft and chewy?
This usually happens when the marshmallow mixture is cooked too long or at too high a heat. Keep the heat on medium-low and remove the pan from the stove as soon as the marshmallows are fully melted. Overcooking causes the sugar to crystallize, resulting in hard treats.
Can I use mini marshmallows instead of regular-sized ones?
Absolutely! Mini marshmallows actually melt faster and more evenly. Use about 6 cups of mini marshmallows in place of the 10-ounce bag of regular marshmallows. The result will be the same.
How do I keep the pumpkins from sticking to my hands while shaping?
Butter your hands generously before shaping, and keep a small bowl of warm water nearby to dip your fingers in. The combination of butter and water creates a non-stick barrier. Reapply as needed throughout the shaping process.
Can I freeze these Halloween treats?
Yes, you can freeze them for up to 2 months. Wrap each pumpkin individually in plastic wrap, then place them in a freezer-safe bag or container. Thaw at room temperature for about 30 minutes before serving. They won’t be quite as crispy as fresh, but they’ll still be delicious.
Pin This Recipe!
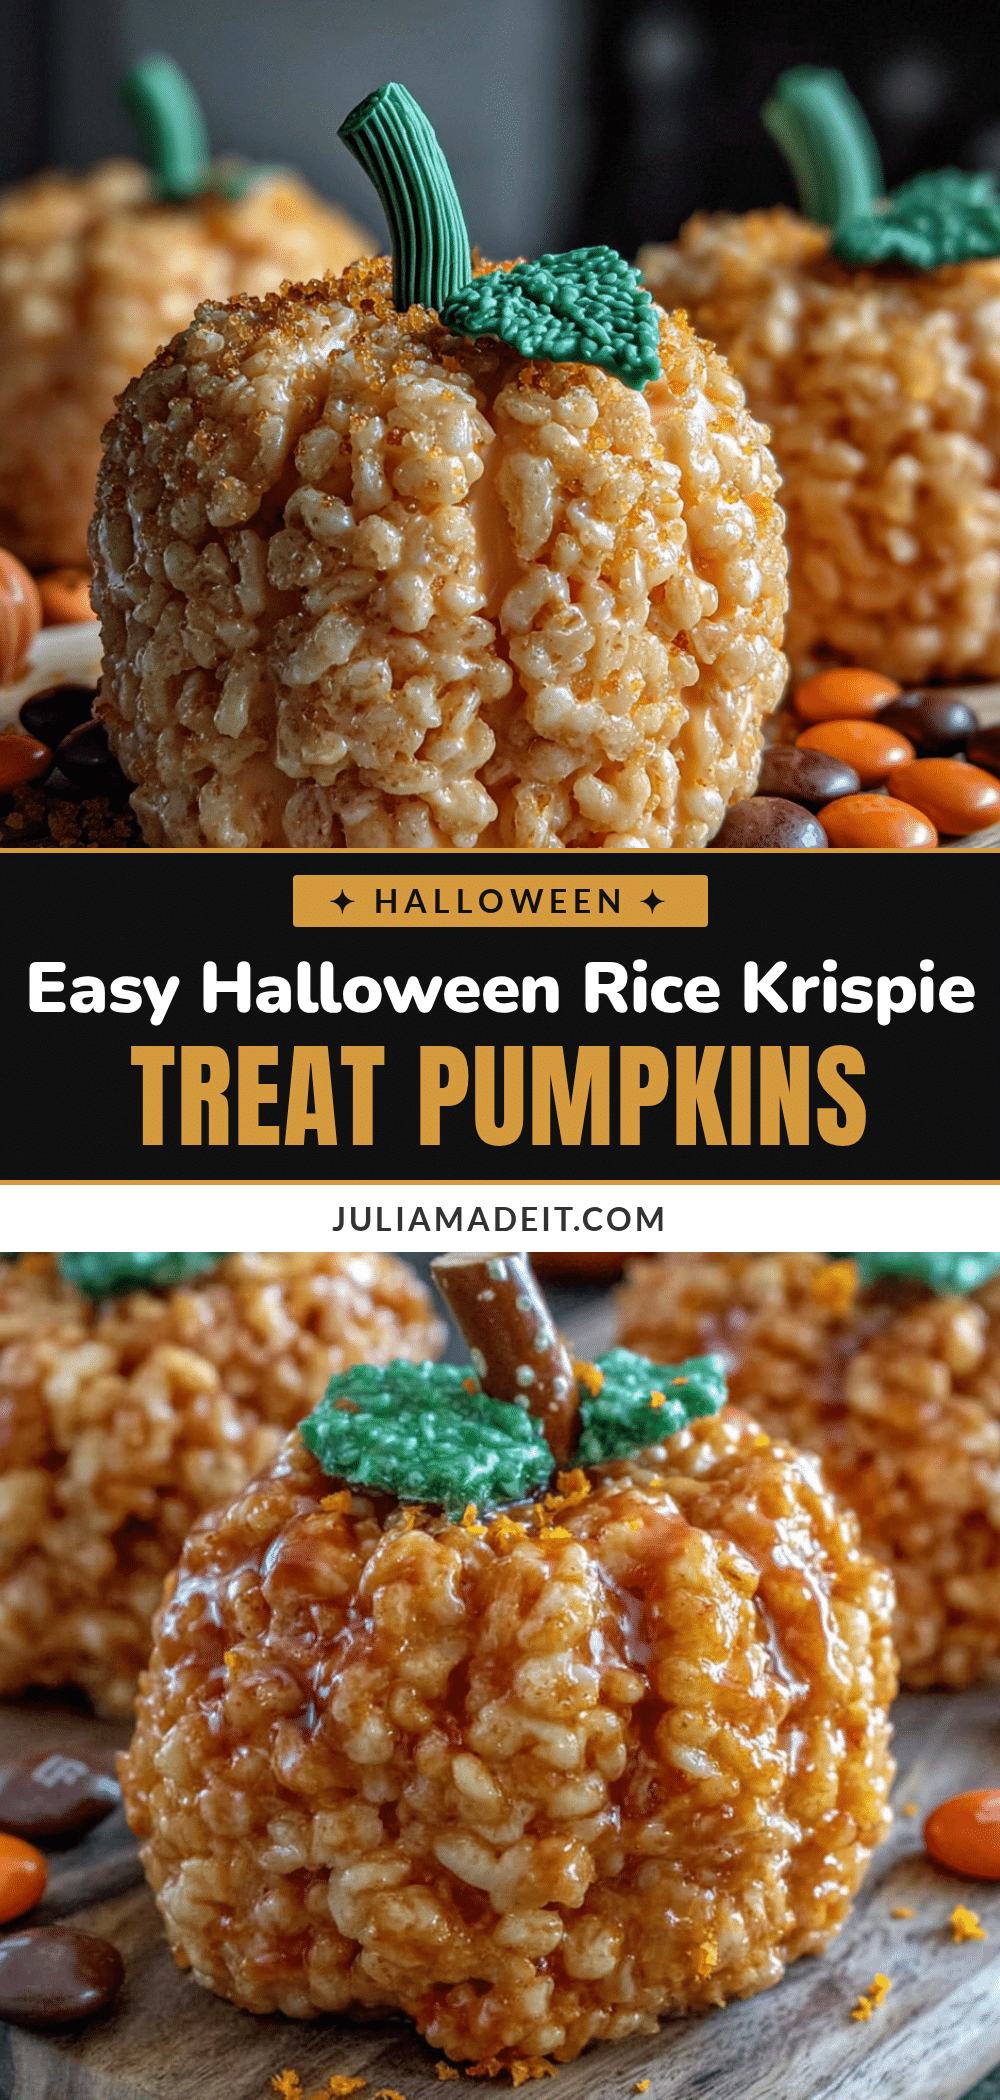
Easy Halloween Rice Krispie Treat Pumpkins
These Easy Halloween Rice Krispie Treat Pumpkins are a fun, no-bake Halloween treat that kids and adults love. Made with simple ingredients like Rice Krispies cereal, marshmallows, and orange food coloring, they’re perfect for classroom parties, family gatherings, or a cozy movie night.
- Prep Time: 15 minutes
- Cook Time: 10 minutes
- Total Time: 55 minutes
- Yield: 12-14 servings 1x
- Category: Dessert
- Cuisine: American
Ingredients
- 6 cups Rice Krispies cereal
- 4 tablespoons unsalted butter
- 1 package (10 oz) marshmallows
- 1/2 teaspoon vanilla extract
- Orange gel food coloring
- Pinch of salt
- Green candy melts or green M&Ms (for stems)
- Black licorice strings or black decorating gel (for faces)
- Pretzel sticks (optional, for stems)
Instructions
- Prepare your workspace: Line a large cookie sheet with parchment paper and lightly spray with cooking spray or rub with butter. Fill a small bowl with warm water for dipping your fingers.
- Melt the butter: In a large saucepan, melt 4 tablespoons of unsalted butter over medium-low heat until fully liquid and slightly foamy, about 2-3 minutes.
- Add the marshmallows: Pour the entire 10-ounce bag of marshmallows into the melted butter. Stir continuously with a silicone spatula until completely melted and smooth, about 5-7 minutes.
- Add vanilla and salt: Remove the pan from heat. Stir in 1/2 teaspoon vanilla extract and a pinch of salt until well combined.
- Add the orange color: Add orange gel food coloring one drop at a time, stirring well after each drop. Use about 5-7 drops for a nice pumpkin orange.
- Mix in the cereal: Pour 6 cups of Rice Krispies cereal into the colored marshmallow mixture. Fold gently until all cereal is evenly coated.
- Let it cool slightly: Let the mixture sit in the pan for 2-3 minutes until cool enough to handle but still warm.
- Butter your hands: Generously butter your hands or spray with cooking spray. Dip fingers in warm water to prevent sticking.
- Shape the pumpkins: Take about 1/4 cup of mixture and roll into a ball about 2 inches in diameter. Place on prepared parchment-lined cookie sheet. Repeat until all mixture is used (makes 12-14 pumpkins).
- Add the stems: While pumpkins are still slightly warm, gently press a green M&M or small piece of green candy melt into the top center of each pumpkin.
- Create the faces: Once pumpkins have completely cooled and set (about 30 minutes), use black decorating gel to draw jack-o-lantern faces or press small pieces of black licorice strings into the surface.
- Let them set completely: Allow decorated pumpkins to sit for another 20-30 minutes before serving.
Notes
Use fresh marshmallows for best melting. Gel food coloring is preferred over liquid to avoid making the mixture too wet. Butter hands generously before shaping to prevent sticking. Store in an airtight container at room temperature for up to 3 days. Can be frozen for up to 2 months.
Nutrition
- Serving Size: 1 pumpkin
- Calories: 180
- Sugar: 18
- Sodium: 150
- Fat: 5
- Saturated Fat: 3
- Carbohydrates: 34
- Protein: 1
Keywords: Halloween treats, Rice Krispie treats, pumpkin, no-bake, kid-friendly, easy Halloween recipe