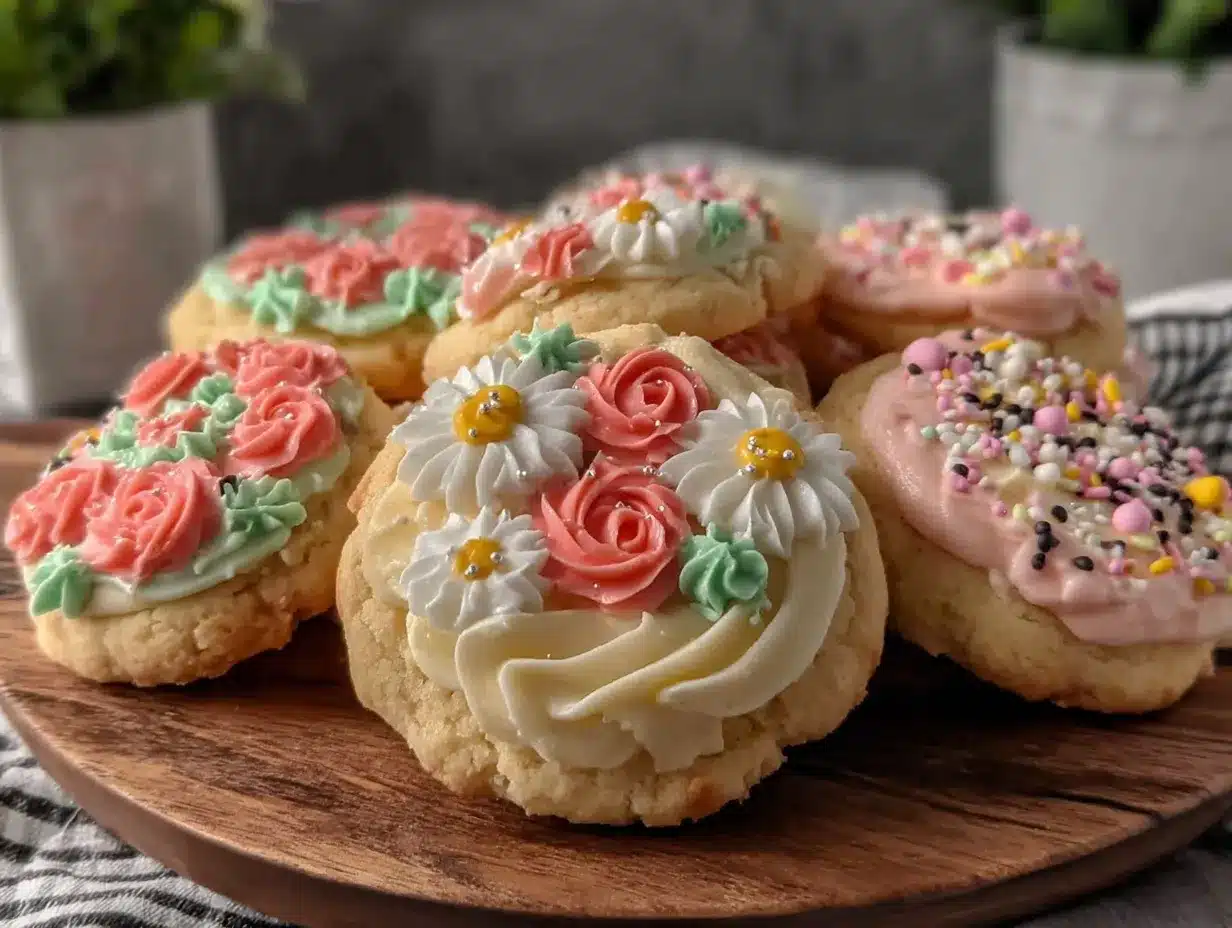
“Look at these—aren’t they just like little spring gardens you can eat?” my friend texted me one afternoon as I was wrestling with my overcooked dinner. Honestly, I wasn’t planning on baking anything fancy that day, but those words stuck with me. I’d been meaning to try a new cookie recipe, something fresh and light for the season, but my usual sugar cookie attempts often ended in a dry, crumbly mess or a dough that refused to roll out properly.
One quiet evening, between sips of a creamy vanilla cold brew coffee I’d just made (my recent go-to pick-me-up, inspired by this recipe), I gave those spring flower decorated sugar cookies another shot. The dough was silky and forgiving, the flavors bright but simple, and the decorating process? Somehow, it felt like painting little edible masterpieces. I found myself making batches of these cookies almost every week, tweaking the icing colors, shapes, and even the sugar-to-butter ratio.
What started as a casual experiment quickly became a sweet ritual that made me pause and appreciate the small joys: the scent of vanilla and almond, the soft hum of the mixer, and those delicate, colorful blooms on buttery cookie canvases. These perfect spring flower decorated sugar cookies aren’t just treats; they’re little celebrations baked into every bite, perfect for any reason to gather or just because.
There’s something quietly satisfying about crafting something so pretty and delicious at home, and honestly, these cookies have become my go-to for everything from backyard brunches to unexpected guests. They’re proof that a simple dough paired with a bit of creativity can turn into something truly special.
Why You’ll Love This Recipe
After countless tries and a kitchen full of flour dust, I can say these spring flower decorated sugar cookies really hit the sweet spot. Here’s why this recipe stands out:
- Quick & Easy: You can whip up the dough and have cookies baking in under 30 minutes — perfect when you want impressive treats without fuss.
- Simple Ingredients: No need to hunt for obscure items; most are pantry staples like butter, sugar, and eggs.
- Perfect for Every Occasion: Whether it’s a birthday brunch, baby shower, or a quiet afternoon tea, these cookies fit right in.
- Crowd-Pleaser: Kids and adults alike can’t stop reaching for seconds — the delicate sweetness and subtle vanilla make them irresistible.
- Unbelievably Delicious: The texture is just right — tender but sturdy enough to hold those pretty flower decorations without crumbling.
What truly makes this recipe different is the way the dough handles: it’s soft enough to shape easily but firm enough to keep its shape during baking. The icing is also a breeze to work with — not too runny, not too stiff — letting you create charming floral designs without stress. I’ve tried other sugar cookie recipes, but this one combines classic flavors with a user-friendly decorating experience, making it my favorite to return to again and again.
Plus, there’s something about these cookies that feels both nostalgic and fresh at the same time. They’re not just cookies; they’re a little moment of joy you can hold in your hand — and honestly, that’s why I keep baking them for every celebration.
What Ingredients You Will Need
This recipe uses simple, wholesome ingredients to deliver bold flavor and a satisfying texture without the fuss. Most of these are kitchen staples you probably already have, which makes it a breeze to get started.
- For the Sugar Cookie Dough:
- All-purpose flour, 3 cups (360 grams) — sifted for a light, tender crumb
- Unsalted butter, 1 cup (227 grams), softened (I prefer Plugrá for its creaminess)
- Granulated sugar, 1 cup (200 grams) — for just the right sweetness
- Large eggs, 2, at room temperature — helps bind everything smoothly
- Pure vanilla extract, 2 teaspoons — quality matters here; I love Nielsen-Massey
- Baking powder, 1 teaspoon — for a slight lift
- Salt, ½ teaspoon — balances out the sweetness
- For the Royal Icing:
- Powdered sugar, 4 cups (480 grams), sifted — smooth and lump-free icing
- Pasteurized egg whites or meringue powder, 3 tablespoons — creates that perfect pipe-able consistency
- Fresh lemon juice, 1 tablespoon — adds a subtle brightness
- Water, 2-4 tablespoons (adjust for consistency)
- Gel food coloring — spring pastels like soft pinks, greens, yellows, and lavenders work beautifully
Feel free to swap the all-purpose flour for a gluten-free blend if needed, just be mindful it may affect texture slightly. For a dairy-free version, use vegan butter alternatives, but keep the rest of the ingredients the same. When it comes to decorating, I’ve found gel colors offer richer hues without watering down the icing, which makes your flower designs pop just right.
Equipment Needed
- Mixing bowls — medium and large sizes for dough and icing preparation
- Electric mixer or stand mixer — makes creaming butter and sugar a breeze
- Measuring cups and spoons — precise measurements keep the dough consistent
- Rolling pin — a smooth, medium-weight one works best for even dough thickness
- Cookie cutters — floral shapes like daisies, tulips, or simple circles to decorate (I like stainless steel for durability)
- Baking sheets — rimmed, to prevent cookie spreading
- Parchment paper or silicone baking mats — prevents sticking and helps with even baking
- Piping bags and small round tips — for detailed icing work (alternatively, disposable bags with a snipped corner work fine)
- Spatula — for mixing and scraping
If you’re on a budget, you can get by with plastic cookie cutters and reusable silicone mats, which are easy to clean and last forever. I’ve tried hand-rolling without a pin, but seriously, investing in a rolling pin saved me so much time and frustration. For icing, if you don’t have piping tips, no worries — a toothpick or skewer works well for finer details.
Preparation Method
-
Prepare the Dough: In a large bowl, cream together the softened butter and granulated sugar using an electric mixer on medium speed until light and fluffy, about 3-4 minutes.
Tip: Scrape down the sides of the bowl occasionally to ensure even mixing.
-
Add the eggs one at a time, beating well after each addition. Stir in the vanilla extract.
Note: The mixture might look slightly curdled at this stage — don’t worry, it’ll come together once the dry ingredients are added.
-
In a separate bowl, whisk together the sifted all-purpose flour, baking powder, and salt.
-
Gradually add the dry ingredients to the wet mixture, mixing on low speed until just combined. Avoid overmixing to keep the cookies tender.
Watch for: The dough should be soft but not sticky. If it feels too sticky, chill it for 15 minutes.
-
Divide the dough into two discs, wrap each in plastic wrap, and chill in the refrigerator for at least 1 hour. This step is crucial for easy rolling and clean cookie edges.
-
Once chilled, preheat your oven to 350°F (175°C). Line baking sheets with parchment paper or silicone mats.
-
On a lightly floured surface, roll out one dough disc to about ¼ inch (6 mm) thickness. Use your cookie cutters to stamp out shapes, placing them about 1 inch (2.5 cm) apart on the baking sheet.
Pro tip: Keep the dough cold between rollings — if it warms up, pop it back in the fridge for 10 minutes.
-
Bake cookies for 8-10 minutes until the edges just start to turn golden. They’ll look slightly underbaked but will firm up as they cool.
Important: Overbaked sugar cookies become too crisp and lose that tender bite.
-
Transfer the cookies to wire racks to cool completely before decorating.
-
Prepare the Royal Icing: In a clean bowl, beat egg whites or meringue powder with lemon juice. Gradually add sifted powdered sugar, mixing on low until combined.
Adjust the consistency with water — thicker for outlining, thinner for flooding. Divide and tint with gel colors as desired.
-
Use piping bags fitted with small round tips to outline and flood your cookies, then add floral details with contrasting colors. Let the icing dry completely (at least 4 hours, preferably overnight).
Quick note: If you want to speed up drying, a fan on low or a cool oven (turned off) can help — just don’t rush it too much or colors may run.
Cooking Tips & Techniques
Working with sugar cookie dough and royal icing can be a little tricky, but a few tricks make all the difference.
- Keep Ingredients at Room Temperature: Butter and eggs mix more smoothly, giving you a silky dough that rolls out evenly.
- Chilling is Key: Don’t skip the chill step! It firms up the dough, making it easier to handle and reducing cookie spread in the oven.
- Flour Lightly: Too much flour during rolling can make cookies tough. Light dusting and using a silicone mat help keep things smooth.
- Test Baking Time: Oven temps vary, so start checking at 8 minutes. Cookies should be pale with just a hint of browning at edges.
- Royal Icing Consistency: Use thicker icing for borders to prevent colors bleeding, thinner for flooding the cookie surface. Practice on parchment before decorating actual cookies.
- Patience Pays Off: Let each icing layer dry before adding details — rushing causes smudges and mix-ups.
- Common Mistake: Overmixing dough leads to tough cookies. Mix just until combined for tender results.
I remember the first time I skipped chilling the dough; the cookies flattened out like pancakes and lost their sweet charm. Also, using a stand mixer made creaming the butter and sugar way easier — but a hand mixer works fine too if you’re persistent!
Variations & Adaptations
One of the joys of this recipe is how adaptable it is. Here are some variations I’ve tried (and loved):
- Gluten-Free Version: Substitute all-purpose flour with a 1:1 gluten-free blend. The texture changes slightly but stays tender and delicious.
- Vegan Adaptation: Use vegan butter and replace eggs with flax eggs (1 tablespoon ground flaxseed + 3 tablespoons water per egg). Royal icing can be made with aquafaba instead of egg whites.
- Flavor Twists: Add lemon zest or almond extract to the dough for a fresh twist. For the icing, a touch of orange blossom water can add a delicate floral note.
- Seasonal Decorations: Swap spring flowers for autumn leaves or winter snowflakes using the same decorating technique.
- Alternative Decorating Methods: Instead of royal icing, try a simple glaze with powdered sugar and milk for a more rustic look.
Personally, I once tried a batch with lavender-infused icing — it was subtle but gave the cookies an extra layer of elegance. These small changes keep the recipe exciting and make it perfect year-round.
Serving & Storage Suggestions
These spring flower decorated sugar cookies are best served at room temperature, allowing the flavors and textures to shine.
- Present them on a pretty platter with fresh flowers for a brunch centerpiece.
- Pair with a lightly brewed tea or a creamy vanilla sweet cream cold brew for a delightful combo (like this cold brew recipe).
- For storage, place cookies in an airtight container separated by parchment paper to avoid sticking. They keep well at room temperature for up to 5 days.
- You can freeze undecorated cookies for up to 3 months; just thaw completely before decorating.
- Leftover decorated cookies can be frozen, but icing texture may change slightly upon thawing.
- Reheat briefly in a warm oven (200°F / 93°C for 5 minutes) for that fresh-baked feel.
Interestingly, the flavors mellow and deepen after a day or two, making them even more enjoyable if you can resist eating them all right away!
Nutritional Information & Benefits
Each cookie (based on a dozen servings) contains approximately:
| Calories | 180 |
|---|---|
| Total Fat | 9 grams |
| Saturated Fat | 5 grams |
| Carbohydrates | 23 grams |
| Sugars | 14 grams |
| Protein | 2 grams |
While these cookies are a treat, the recipe uses real butter and eggs, contributing wholesome fat and protein, unlike heavily processed alternatives. The lemon juice in the icing adds a hint of vitamin C, and using natural vanilla extract brings antioxidants. For those mindful of allergens, keep in mind this recipe contains gluten, dairy, and eggs, but adaptations can be made.
From a wellness perspective, I appreciate that these cookies satisfy sweet cravings without artificial colors or preservatives, making them a better choice for family celebrations.
Conclusion
These perfect spring flower decorated sugar cookies are a little slice of joy you can bake and decorate yourself, whether it’s for a special occasion or just a sunny afternoon. I love how they combine simplicity and charm, letting me share something handmade that truly feels thoughtful.
Feel free to play with the decorations or flavors to make them your own—there’s no wrong way to create these sweet, edible blooms. If you’ve enjoyed recipes that bring a touch of comfort and creativity to your kitchen, you might appreciate the buttery goodness of cheddar bay biscuits or the fresh zing of tangy lemon bars—both delicious companions to your cookie baking adventures.
I’d love to hear about your own decorating experiments or any tweaks you try. Baking is always better when shared, one sweet moment at a time.
FAQs
Can I make the dough ahead of time?
Absolutely! You can prepare the dough, wrap it tightly, and refrigerate it for up to 3 days before rolling and baking.
What’s the best way to store decorated sugar cookies?
Store them in an airtight container at room temperature, separated by parchment paper to prevent sticking, for up to 5 days.
Can I use regular food coloring instead of gel?
Gel food coloring is preferred because it won’t thin the icing, but regular liquid coloring can work if used sparingly.
How do I fix royal icing that’s too thick or too thin?
Add a few drops of water to thin it out or more powdered sugar to thicken it, mixing well each time until you reach the desired consistency.
Are these cookies suitable for kids to decorate?
Yes! The dough is easy to handle, and the icing can be piped or spread with a little supervision, making it a fun activity for kids with adult guidance.
Pin This Recipe!
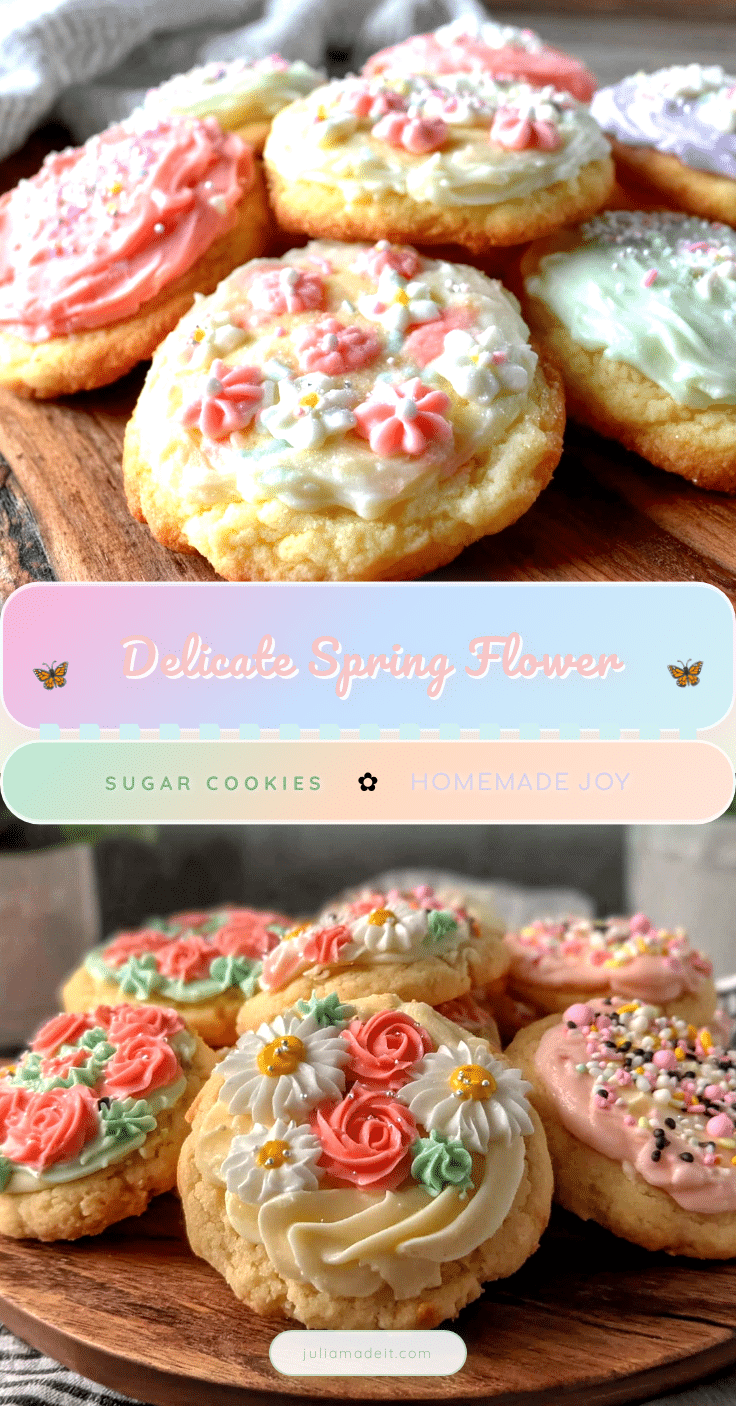
Perfect Spring Flower Decorated Sugar Cookies

These spring flower decorated sugar cookies are tender, buttery, and perfect for any celebration. The silky dough is easy to shape and the royal icing lets you create charming floral designs.
- Prep Time: 20 minutes
- Cook Time: 10 minutes
- Total Time: 1 hour 30 minutes
- Yield: 12 servings 1x
- Category: Dessert
- Cuisine: American
Ingredients
- 3 cups (360 grams) all-purpose flour, sifted
- 1 cup (227 grams) unsalted butter, softened
- 1 cup (200 grams) granulated sugar
- 2 large eggs, at room temperature
- 2 teaspoons pure vanilla extract
- 1 teaspoon baking powder
- ½ teaspoon salt
- 4 cups (480 grams) powdered sugar, sifted
- 3 tablespoons pasteurized egg whites or meringue powder
- 1 tablespoon fresh lemon juice
- 2–4 tablespoons water (adjust for consistency)
- Gel food coloring (spring pastels like soft pinks, greens, yellows, lavenders)
Instructions
- In a large bowl, cream together the softened butter and granulated sugar using an electric mixer on medium speed until light and fluffy, about 3-4 minutes. Scrape down the sides of the bowl occasionally.
- Add the eggs one at a time, beating well after each addition. Stir in the vanilla extract. The mixture might look slightly curdled at this stage.
- In a separate bowl, whisk together the sifted all-purpose flour, baking powder, and salt.
- Gradually add the dry ingredients to the wet mixture, mixing on low speed until just combined. Avoid overmixing. The dough should be soft but not sticky; chill for 15 minutes if too sticky.
- Divide the dough into two discs, wrap each in plastic wrap, and chill in the refrigerator for at least 1 hour.
- Preheat oven to 350°F (175°C). Line baking sheets with parchment paper or silicone mats.
- On a lightly floured surface, roll out one dough disc to about ¼ inch (6 mm) thickness. Use cookie cutters to stamp out shapes, placing them about 1 inch (2.5 cm) apart on the baking sheet. Keep dough cold between rollings.
- Bake cookies for 8-10 minutes until edges just start to turn golden. They will look slightly underbaked but will firm up as they cool. Avoid overbaking.
- Transfer cookies to wire racks to cool completely before decorating.
- Prepare the royal icing: In a clean bowl, beat egg whites or meringue powder with lemon juice. Gradually add sifted powdered sugar, mixing on low until combined. Adjust consistency with water: thicker for outlining, thinner for flooding. Divide and tint with gel colors as desired.
- Use piping bags fitted with small round tips to outline and flood cookies, then add floral details with contrasting colors. Let icing dry completely (at least 4 hours, preferably overnight). To speed drying, use a fan on low or a cool oven (turned off).
Notes
Keep ingredients at room temperature for smooth mixing. Chilling dough is crucial for easy rolling and clean edges. Use gel food coloring for richer hues without thinning icing. Let each icing layer dry fully before adding details to avoid smudging. Dough can be prepared up to 3 days ahead and refrigerated. Store decorated cookies in airtight container separated by parchment paper for up to 5 days. Freeze undecorated dough or cookies for longer storage.
Nutrition
- Serving Size: 1 cookie
- Calories: 180
- Sugar: 14
- Fat: 9
- Saturated Fat: 5
- Carbohydrates: 23
- Protein: 2
Keywords: sugar cookies, spring cookies, decorated cookies, royal icing, flower cookies, easy sugar cookie recipe, celebration cookies