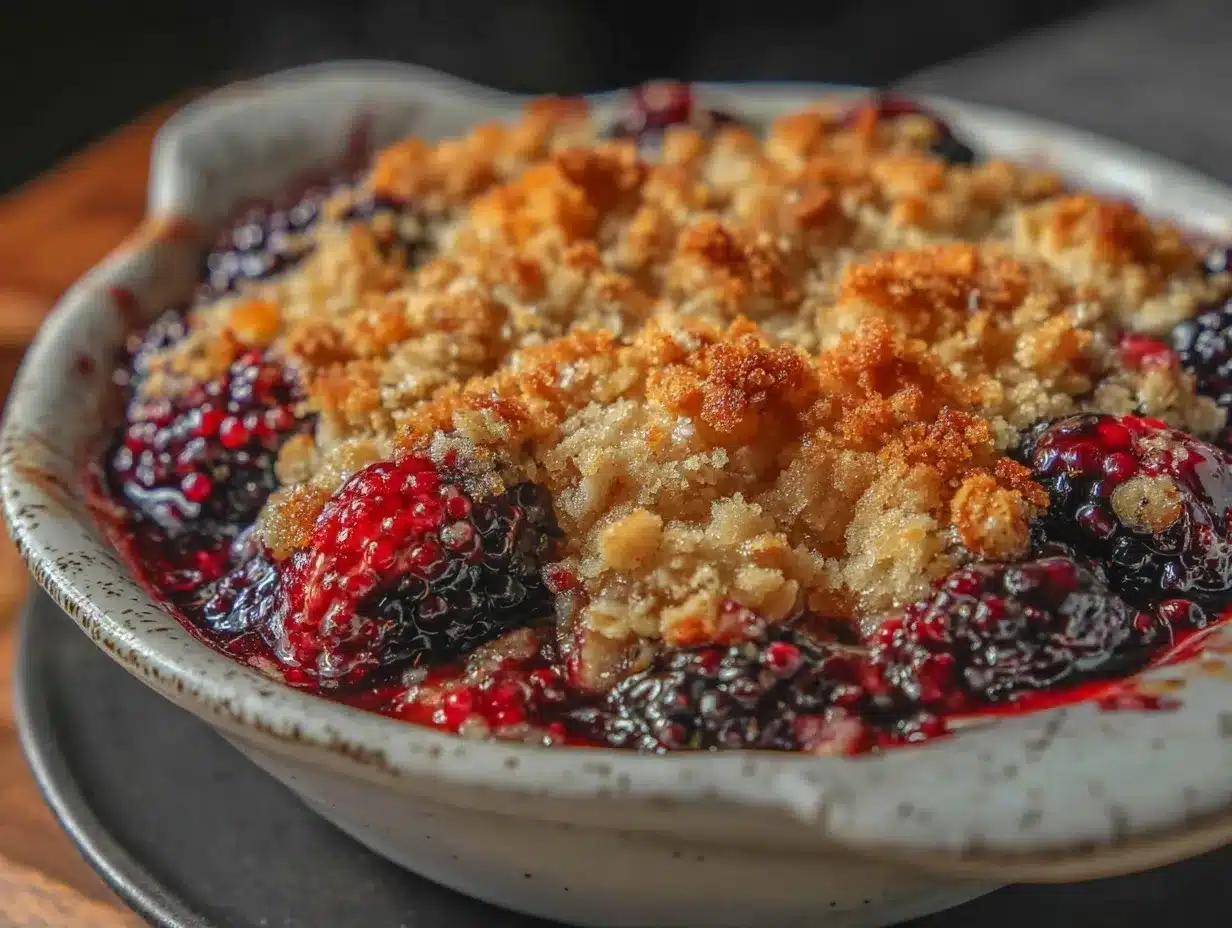
“You gotta try this mulberry crisp,” my neighbor called over the fence one sunny afternoon, her voice bubbling with the kind of enthusiasm you only get when a recipe truly hits the spot. I was skeptical—mulberries? Honestly, they always seemed like the shy cousin of berries, never quite stealing the spotlight. But that day, with a bowl of her crisp in hand, the tart-sweet aroma and that irresistibly crunchy oat topping changed my mind forever.
It wasn’t some fancy bake or a complicated dessert. Just a simple, homey mulberry crisp that felt like a cozy hug after a long week. I found myself making it over and over, tweaking the oat topping just a little each time to get that perfect balance of crunch and chew. There’s something about the way the mulberries burst with juice under that golden, crumbly blanket—it’s comforting without being heavy, and honestly, it’s become my go-to when I want something sweet but not fussy.
I never imagined this recipe would stick with me like it has, but here we are. The mulberry crisp isn’t just a dessert; it’s a quiet moment of peace, a reminder that simple ingredients can make magic happen when you let them shine. And that crunchy oat topping? Pure bliss.
Why You’ll Love This Recipe
After countless trials in my kitchen, this Cozy Mulberry Crisp with Crunchy Oat Topping has earned its place as a favorite for so many reasons. It’s not just another fruit crisp—it’s thoughtfully crafted to bring out the best of mulberries, paired with an oat topping that’s satisfyingly crisp without ever feeling dry or crumbly. Here’s why this recipe stands apart and why you’ll find yourself reaching for it again and again:
- Quick & Easy: Ready in under 45 minutes, it’s perfect for those evenings when you want dessert but aren’t up for a kitchen marathon.
- Simple Ingredients: No need for specialty stores—most items are pantry staples or easy to find, making this recipe super accessible.
- Perfect for Cozy Evenings: Whether you’re winding down after a day or hosting a laid-back gathering, this crisp fits right in.
- Crowd-Pleaser: Kids, adults, berry skeptics—everyone seems to ask for seconds, especially when paired with vanilla ice cream.
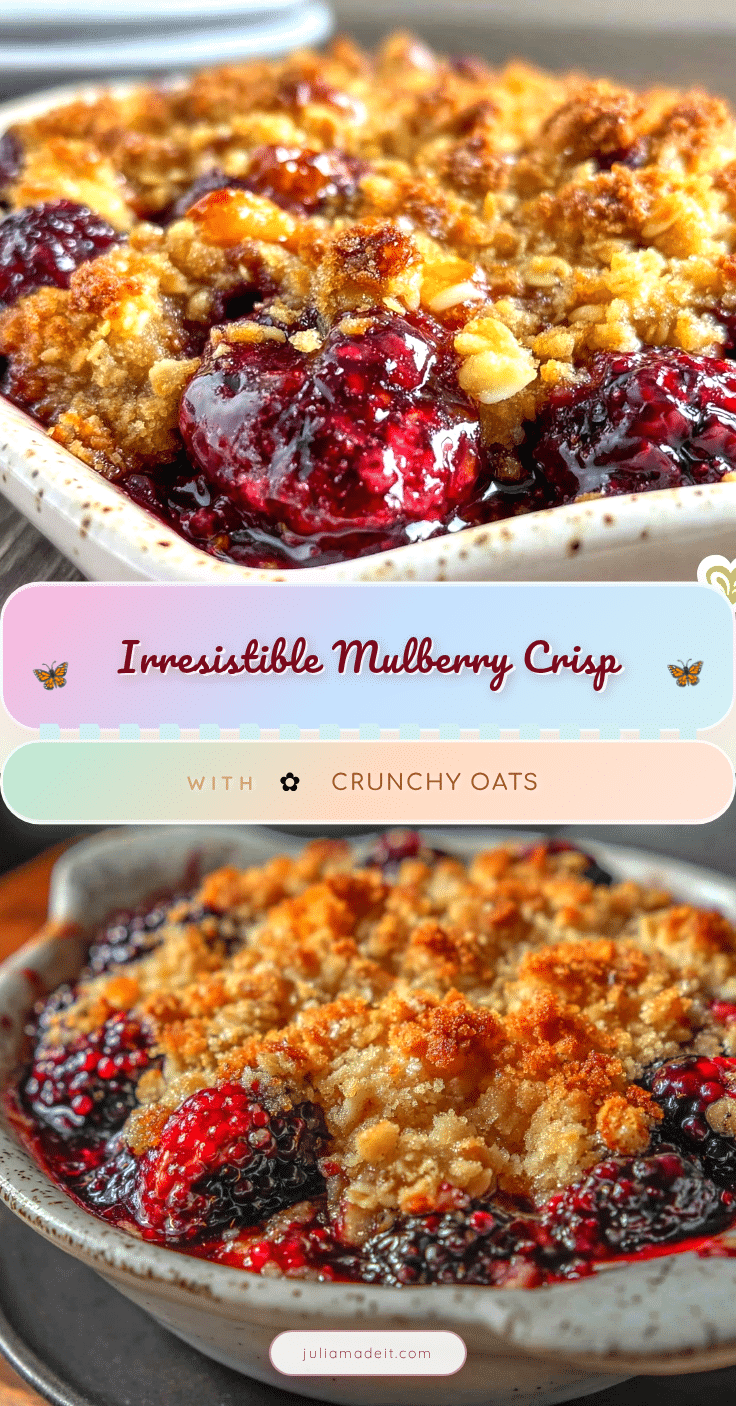
- Unbelievably Delicious: The contrast between juicy mulberries and the crunchy oat topping creates a texture and flavor combo that feels like comfort food done right.
What really sets this mulberry crisp apart is the oat topping technique. By mixing rolled oats with a touch of brown sugar and butter, then baking until golden, you get crunchy bits that hold their shape instead of turning soggy—a little trick I picked up from mastering crispy dishes like the crispy honey garlic chicken thighs. Plus, the subtle cinnamon and lemon zest in the filling bring out the mulberries’ natural brightness without overwhelming their delicate flavor.
This recipe isn’t just dessert; it’s a little celebration of homey flavors and simple pleasures, the kind that makes you pause and savor the moment.
What Ingredients You Will Need
This Cozy Mulberry Crisp recipe uses simple, wholesome ingredients to deliver bold flavor and satisfying texture without the fuss. Most are pantry staples, and if you’ve got fresh or frozen mulberries on hand, you’re already halfway there. Here’s a breakdown of what you’ll need:
For the Mulberry Filling
- 4 cups fresh mulberries (or frozen, thawed and drained; look for plump and dark berries for best flavor)
- ¾ cup granulated sugar (adjust slightly depending on berry sweetness)
- 2 tablespoons all-purpose flour (helps thicken the juicy filling)
- 1 teaspoon fresh lemon juice (adds brightness and balances sweetness)
- ½ teaspoon ground cinnamon (optional but adds warm depth)
For the Crunchy Oat Topping
- 1 cup old-fashioned rolled oats (not instant; provides that satisfying chew)
- ½ cup all-purpose flour (helps bind the topping)
- ⅓ cup packed light brown sugar (for caramel notes)
- ¼ teaspoon salt
- ½ teaspoon ground cinnamon (to complement the filling)
- 6 tablespoons unsalted butter, melted and slightly cooled (use real butter for best richness)
You can swap the all-purpose flour with almond flour for a gluten-free option, and if you prefer a vegan version, substitute the butter with coconut oil. For a tangier twist, stirring in a tablespoon of Greek yogurt or sour cream into the filling adds creaminess without masking the berry’s natural flavor.
Mulberries aren’t always easy to find, but if you’re curious about trying other berries, this topping works beautifully over blueberries or blackberries too. In summer, fresh mulberries shine brightest, but frozen berries perform well when fresh aren’t available.
Equipment Needed
- Baking dish: An 8×8-inch (20×20 cm) glass or ceramic baking dish works perfectly to hold the crisp without crowding the fruit.
- Mixing bowls: Two medium bowls—one for the filling, one for the oat topping.
- Measuring cups and spoons: For precise ingredient amounts (trust me, even a teaspoon off can change the texture).
- Wooden spoon or spatula: For mixing the filling and topping without overworking.
- Oven mitts: Definitely needed to safely handle the hot dish.
If you don’t have a baking dish that size, a similarly sized cast iron skillet works wonderfully and adds rustic charm. I personally love using my trusty glass dish because it’s easy to check the bubbling edges without opening the oven. For a budget-friendly option, a metal baking pan with a nonstick coating will do just fine, but watch your baking time closely as metal heats faster.
Preparation Method
- Preheat your oven to 350°F (175°C). This gives the oven enough time to reach the perfect heat for that golden topping.
- Prepare the mulberry filling: In a medium bowl, gently toss 4 cups of mulberries with ¾ cup granulated sugar, 2 tablespoons flour, 1 teaspoon lemon juice, and ½ teaspoon cinnamon. Make sure the berries are coated but handle them gently to avoid crushing. This mixture balances tartness and thickens the juices during baking.
- Transfer the berry mixture to your baking dish. Spread evenly to ensure each bite has that juicy berry goodness. You’ll notice the fresh, tangy aroma already starting to awaken your senses.
- Make the oat topping: In a separate bowl, combine 1 cup rolled oats, ½ cup flour, ⅓ cup packed brown sugar, ¼ teaspoon salt, and ½ teaspoon cinnamon. Stir well to mix dry ingredients evenly.
- Pour in the melted butter: Slowly add 6 tablespoons melted unsalted butter to the oat mixture. Use a spoon or your fingers to combine until the mixture looks crumbly and slightly clumpy—like coarse sand. This texture is key for that crunchy, chewy topping.
- Sprinkle the oat topping evenly over the mulberries. Try to cover the berries fully but don’t pack it down; the crumbs should rest lightly on top for even baking.
- Bake for 35–40 minutes. The topping should turn a beautiful golden brown, and you’ll see bubbling juices around the edges. If the topping browns too quickly, tent the dish loosely with foil to prevent burning.
- Cool for 10–15 minutes before serving. This allows the filling to thicken slightly, making it easier to serve and eat. Plus, it gives you a moment to breathe in that cozy scent filling the kitchen.
Pro tip: If you want to speed things up, prepare the topping while the oven preheats, and don’t skip the lemon juice—it really brightens the mulberry flavor, cutting the sweetness just right. When I first made this, I accidentally swapped lemon juice for vinegar (don’t ask), and the difference was night and day—so trust me on this one!
Cooking Tips & Techniques
Getting the perfect mulberry crisp is all about balance and timing. Here are some tips I’ve picked up after a few too many burnt toppings and watery fillings:
- Don’t overmix the filling: Mulberries are delicate, so gently toss to avoid turning your crisp into a mushy mess.
- Use old-fashioned oats: Instant oats will absorb too much moisture and become gummy; stick to rolled oats for that satisfying crunch.
- Butter temperature matters: Melt the butter but let it cool slightly before mixing with oats. Too hot, and it can turn greasy; too cool, and it won’t coat evenly.
- Keep an eye on baking time: Ovens vary, so start checking at 30 minutes if it’s your first time. Look for bubbling fruit and golden topping.
- Try a quick broil at the end: If the topping isn’t as crunchy as you like, a minute or two under the broiler can add extra crispness—just don’t walk away from the oven!
I remember once rushing the topping prep and ended up with a dense, clumpy crust—lesson learned. Take your time mixing, and you’ll get those delightful clusters that break apart with a satisfying crunch. Also, multitasking by prepping a batch of cheddar bay biscuits while this bakes makes for a seriously cozy kitchen vibe.
Variations & Adaptations
While the classic mulberry crisp is a winner on its own, there’s plenty of room to make it your own or to suit dietary needs:
- Gluten-Free: Swap the all-purpose flour in the topping and filling with almond flour or a gluten-free flour blend. The crisp will still be crunchy but with a slightly nuttier flavor.
- Vegan: Replace butter with coconut oil or a vegan butter alternative. Use maple syrup instead of brown sugar for a different sweetness profile.
- Nutty Boost: Add ½ cup chopped walnuts or pecans to the oat topping for extra crunch and a toasty flavor.
- Seasonal Twist: Try mixing mulberries with sliced peaches or apples for a more complex fruit base when mulberries are scarce.
- Spice it Up: A pinch of ground ginger or nutmeg in the topping adds warmth and depth, especially nice for fall or winter versions.
One time, I swapped in frozen mulberries and added a splash of bourbon to the filling—it gave the crisp an adult twist that was a hit at a casual dinner party. Don’t hesitate to experiment and find what clicks with your taste buds.
Serving & Storage Suggestions
This cozy mulberry crisp is best served warm, fresh out of the oven, with a scoop of vanilla ice cream or a dollop of whipped cream. The contrast between the warm berries and cool cream is honestly hard to beat. If you want a non-dairy option, coconut whipped cream pairs beautifully too.
For a simple presentation, serve it right in the baking dish or spoon into individual ramekins. A sprinkle of powdered sugar or a few fresh mint leaves can add a pretty touch when you’re feeling fancy.
Leftovers keep well covered in the refrigerator for up to 3 days. Reheat gently in the microwave or oven to bring back that freshly baked feel. The topping might soften a bit with storage, but giving it a quick toast in the oven can revive some crunch. You could also freeze portions for up to 2 months—just thaw overnight in the fridge before reheating.
Flavors tend to deepen after a day, making this crisp an even more comforting treat on day two. It’s exactly the kind of dessert that tastes like a warm kitchen hug anytime you need it.
Nutritional Information & Benefits
This mulberry crisp combines wholesome ingredients that offer more than just deliciousness. Mulberries themselves are a good source of vitamin C, iron, and antioxidants, which support immunity and overall wellness. The oats in the topping provide fiber and help keep you feeling satisfied.
Estimated nutrition per serving (based on 8 servings): approximately 220 calories, 7g fat, 35g carbohydrates, 3g fiber, and 3g protein. While it’s a sweet treat, the recipe uses moderate sugar and real butter, keeping it balanced.
For those with dietary considerations, it’s easy to swap ingredients to meet gluten-free or vegan needs without losing the cozy charm. Just be mindful of nut allergies if you add nuts to the topping.
Honestly, this crisp feels like a treat that’s still mindful—comfort food that’s not weighed down by excess sugar or artificial ingredients, which makes indulging a little easier on the conscience.
Conclusion
This Cozy Mulberry Crisp with Crunchy Oat Topping has quietly become one of those recipes I turn to when I want something simple but satisfying. It’s easy to make, uses ingredients you likely have on hand, and delivers that perfect mix of juicy berries and crumbly topping every time. Plus, it has that kind of warmth that sticks with you long after the last bite.
Feel free to adapt it to your taste, whether that means adding nuts, going gluten-free, or mixing in other fruits. That’s the joy of a recipe like this—it’s a cozy canvas for your kitchen creativity.
Since you enjoy comforting classics, you might appreciate the simplicity of the perfect classic apple pie or the satisfying ease of cozy loaded baked potato soup for your next home-cooked treat.
Give this crisp a try and let it bring a little cozy sweetness to your day—you might just find it becomes a favorite, too.
Frequently Asked Questions
Can I use frozen mulberries for this recipe?
Yes! Just make sure to thaw and drain them well to avoid excess liquid in the crisp.
How do I keep the oat topping crunchy?
Using rolled oats and mixing with melted butter helps create a crunchy topping. Avoid packing it down and bake until golden. If needed, a quick broil at the end can add extra crispness.
Can I make this crisp ahead of time?
Absolutely. You can prepare it and refrigerate for up to 24 hours before baking. Just bake it fresh before serving for best texture.
What’s a good substitute if I don’t have mulberries?
Blackberries, blueberries, or even sliced peaches work well as alternatives while keeping the crisp delicious.
Is this recipe gluten-free?
The original recipe uses all-purpose flour, but swapping with a gluten-free flour blend or almond flour makes it gluten-free without compromising texture.
Pin This Recipe!
Cozy Mulberry Crisp Recipe with Easy Crunchy Oat Topping You’ll Love
A simple, homey mulberry crisp featuring juicy mulberries under a golden, crunchy oat topping. Perfect for cozy evenings and easy to make with pantry staples.
- Prep Time: 10 minutes
- Cook Time: 35-40 minutes
- Total Time: 45-50 minutes
- Yield: 8 servings 1x
- Category: Dessert
- Cuisine: American
Ingredients
- 4 cups fresh mulberries (or frozen, thawed and drained)
- 3/4 cup granulated sugar
- 2 tablespoons all-purpose flour
- 1 teaspoon fresh lemon juice
- 1/2 teaspoon ground cinnamon (optional)
- 1 cup old-fashioned rolled oats
- 1/2 cup all-purpose flour
- 1/3 cup packed light brown sugar
- 1/4 teaspoon salt
- 1/2 teaspoon ground cinnamon
- 6 tablespoons unsalted butter, melted and slightly cooled
Instructions
- Preheat your oven to 350°F (175°C).
- In a medium bowl, gently toss 4 cups of mulberries with 3/4 cup granulated sugar, 2 tablespoons flour, 1 teaspoon lemon juice, and 1/2 teaspoon cinnamon. Handle gently to avoid crushing.
- Transfer the berry mixture to your baking dish and spread evenly.
- In a separate bowl, combine 1 cup rolled oats, 1/2 cup flour, 1/3 cup packed brown sugar, 1/4 teaspoon salt, and 1/2 teaspoon cinnamon. Stir well.
- Slowly add 6 tablespoons melted unsalted butter to the oat mixture and combine until crumbly and slightly clumpy.
- Sprinkle the oat topping evenly over the mulberries without packing it down.
- Bake for 35–40 minutes until the topping is golden brown and juices bubble around the edges. Tent with foil if topping browns too quickly.
- Cool for 10–15 minutes before serving to allow the filling to thicken.
Notes
Use old-fashioned rolled oats for a crunchy topping. Melt butter and let it cool slightly before mixing to avoid greasiness. Avoid overmixing the filling to keep berries intact. Tent with foil if topping browns too fast. A quick broil at the end can add extra crispness. For gluten-free, substitute flours with almond or gluten-free blend. For vegan, replace butter with coconut oil and brown sugar with maple syrup.
Nutrition
- Serving Size: 1/8 of the crisp
- Calories: 220
- Fat: 7
- Carbohydrates: 35
- Fiber: 3
- Protein: 3
Keywords: mulberry crisp, fruit crisp, oat topping, easy dessert, cozy dessert, berry dessert, gluten-free option, vegan option