“You’ve got to try this!” my neighbor called out one humid afternoon, holding a small plate with these bright little bars. Honestly, I was skeptical—key lime anything usually feels a little too tart or fussy for my laid-back style. But that sticky-sweet aroma of graham cracker crust mixed with that zingy lime filling? It pulled me right in.
She confessed it was a last-minute save for a backyard barbecue when the oven had given up on her. No time to bake, no fuss with meringue or whipped cream, just a simple, chill-and-set magic trick. I took a bite and, well, let’s say it didn’t just taste good—it was practically begging to be made again.
After testing it myself a handful of times that week (you know when you can’t stop tweaking a recipe?), I realized this easy no-bake key lime pie bars recipe with graham crust isn’t just a shortcut—it’s a keeper. It’s that kind of dessert that cools you off on sticky days and makes you smile without the usual kitchen chaos.
What’s wild is how just a few staple ingredients come together so effortlessly to deliver that creamy, tangy, perfectly sweet bite. This recipe stuck with me because it’s honest, uncomplicated, and genuinely refreshing—no bells and whistles, just pure summer vibes in bar form. It’s become my go-to when I want something fuss-free yet memorable, and I’m confident it can do the same for you.
Why You’ll Love This Easy No-Bake Key Lime Pie Bars Recipe
This recipe has quickly become a favorite, and here’s why it might just become yours:
- Quick & Easy: Ready in about 15 minutes with no baking required, perfect for those scorching summer days or last-minute dessert cravings.
- Simple Ingredients: No exotic items—just pantry staples like graham crackers, sweetened condensed milk, and fresh key lime juice. You likely have most of them already.
- Perfect for Summer Gatherings: Whether it’s a casual backyard party or a potluck, these bars bring a bright, refreshing finish to any meal.
- Crowd-Pleaser: Kids, adults, and even picky eaters tend to ask for seconds. The balance of tart and sweet hits just right.
- Unbelievably Delicious: The graham cracker crust adds a buttery crunch that contrasts beautifully with the creamy, zesty filling.
What sets this recipe apart is the no-bake method paired with a perfectly textured graham crust that stays crisp without getting soggy. Plus, blending fresh key lime juice with sweetened condensed milk creates a silky smooth filling that’s tangy but never overwhelming. I’ve tested versions with bottled lime juice, but honestly, fresh key lime juice makes a noticeable difference in flavor and brightness.
It’s the kind of dessert you close your eyes for after the first bite, the kind that feels like a mini-vacation on a plate. It’s straightforward enough for a casual cook but impressive enough that friends ask for the recipe, like when I brought these bars to a gathering alongside my easy epic charcuterie board.
What Ingredients You Will Need
This recipe uses simple, wholesome ingredients to deliver bold flavor and satisfying texture without the fuss. The ingredients are pantry-friendly, and you can make smart substitutions if needed.
For the Graham Crust:
- 1 1/2 cups graham cracker crumbs (about 10 full crackers, finely crushed; I prefer Honey Maid for the best texture)
- 1/3 cup unsalted butter, melted (adds richness and helps bind the crust)
- 1/4 cup granulated sugar (balances the buttery crust sweetness)
For the Key Lime Filling:

- 1 can (14 oz / 396g) sweetened condensed milk (use full-fat for creamier results)
- 1/2 cup fresh key lime juice (about 20-25 key limes; if key limes aren’t available, regular lime juice works but key lime is best for that authentic tang)
- 4 large egg yolks, room temperature (for richness and smooth texture)
- 1 teaspoon lime zest (adds fragrant brightness)
If you want to swap the graham crust for a gluten-free option, almond flour mixed with a little coconut oil works surprisingly well. For a dairy-free twist, use coconut condensed milk and vegan butter alternatives.
Equipment Needed
- 9×9-inch baking pan (glass or metal; glass is great for even chilling)
- Mixing bowls (one medium for crust, one for filling)
- Whisk or electric mixer (for blending egg yolks and lime juice smoothly)
- Measuring cups and spoons (accuracy matters for balance here)
- Spatula (to spread the crust evenly and scrape filling)
- Food processor or rolling pin (to crush graham crackers finely)
If you don’t have a food processor, placing graham crackers in a zip-top bag and crushing them with a rolling pin works just fine. I keep a silicone spatula on hand for scraping every last bit of the luscious filling from the bowl—trust me, it’s worth it! For budget-friendly options, simple glass pans and manual mixing tools work perfectly.
Preparation Method
- Prepare the crust: In a medium bowl, combine 1 1/2 cups finely crushed graham cracker crumbs with 1/4 cup granulated sugar. Pour in 1/3 cup melted unsalted butter and stir until the mixture resembles wet sand. This step is crucial—too dry and the crust won’t hold, too wet and it’ll get soggy.
- Press the crust: Transfer the graham mixture into a 9×9-inch baking pan lined with parchment for easy removal. Use the bottom of a glass or measuring cup to firmly press the crumbs into an even layer. This should take about 3 minutes. Place the pan in the fridge to chill while you make the filling.
- Make the filling: In a mixing bowl, whisk together 4 large egg yolks and 1/2 cup fresh key lime juice until slightly thickened and pale in color—about 2-3 minutes by hand or 1 minute with an electric mixer. Then, slowly whisk in the entire 14 oz can of sweetened condensed milk until smooth. Fold in 1 teaspoon lime zest for that extra zing.
- Pour and chill: Pour the lime filling over the chilled crust, spreading it evenly with a spatula. Cover with plastic wrap and refrigerate for at least 3 hours, preferably 4, until firm and sliceable.
- Slice and serve: Once set, use a sharp knife to cut into 12 bars. Clean the knife between cuts for clean edges. Serve chilled for maximum refreshment.
Sometimes the filling can be a bit loose if the lime juice is too acidic or too much is added. If that happens, a quick fix is to let it chill longer or add an extra egg yolk next time for extra firmness. When pressing the crust, don’t skimp on the pressure—it’s what keeps the base sturdy and satisfying.
Cooking Tips & Techniques
One trick I learned the hard way: fresh key lime juice is a game-changer. Bottled lime juice just doesn’t pack the same punch and can make the filling taste flat or overly sweet. Also, room temperature egg yolks incorporate more smoothly, avoiding any lumps in the filling.
Another tip: be patient with chilling. It tempers the filling and lets flavors marry. Rushing this step can lead to a runny bar that falls apart when cut. I usually prep these bars the night before a gathering and they turn out perfect every time.
Don’t forget to zest the limes before juicing—this zest releases essential oils that brighten every bite. When crushing graham crackers, aim for crumbs that are fine but still have a slight crunch for texture balance.
For consistent slices, dip your knife in hot water and wipe it dry between cuts. This simple trick helps you get clean, professional-looking bars without the mess.
Variations & Adaptations
- Dairy-Free Version: Swap sweetened condensed milk for a coconut milk-based condensed milk alternative, and use vegan butter for the crust. It still sets firm and tastes amazing.
- Berry Bliss: Add a thin layer of fresh raspberries or blueberries on top of the lime filling before chilling. The tart-sweet berries complement the citrus beautifully and add a pop of color.
- Spiced Crust: Mix a teaspoon of cinnamon or ginger into the graham crust for a warm, cozy twist that’s unexpected but delightful.
- Gluten-Free Crust: Use almond flour mixed with a bit of honey and melted coconut oil to replace graham crackers, perfect for gluten-sensitive folks.
Personally, I once tried topping these bars with a drizzle of homemade caramel sauce for a crowd-pleasing surprise. It balanced the tartness in a way that had everyone asking for seconds (and thirds). If you like playing around with flavor profiles, this recipe welcomes your creativity.
Serving & Storage Suggestions
Serve these bars chilled straight from the fridge for the best texture and zingy freshness. They pair wonderfully with a dollop of lightly whipped cream or a sprinkle of extra lime zest for garnish.
They’re fantastic alongside a cool beverage like iced tea or a sparkling citrus mocktail, especially for outdoor summer events. I’ve found they also make a great contrast on a dessert charcuterie board featuring cookies and fresh fruit, similar to ideas in my dessert charcuterie board with cookies to impress.
Store leftover bars in an airtight container in the fridge for up to 4 days. They freeze well too—wrap individual bars tightly in plastic and foil, then thaw overnight in the fridge for a quick treat later. The flavors actually deepen a bit after resting, making them even more luscious.
Nutritional Information & Benefits
Each bar is roughly 220 calories, with a good balance of protein, fats, and carbs thanks to the eggs, butter, and graham crust. The fresh key lime juice provides vitamin C, a natural antioxidant that supports immunity.
While this dessert is indulgent, it avoids artificial preservatives and uses real, simple ingredients. You can easily adjust sweetness levels or swap ingredients to fit gluten-free or dairy-free diets. Just keep in mind the condensed milk is the main sweetener and thickener here.
From a wellness perspective, this recipe feels like a treat that doesn’t overwhelm your system—fresh citrus and moderate fat from butter and eggs come together to offer a satisfying but not overly heavy dessert.
Conclusion
Easy no-bake key lime pie bars with graham crust have become my summer standby for good reason. They’re reliably delicious, come together fast, and bring a bright, refreshing note to any occasion. Whether you’re a seasoned baker or just looking for a fuss-free dessert, this recipe welcomes you to experiment and make it your own.
I love how it balances simplicity with wow-factor, and how it fits effortlessly into busy days or casual get-togethers. If you try these bars, I’d love to hear how you customize them or what moments they become a part of in your kitchen.
For more easy yet impressive recipes, you might enjoy my creamy hamburger helper copycat recipe or the cozy cheeseburger casserole—both go-to comfort foods with minimal fuss. Happy baking (or rather, chilling)!
FAQs About Easy No-Bake Key Lime Pie Bars
Can I use regular limes instead of key limes?
Yes, regular lime juice works fine, although key limes have a slightly sweeter, more floral flavor that really makes this recipe shine.
Do the egg yolks need to be cooked?
In this recipe, the acidity of the lime juice gently “cooks” the egg yolks, thickening the filling safely. However, if you’re concerned, you can use pasteurized eggs.
How long do the bars need to chill?
At least 3-4 hours in the refrigerator to firm up properly. Overnight chilling is ideal for the best texture.
Can I make these bars ahead of time?
Absolutely! They keep well in the fridge for up to 4 days and can be frozen for longer storage.
What’s the best way to get clean slices?
Use a sharp knife dipped in hot water, wiping it clean between each cut. This avoids sticking and gives you neat edges.
Pin This Recipe!
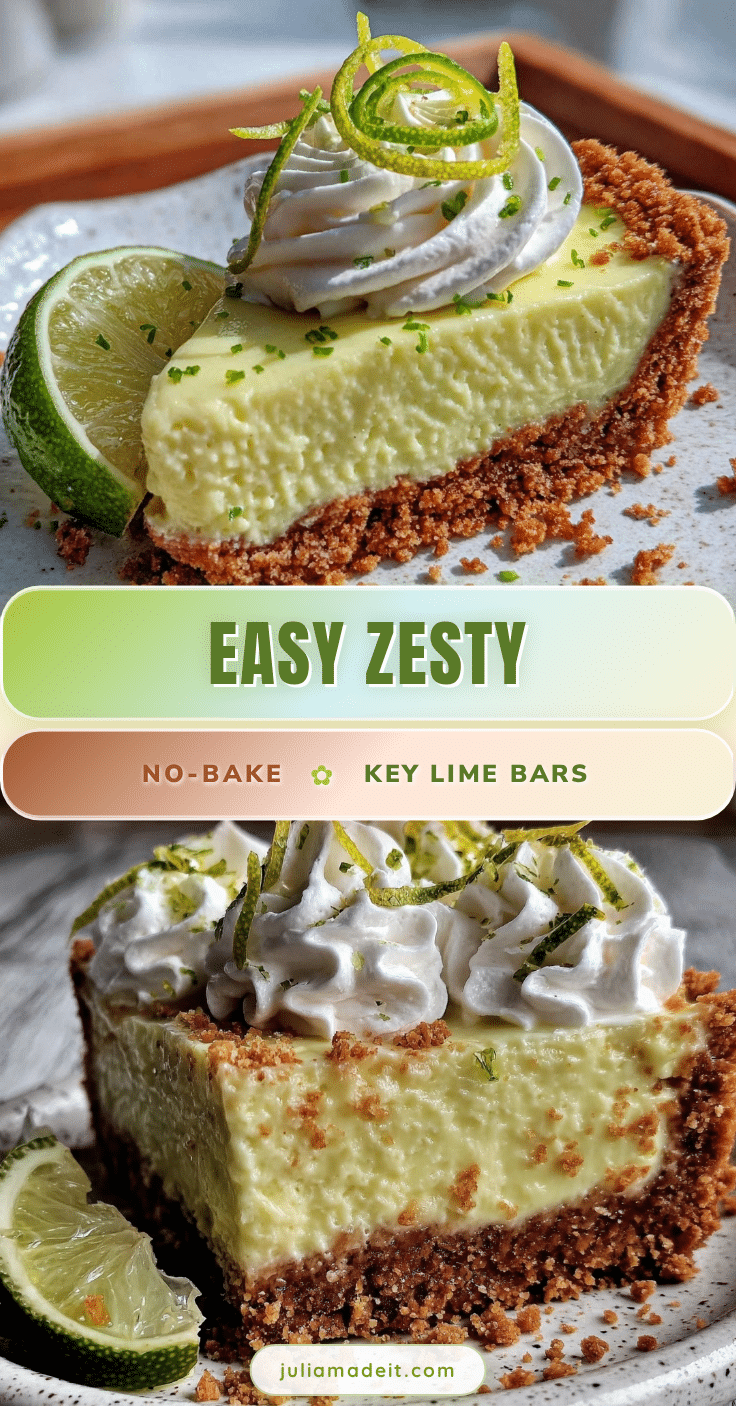
Easy No-Bake Key Lime Pie Bars
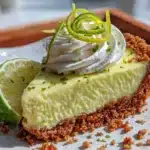
A quick and easy no-bake dessert featuring a buttery graham cracker crust and a creamy, tangy key lime filling. Perfect for summer gatherings and fuss-free entertaining.
- Prep Time: 15 minutes
- Cook Time: 0 minutes
- Total Time: 3 hours 15 minutes
- Yield: 12 bars 1x
- Category: Dessert
- Cuisine: American
Ingredients
- 1 1/2 cups graham cracker crumbs (about 10 full crackers, finely crushed)
- 1/3 cup unsalted butter, melted
- 1/4 cup granulated sugar
- 1 can (14 oz / 396g) sweetened condensed milk
- 1/2 cup fresh key lime juice (about 20–25 key limes)
- 4 large egg yolks, room temperature
- 1 teaspoon lime zest
Instructions
- Prepare the crust: In a medium bowl, combine 1 1/2 cups finely crushed graham cracker crumbs with 1/4 cup granulated sugar. Pour in 1/3 cup melted unsalted butter and stir until the mixture resembles wet sand.
- Press the crust: Transfer the graham mixture into a 9×9-inch baking pan lined with parchment paper. Use the bottom of a glass or measuring cup to firmly press the crumbs into an even layer. Chill in the fridge while making the filling.
- Make the filling: In a mixing bowl, whisk together 4 large egg yolks and 1/2 cup fresh key lime juice until slightly thickened and pale, about 2-3 minutes by hand or 1 minute with an electric mixer. Slowly whisk in the entire 14 oz can of sweetened condensed milk until smooth. Fold in 1 teaspoon lime zest.
- Pour and chill: Pour the lime filling over the chilled crust, spreading evenly with a spatula. Cover with plastic wrap and refrigerate for at least 3 hours, preferably 4, until firm and sliceable.
- Slice and serve: Use a sharp knife to cut into 12 bars. Clean the knife between cuts for clean edges. Serve chilled.
Notes
Use fresh key lime juice for best flavor. Room temperature egg yolks blend more smoothly. Chill bars for at least 3-4 hours or overnight for best texture. Dip knife in hot water and wipe between cuts for clean slices. For gluten-free crust, substitute almond flour and coconut oil. For dairy-free, use coconut condensed milk and vegan butter.
Nutrition
- Serving Size: 1 bar
- Calories: 220
- Sugar: 22
- Sodium: 120
- Fat: 10
- Saturated Fat: 6
- Carbohydrates: 29
- Fiber: 1
- Protein: 4
Keywords: key lime pie bars, no-bake dessert, summer dessert, graham cracker crust, easy dessert, key lime recipe