Let me tell you, the scent of warm vanilla and cinnamon wafting from my kitchen as these Fluffy Christmas Whoopie Pies bake is enough to make anyone’s mouth water. The first time I baked these festive treats was on a chilly December afternoon, the kind of moment where you pause, take a deep breath, and just smile because you know you’re onto something truly special. I was instantly hooked—each bite a perfect balance of soft, pillowy cake and creamy, sweet frosting that tastes like holiday magic.
Years ago, when I was knee-high to a grasshopper, my grandma would whip up all sorts of Christmas goodies, but whoopie pies weren’t on the menu. I stumbled upon this recipe during a rainy weekend, trying to recreate a nostalgic holiday vibe with a modern twist. Honestly, I wish I’d discovered these Fluffy Christmas Whoopie Pies with Festive Frosting years ago—they’re dangerously easy and provide pure, nostalgic comfort that feels like a warm hug on a cold winter’s day.
My family couldn’t stop sneaking them off the cooling rack (and I can’t really blame them). They’re perfect for holiday parties, a sweet surprise for your kids, or to brighten up your Pinterest cookie board with their festive flair. After testing this recipe multiple times—in the name of research, of course—it’s become a staple for family gatherings and gifting. Trust me, you’re going to want to bookmark this one for your Christmas baking this year.
Why You’ll Love This Recipe
Honestly, this Fluffy Christmas Whoopie Pies recipe stands out because it combines simplicity with a festive twist that’s hard to beat. Tested again and again, it’s a family-approved, crowd-pleasing delight that’s as fun to make as it is to eat. Here’s why you’ll love it:
- Quick & Easy: Comes together in under 45 minutes, perfect for busy holiday prep or last-minute treats.
- Simple Ingredients: No fancy grocery trips needed; you likely already have everything in your pantry and fridge.
- Perfect for Holiday Gatherings: Great for cookie exchanges, Christmas brunch, or as a charming homemade gift.
- Crowd-Pleaser: Kids and adults alike rave about the soft cake and luscious frosting combo.
- Unbelievably Delicious: The texture is fluffy and light, while the festive frosting adds just the right amount of sweetness and holiday spice.
What really sets this recipe apart is the frosting—fluffy, creamy, and bursting with a hint of peppermint and cinnamon, which gives it that unmistakable festive feel. Plus, the cake batter is whipped just enough to keep these whoopie pies airy and soft, not dense or heavy. This recipe isn’t just good—it’s the kind that makes you close your eyes after the first bite and smile. It’s comfort food with a holiday glow, perfect for impressing guests without stress, or turning a simple snack into something memorable.
What Ingredients You Will Need
This recipe uses simple, wholesome ingredients to deliver bold flavor and satisfying texture without the fuss. Most are pantry staples, and a few festive touches make all the difference.
- For the Whoopie Pie Batter:
- All-purpose flour – 2 1/2 cups (312g), sifted for a light texture
- Granulated sugar – 1 cup (200g)
- Unsweetened cocoa powder – 1/3 cup (35g), for that classic chocolate flavor
- Baking soda – 1 teaspoon
- Salt – 1/2 teaspoon
- Buttermilk – 1 cup (240ml), room temperature (adds tenderness)
- Unsalted butter – 1/2 cup (115g), melted and cooled (I love using KerryGold for richness)
- Large eggs – 2, room temperature
- Vanilla extract – 2 teaspoons (pure vanilla is a game-changer)
- Ground cinnamon – 1/2 teaspoon (adds warmth and festive flair)
- For the Festive Frosting:
- Cream cheese – 8 oz (225g), softened
- Unsalted butter – 1/4 cup (57g), softened
- Powdered sugar – 2 cups (240g), sifted to avoid lumps
- Vanilla extract – 1 teaspoon
- Ground cinnamon – 1/4 teaspoon
- Peppermint extract – 1/4 teaspoon (optional but highly recommended)
- Red and green sprinkles or edible glitter – for decoration (makes them festive and fun!)
If you don’t have buttermilk, no worries! Just mix 1 cup milk with 1 tablespoon lemon juice or vinegar and let it sit for 5 minutes. For a dairy-free option, swap cream cheese and butter with coconut-based alternatives and use almond milk for buttermilk substitute.
Equipment Needed
- Mixing bowls – a couple of medium-sized ones for batter and frosting
- Electric mixer or stand mixer – makes whipping the frosting a breeze (hand mixers work too!)
- Measuring cups and spoons – for precise ingredient amounts
- Sifter or fine mesh sieve – to sift flour, cocoa, and powdered sugar
- Baking sheets – two, lined with parchment paper or silicone mats
- Cooling racks – to cool the whoopie pies evenly and quickly
- Spatula and spoon – for mixing and spreading frosting
- Cookie scoop or tablespoon – to portion batter evenly and keep pies uniform
Honestly, you can make these without a stand mixer, but it speeds things up and ensures a fluffier frosting. If you don’t have parchment paper, silicone baking mats are reusable and eco-friendly. I’ve tried both and love the silicone mats for less waste and easy cleanup.
Preparation Method

- Preheat your oven to 350°F (175°C). Line two baking sheets with parchment paper or silicone mats.
- Whisk the dry ingredients: In a large bowl, sift together 2 1/2 cups all-purpose flour, 1/3 cup cocoa powder, 1 teaspoon baking soda, 1/2 teaspoon salt, and 1/2 teaspoon ground cinnamon. Set aside.
- Mix the wet ingredients: In another bowl, whisk together 1 cup buttermilk, 2 large eggs, 1/2 cup melted unsalted butter, 1 cup granulated sugar, and 2 teaspoons vanilla extract until smooth and combined. The batter should be slightly thin but creamy.
- Combine wet and dry: Slowly add the dry ingredients into the wet, stirring gently with a spatula until just combined. Avoid overmixing—some lumps are okay. The batter should be thick but spoonable.
- Portion the batter: Using a cookie scoop or tablespoon, drop rounded spoonfuls of batter onto the prepared baking sheets, spacing them about 2 inches apart. Each mound should be about 2 inches in diameter.
- Bake: Place baking sheets in the oven and bake for 12-14 minutes, or until the tops spring back lightly when touched. The edges may look set, but the centers should remain soft and fluffy.
- Cool: Remove from the oven and let the whoopie pies cool on the baking sheets for 5 minutes before transferring them to a wire rack to cool completely. This step helps them firm up without drying out.
- Make the frosting: In a large bowl, beat 8 oz softened cream cheese and 1/4 cup softened butter with an electric mixer until smooth. Gradually add 2 cups sifted powdered sugar, beating until fluffy. Mix in 1 teaspoon vanilla extract, 1/4 teaspoon ground cinnamon, and 1/4 teaspoon peppermint extract (if using). Taste and adjust peppermint to your liking.
- Assemble the whoopie pies: Once the cake rounds are cool, spread about 2 tablespoons of frosting on the flat side of one round. Top with another round, pressing gently to sandwich. Repeat with remaining pies.
- Decorate: Sprinkle the edges with red and green sprinkles or edible glitter for that festive sparkle. Chill assembled pies for 20 minutes before serving to let the frosting set.
If your batter feels too runny, add a tablespoon of flour to thicken it up. If frosting feels too stiff, add a splash of milk or cream to loosen it. These little adjustments make all the difference.
Cooking Tips & Techniques
Making Fluffy Christmas Whoopie Pies is straightforward, but a few tricks from my kitchen will help you nail them every time. First, don’t skip sifting the dry ingredients—cocoa powder and flour tend to clump, and sifting ensures a lighter, smoother batter. I’ve learned the hard way that overmixing the batter can make the whoopie pies dense rather than fluffy, so mix just until combined.
When portioning the batter, I use a cookie scoop to get evenly sized pies, which bake uniformly and look prettier stacked with frosting. Baking time can vary slightly depending on your oven, so start checking around 12 minutes. You want the tops to spring back lightly, not dry or cracking.
For the frosting, using room temperature cream cheese and butter is key. Cold ingredients won’t blend well, and hot ones can get greasy. Beat until fluffy, scraping down the sides often. If peppermint extract is too strong for you, start with less and add more gradually. It’s all about balance.
Lastly, chilling the assembled pies before serving helps the frosting firm up and makes them easier to handle. I usually make these a few hours ahead or even the day before—they keep well and taste better when flavors meld.
Variations & Adaptations
Feel like mixing things up? Here are some tasty ways to customize your Christmas whoopie pies:
- Dietary swaps: Use almond or oat flour for a gluten-free version (note the texture may be denser). Substitute dairy-free cream cheese and butter alternatives to make them vegan-friendly.
- Seasonal flavors: Swap the cinnamon and peppermint in the frosting for orange zest and a splash of Grand Marnier for a citrusy twist. In summer, try a strawberry cream cheese frosting with fresh berry bits.
- Chocolate variations: Add mini chocolate chips to the batter for little bursts of melty chocolate. Or switch the cocoa powder for matcha powder to create green tea whoopie pies with white chocolate frosting.
One variation I adore is adding a teaspoon of espresso powder to the batter to deepen the chocolate flavor—it’s subtle but makes a big difference. Honestly, experimenting with flavors is half the fun, so don’t be shy about your own creative spin!
Serving & Storage Suggestions
These Fluffy Christmas Whoopie Pies are best served at room temperature for that soft, tender bite. Arrange them on a festive platter with a dusting of powdered sugar or extra sprinkles for that holiday wow factor. They pair beautifully with a cup of hot cocoa, peppermint tea, or even a glass of eggnog if you’re feeling fancy.
To store, keep the whoopie pies in an airtight container in the refrigerator for up to 5 days. If you want to freeze them, wrap each pie individually in plastic wrap and place in a freezer bag—freeze for up to 2 months. Thaw overnight in the fridge before serving.
Reheating is not usually necessary, but if you prefer them warm, pop them in the microwave for 10-15 seconds. Just be careful not to melt the frosting! Over time, the flavors in the frosting and cake mingle, making these even tastier the day after baking.
Nutritional Information & Benefits
Each Fluffy Christmas Whoopie Pie contains approximately 250-300 calories, depending on portion size and frosting thickness. They provide a satisfying balance of carbs and fats, with a little protein from the eggs and cream cheese. The cinnamon adds a touch of antioxidants and helps balance blood sugar.
While these treats are definitely a festive indulgence, using real butter and cream cheese means you’re getting quality fats versus artificial substitutes. You can lighten them up by reducing sugar slightly or swapping in lower-fat cream cheese, though honestly, the full-fat version gives that decadent, creamy texture you want.
This recipe is naturally gluten-full, but swapping flours can make it suitable for gluten intolerance. Be mindful of peppermint extract if allergies are a concern. Overall, these whoopie pies are a joyful treat that fits right into holiday celebrations without guilt when enjoyed in moderation.
Conclusion
Fluffy Christmas Whoopie Pies with Festive Frosting are a must-try for anyone wanting to add a little extra magic to their holiday baking. They’re simple, fun, and packed with the flavors we all crave this time of year—soft chocolate, warm spices, and that creamy frosting with a hint of peppermint. Customize them however you like, from gluten-free to flavor-packed variations, and watch your family and friends fall in love bite after bite.
I love this recipe because it brings back those cozy holiday vibes while being easy enough to whip up even during the busiest season. So go ahead, try it out, and don’t forget to share your own twists or stories in the comments. Happy baking and happy holidays—may your kitchen be filled with warmth and sweet smells!
FAQs
Can I make the whoopie pies ahead of time?
Absolutely! You can bake the cake rounds a day or two ahead and store them in an airtight container. Assemble with frosting right before serving or up to a day in advance and refrigerate.
What if I don’t have buttermilk?
No problem! Mix 1 cup milk with 1 tablespoon lemon juice or vinegar and let it sit for 5 minutes to create a buttermilk substitute.
Can I freeze these whoopie pies?
Yes, wrap each pie individually in plastic wrap and freeze in an airtight bag for up to 2 months. Thaw in the refrigerator overnight before serving.
How can I make the frosting less sweet?
Try reducing the powdered sugar by about 1/2 cup or adding a bit more cream cheese or butter to mellow the sweetness. Adjust peppermint extract carefully—it can amplify the sweetness perception.
Are there any good substitutions for cream cheese in the frosting?
You can use mascarpone or a dairy-free cream cheese alternative if needed. Keep in mind this may slightly change the texture and flavor but still tastes delicious.
Pin This Recipe!
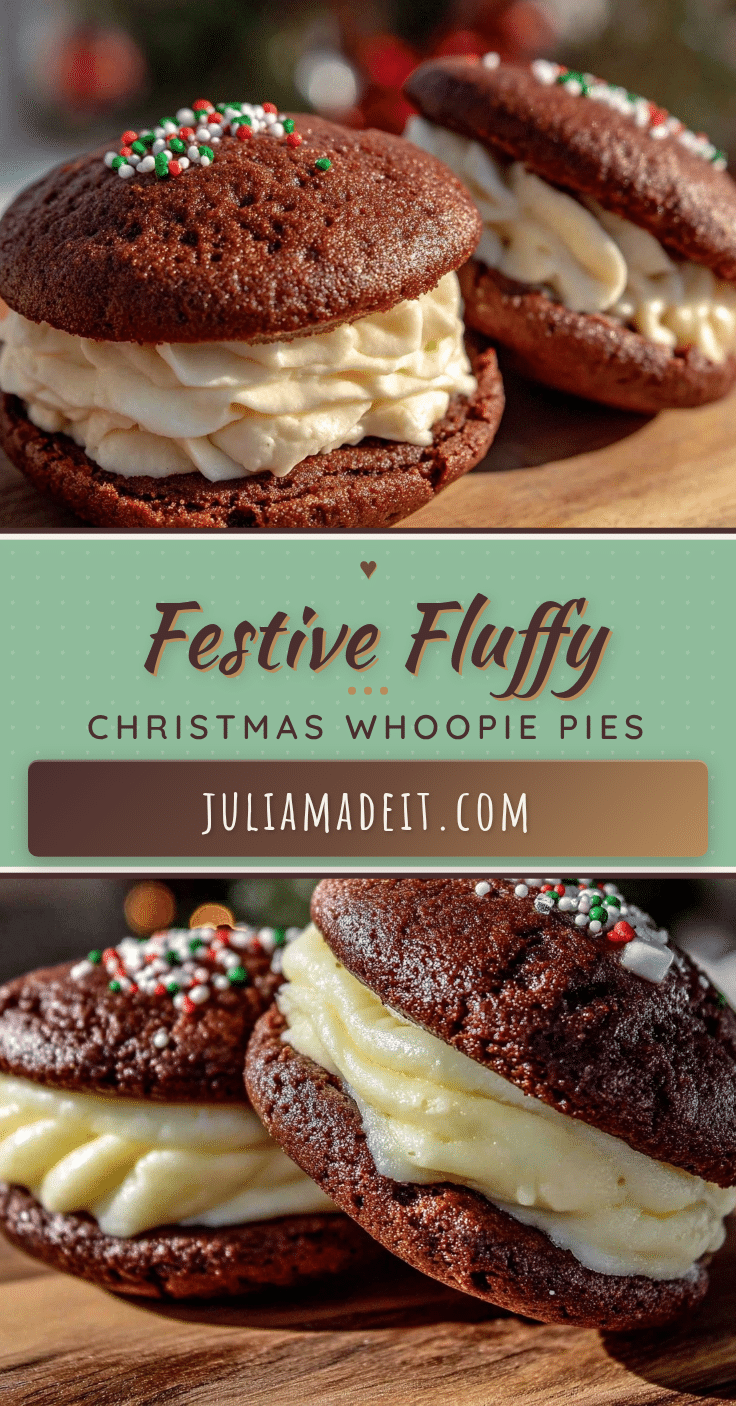
Fluffy Christmas Whoopie Pies Recipe Easy Festive Frosting Idea

Soft, pillowy chocolate whoopie pies filled with a creamy, festive peppermint and cinnamon frosting. Perfect for holiday gatherings and easy to make with simple pantry ingredients.
- Prep Time: 15 minutes
- Cook Time: 14 minutes
- Total Time: 40 minutes
- Yield: 12 servings 1x
- Category: Dessert
- Cuisine: American
Ingredients
- 2 1/2 cups (312g) all-purpose flour, sifted
- 1 cup (200g) granulated sugar
- 1/3 cup (35g) unsweetened cocoa powder
- 1 teaspoon baking soda
- 1/2 teaspoon salt
- 1 cup (240ml) buttermilk, room temperature
- 1/2 cup (115g) unsalted butter, melted and cooled
- 2 large eggs, room temperature
- 2 teaspoons vanilla extract
- 1/2 teaspoon ground cinnamon
- 8 oz (225g) cream cheese, softened
- 1/4 cup (57g) unsalted butter, softened
- 2 cups (240g) powdered sugar, sifted
- 1 teaspoon vanilla extract
- 1/4 teaspoon ground cinnamon
- 1/4 teaspoon peppermint extract (optional)
- Red and green sprinkles or edible glitter for decoration
Instructions
- Preheat your oven to 350°F (175°C). Line two baking sheets with parchment paper or silicone mats.
- In a large bowl, sift together 2 1/2 cups all-purpose flour, 1/3 cup cocoa powder, 1 teaspoon baking soda, 1/2 teaspoon salt, and 1/2 teaspoon ground cinnamon. Set aside.
- In another bowl, whisk together 1 cup buttermilk, 2 large eggs, 1/2 cup melted unsalted butter, 1 cup granulated sugar, and 2 teaspoons vanilla extract until smooth and combined.
- Slowly add the dry ingredients into the wet, stirring gently with a spatula until just combined. Avoid overmixing; some lumps are okay.
- Using a cookie scoop or tablespoon, drop rounded spoonfuls of batter onto the prepared baking sheets, spacing about 2 inches apart.
- Bake for 12-14 minutes, or until the tops spring back lightly when touched.
- Remove from oven and let cool on baking sheets for 5 minutes, then transfer to a wire rack to cool completely.
- In a large bowl, beat 8 oz softened cream cheese and 1/4 cup softened butter until smooth. Gradually add 2 cups sifted powdered sugar, beating until fluffy.
- Mix in 1 teaspoon vanilla extract, 1/4 teaspoon ground cinnamon, and 1/4 teaspoon peppermint extract (if using).
- Spread about 2 tablespoons of frosting on the flat side of one cake round, top with another round, and gently press to sandwich.
- Decorate edges with red and green sprinkles or edible glitter. Chill assembled pies for 20 minutes before serving.
Notes
If batter is too runny, add a tablespoon of flour to thicken. If frosting is too stiff, add a splash of milk or cream to loosen. Use room temperature cream cheese and butter for best frosting texture. Chill assembled pies before serving to firm frosting. Can substitute dairy-free ingredients for vegan version. Use almond or oat flour for gluten-free adaptation.
Nutrition
- Serving Size: 1 whoopie pie
- Calories: 275
- Sugar: 22
- Sodium: 210
- Fat: 14
- Saturated Fat: 8
- Carbohydrates: 34
- Fiber: 2
- Protein: 4
Keywords: Christmas, whoopie pies, festive frosting, peppermint, cinnamon, holiday dessert, easy baking, chocolate, cream cheese frosting