Let me tell you, the scent of sweet cherries mingling with buttery, flaky pastry wafting from my oven is enough to make anyone’s mouth water. The first time I baked this perfect cherry pie with flaky lattice crust, I was instantly hooked—the kind of moment where you pause, take a deep breath, and just smile because you know you’re onto something truly special. Years ago, when I was knee-high to a grasshopper, my grandma would make cherry pies every summer, and the aroma would fill the whole house like a warm hug.
Honestly, I wish I’d discovered this easy flaky lattice crust recipe years ago—it’s dangerously easy and yields a crust that’s tender, crisp, and just the right amount of golden. My family couldn’t stop sneaking slices off the cooling rack (and I can’t really blame them). You know what makes this cherry pie really shine? The balance of sweet and tart cherries paired with a delicate lattice top that’s as pretty as it is delicious.
This perfect cherry pie is a showstopper for potlucks, a sweet treat for your kids after school, or a way to brighten up your Pinterest cookie board with a classic dessert that feels like pure, nostalgic comfort. I’ve tested this recipe more times than I can count—in the name of research, of course—and it’s become a staple for family gatherings and gifting. Trust me, you’re going to want to bookmark this one.
Why You’ll Love This Recipe
After countless trials and tweaks, this perfect cherry pie recipe with flaky lattice crust stands out from the crowd. Here’s why you’ll fall head over heels:
- Quick & Easy: Comes together in under 90 minutes, perfect for busy weeknights or last-minute dessert cravings.
- Simple Ingredients: No fancy grocery trips needed; you likely already have everything in your kitchen pantry.
- Perfect for Any Occasion: Great for brunch, holiday dinners, or casual family get-togethers.
- Crowd-Pleaser: Always gets rave reviews from kids, adults, and even picky eaters.
- Unbelievably Delicious: That flaky lattice crust combined with luscious cherry filling is next-level comfort food.
This isn’t just another cherry pie recipe. The secret lies in the flaky lattice crust—crafted with cold butter and just the right handling to create those delicate, crisp layers. Plus, the filling is perfectly balanced with fresh or frozen cherries, a touch of almond extract, and just enough sugar to make your taste buds dance without overwhelming the natural tartness.
Whether you’re aiming to impress guests without the fuss or craving a slice that makes you close your eyes after the first bite, this recipe offers comfort food with soul and simplicity. It’s like a warm hug on a plate, and honestly, it’s one of the best cherry pies you’ll ever make at home.
What Ingredients You Will Need
This perfect cherry pie recipe uses simple, wholesome ingredients to deliver bold flavor and a satisfying flaky texture without the fuss. Most are pantry staples, and substitutions are easy if needed.
- For the crust:
- 2 ½ cups all-purpose flour (I recommend King Arthur for best texture)
- 1 tsp granulated sugar (adds a touch of sweetness)
- 1 tsp salt
- 1 cup (2 sticks) unsalted butter, very cold and cut into small cubes (crucial for flaky layers)
- 6-8 tbsp ice water (adjust as needed to bring the dough together)
- For the cherry filling:
- 5 cups fresh or frozen tart cherries, pitted (if frozen, thaw and drain excess juice)
- 1 cup granulated sugar (adjust to taste depending on cherry tartness)
- 3 tbsp cornstarch (for thickening)
- 1 tbsp fresh lemon juice (brightens flavors)
- 1 tsp almond extract (optional but highly recommended for a subtle nutty note)
- 1 tbsp unsalted butter, cut into small pieces (to dot on top of filling)
- 1 egg, beaten (for egg wash)
- Coarse sugar, for sprinkling on the crust (adds pretty sparkle and crunch)
Ingredient tips: If you need a gluten-free option, swap the all-purpose flour with a 1-to-1 gluten-free baking flour blend. For dairy-free crust, use a vegan butter substitute like Earth Balance (works beautifully!). If cherries are out of season, frozen work just as well, and you can swap lemon juice for orange juice for a different but tasty twist.
Equipment Needed
- 9-inch pie dish: A classic ceramic or glass pie dish works best for even baking.
- Mixing bowls: One large bowl for dough and another for filling.
- Pastry cutter or food processor: To cut cold butter into flour quickly; a food processor speeds this up, but a pastry cutter works fine too.
- Rolling pin: For rolling out dough evenly. If you don’t have one, a clean wine bottle can work in a pinch.
- Pastry brush: For applying egg wash to the crust for that golden finish.
- Sharp knife or pizza cutter: To cut lattice strips for the top crust.
- Cooling rack: To let the pie cool properly and keep the bottom crust crisp.
I’ve tried this recipe with everything from plastic rolling pins to silicone pastry mats, but honestly, a wooden rolling pin and a lightly floured surface give the best results. And a quick tip: keep your butter and water ice cold—warm hands can melt the butter and make the crust tough, so chilling your tools can help too.
Preparation Method
- Make the pie dough: In a large bowl, whisk together 2 ½ cups flour, 1 tsp sugar, and 1 tsp salt. Add the cold butter cubes and, using a pastry cutter or your fingers, cut the butter into the flour until the mixture resembles coarse crumbs with pea-sized chunks. Don’t overwork it—some butter bits are good for flakiness.
- Add ice water: Sprinkle 6 tablespoons of ice water over the mixture a tablespoon at a time, gently mixing with a fork until the dough just comes together. If it’s still dry, add up to 2 more tablespoons. Form the dough into two discs, wrap in plastic, and chill for at least 1 hour.
- Prepare the cherry filling: In a medium bowl, toss cherries with sugar, cornstarch, lemon juice, and almond extract until well combined. Set aside to macerate while the dough chills.
- Roll out the bottom crust: On a lightly floured surface, roll one dough disc into a 12-inch circle. Transfer it carefully to your 9-inch pie dish, easing it into place without stretching. Trim edges leaving about ½ inch overhang.
- Add the filling: Pour the cherry mixture into the crust and dot with 1 tbsp butter pieces. This adds richness to the filling.
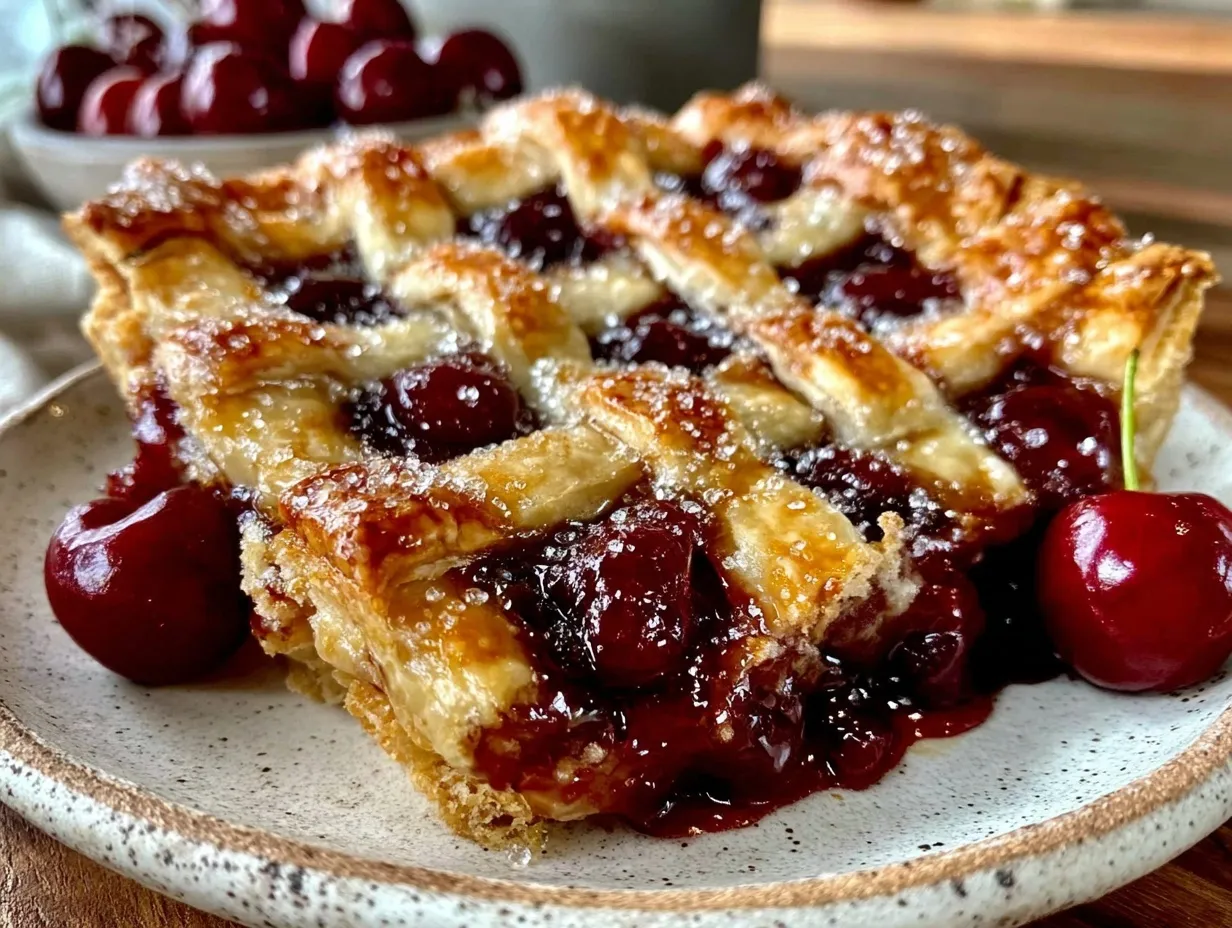
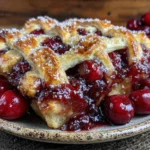
- Create the lattice top: Roll out the second disc to a 12-inch circle. Cut into ½-inch strips using a knife or pizza cutter. Lay half the strips parallel across the pie, then weave the remaining strips perpendicular, creating a lattice pattern. Trim the edges and fold the overhang of both crusts under itself. Crimp edges with your fingers or a fork for a pretty finish.
- Apply egg wash: Brush the lattice crust with beaten egg and sprinkle with coarse sugar for sparkle and crunch.
- Bake the pie: Place the pie on a baking sheet and bake in a preheated 400°F (200°C) oven for 20 minutes. Reduce heat to 350°F (175°C) and bake for another 30-40 minutes until the crust is golden and the filling bubbles.
- Cool thoroughly: Let the pie cool on a rack for at least 3 hours before slicing. This rest time allows the filling to set properly so you get clean slices.
If your crust edges brown too quickly, tent them with foil after the first 20 minutes to prevent burning. You’ll know it’s ready when the crust is beautifully golden and the cherry juices are bubbling through the lattice—sometimes the smell alone makes me want to dive right in!
Cooking Tips & Techniques
Making a perfect cherry pie with flaky lattice crust is easier than you think, but a few tricks make all the difference. First, keep your butter as cold as possible. I’ve learned the hard way that warm butter means a tough crust, so I often throw my butter cubes in the freezer for 15 minutes before starting.
When mixing dough, less is more. Overworking develops gluten, which can make the crust chewy rather than flaky. Use a light touch and stop as soon as the dough just holds together.
For the lattice crust, don’t rush the weaving—it might seem fiddly, but taking your time makes the pie look stunning and lets steam escape during baking. If your dough cracks when rolling, just pinch it back together gently.
Timing is key: start baking at a higher temperature to set the crust, then lower it to cook the filling through without burning the top. And, honestly, chilling the pie dough discs overnight is a game-changer for flavor and texture—if you can wait that long!
Variations & Adaptations
- Dietary adjustments: For gluten-free, swap all-purpose flour for a gluten-free blend (Bob’s Red Mill is a good choice). For a vegan crust, use plant-based butter and substitute the egg wash with almond milk or coconut cream.
- Seasonal twists: In summer, try swapping cherries for fresh blueberries or blackberries. For a festive touch, add a pinch of cinnamon or nutmeg to the filling.
- Flavor boosts: Experiment with adding a splash of Kirsch (cherry brandy) or vanilla extract to the filling for a grown-up flair. I once added fresh mint leaves to the filling—surprisingly refreshing!
I personally love making mini cherry pies using this recipe. They’re perfect for sharing and bake faster. Just adjust baking time to about 20-25 minutes at 350°F (175°C).
Serving & Storage Suggestions
This cherry pie is best served slightly warm or at room temperature, with a scoop of vanilla ice cream or a dollop of whipped cream on the side. It pairs beautifully with a cup of strong coffee or a tall glass of cold milk.
Store leftover pie covered loosely with foil at room temperature for up to 2 days, or refrigerate for up to 4 days. For longer storage, wrap tightly and freeze for up to 3 months. To reheat, thaw overnight in the fridge and warm slices in a 350°F (175°C) oven for 10-15 minutes to revive that flaky crust.
Flavors mellow and deepen after resting a day, so if you can resist, letting the pie sit overnight makes for an even tastier experience.
Nutritional Information & Benefits
A slice of this perfect cherry pie (about 1/8th of the pie) contains roughly 320 calories, 15g fat, 45g carbohydrates, and 3g protein. Cherries are rich in antioxidants and vitamin C, which support immune health. Using unsalted butter and controlling sugar levels helps keep it balanced.
This recipe can easily be adjusted for dietary needs—gluten-free and vegan options are straightforward. Just be mindful of the added sugar if you’re watching carbs. Overall, it’s a satisfying treat that brings joy without too much guilt.
Conclusion
This perfect cherry pie with flaky lattice crust is a timeless dessert that’s both approachable for beginners and impressive enough to wow any crowd. It’s got that classic charm, paired with a tender, buttery crust and luscious cherry filling that hits all the right notes. I love how versatile it is—you can customize it to your taste or dietary needs and still get fantastic results.
Give it a try, and don’t hesitate to make it your own by adding your favorite twists. I’d love to hear how your pie turns out or any fun variations you come up with! Drop a comment below, share your photos, or tell me what you paired it with.
Happy baking, friends—this cherry pie feels like a warm hug you can slice and share.
FAQs
Can I use canned cherries instead of fresh or frozen?
Canned cherries tend to be very soft and watery, which can make the filling soggy. If you must use them, drain well and reduce the added liquid in the recipe.
How do I prevent the bottom crust from getting soggy?
Make sure to use a metal or glass pie dish and pre-chill your dough. Also, avoid overfilling and bake the pie on a lower oven rack to help the bottom crust cook thoroughly.
Can I prepare the pie dough ahead of time?
Absolutely! You can make the dough up to two days in advance and keep it wrapped in the fridge, or freeze it for up to a month. Just thaw in the fridge overnight before using.
What’s the secret to making the lattice crust look perfect?
Use a sharp knife or pizza cutter to get even strips, keep your dough cold, and take your time weaving carefully. Brush with egg wash for that beautiful golden shine.
How do I know when the pie is fully baked?
The crust should be golden brown, especially on the edges, and you should see the cherry filling bubbling through the lattice. If the crust browns too fast, tent with foil and continue baking until done.
Pin This Recipe!
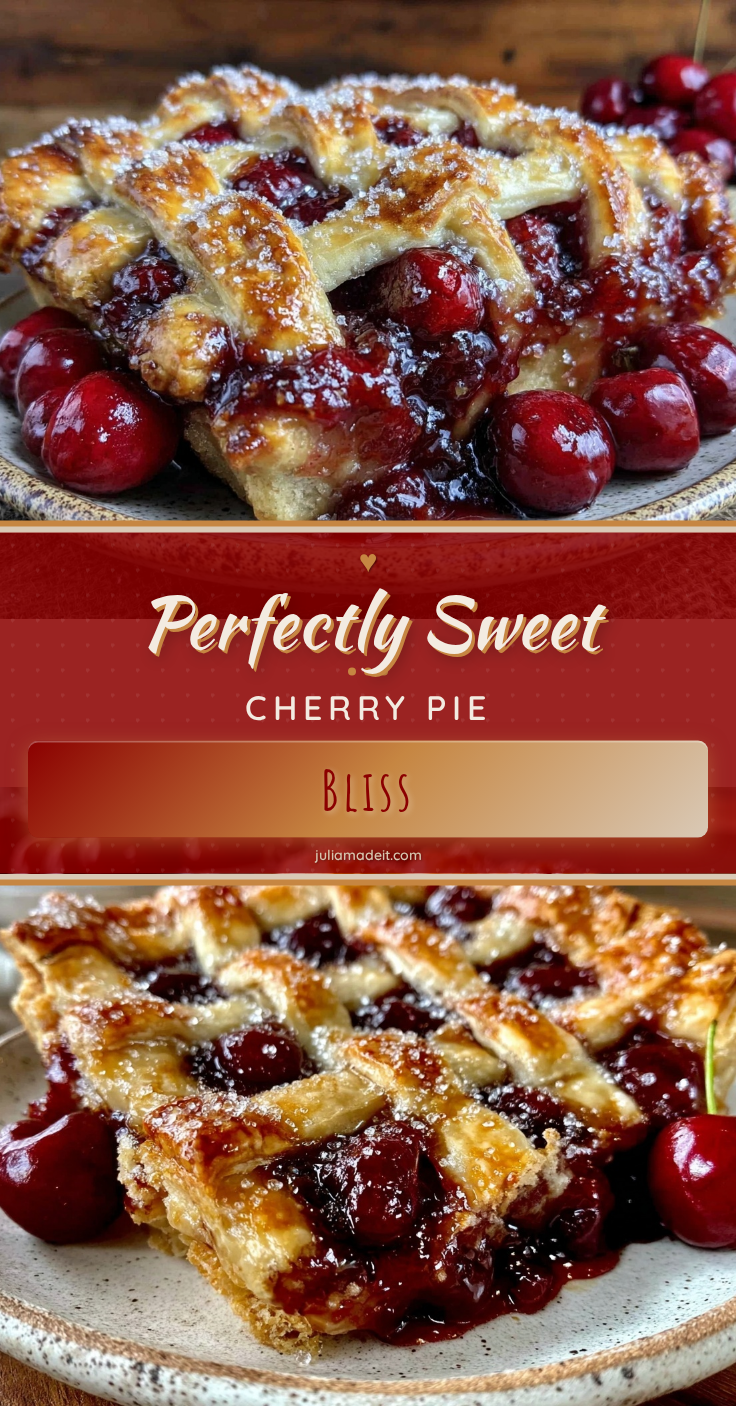
Perfect Cherry Pie Recipe Easy Flaky Lattice Crust for Beginners
A classic cherry pie with a tender, flaky lattice crust and a perfectly balanced sweet and tart cherry filling. Easy to make and perfect for any occasion.
- Prep Time: 20 minutes
- Cook Time: 50-60 minutes
- Total Time: 3 hours 20 minutes
- Yield: 8 servings 1x
- Category: Dessert
- Cuisine: American
Ingredients
- 2 ½ cups all-purpose flour
- 1 tsp granulated sugar (for crust)
- 1 tsp salt
- 1 cup (2 sticks) unsalted butter, very cold and cut into small cubes
- 6–8 tbsp ice water
- 5 cups fresh or frozen tart cherries, pitted
- 1 cup granulated sugar (for filling)
- 3 tbsp cornstarch
- 1 tbsp fresh lemon juice
- 1 tsp almond extract (optional)
- 1 tbsp unsalted butter, cut into small pieces (to dot on filling)
- 1 egg, beaten (for egg wash)
- Coarse sugar, for sprinkling on crust
Instructions
- In a large bowl, whisk together 2 ½ cups flour, 1 tsp sugar, and 1 tsp salt.
- Add cold butter cubes and cut into flour using a pastry cutter or fingers until mixture resembles coarse crumbs with pea-sized chunks.
- Sprinkle 6 tablespoons ice water over mixture a tablespoon at a time, mixing gently until dough just comes together; add up to 2 more tablespoons if needed.
- Form dough into two discs, wrap in plastic, and chill for at least 1 hour.
- In a medium bowl, toss cherries with sugar, cornstarch, lemon juice, and almond extract; set aside to macerate.
- Roll one dough disc into a 12-inch circle on a floured surface and transfer to a 9-inch pie dish; trim edges leaving ½ inch overhang.
- Pour cherry filling into crust and dot with 1 tbsp butter pieces.
- Roll out second dough disc to 12-inch circle and cut into ½-inch strips.
- Lay half the strips parallel across the pie, then weave remaining strips perpendicular to create lattice; trim edges and fold overhang under itself, crimp edges.
- Brush lattice crust with beaten egg and sprinkle with coarse sugar.
- Place pie on baking sheet and bake at 400°F (200°C) for 20 minutes.
- Reduce oven temperature to 350°F (175°C) and bake for an additional 30-40 minutes until crust is golden and filling bubbles.
- Cool pie on a rack for at least 3 hours before slicing to allow filling to set.
Notes
Keep butter and water ice cold to ensure a flaky crust. Chill dough discs for at least 1 hour or overnight for best results. Tent crust edges with foil if browning too quickly. Use fresh or frozen tart cherries for best flavor. For gluten-free, substitute flour with a 1-to-1 gluten-free blend. For vegan, use plant-based butter and substitute egg wash with almond milk or coconut cream.
Nutrition
- Serving Size: 1 slice (1/8th of pi
- Calories: 320
- Fat: 15
- Carbohydrates: 45
- Protein: 3
Keywords: cherry pie, lattice crust, flaky pie crust, easy cherry pie, homemade pie, dessert, baking, classic pie