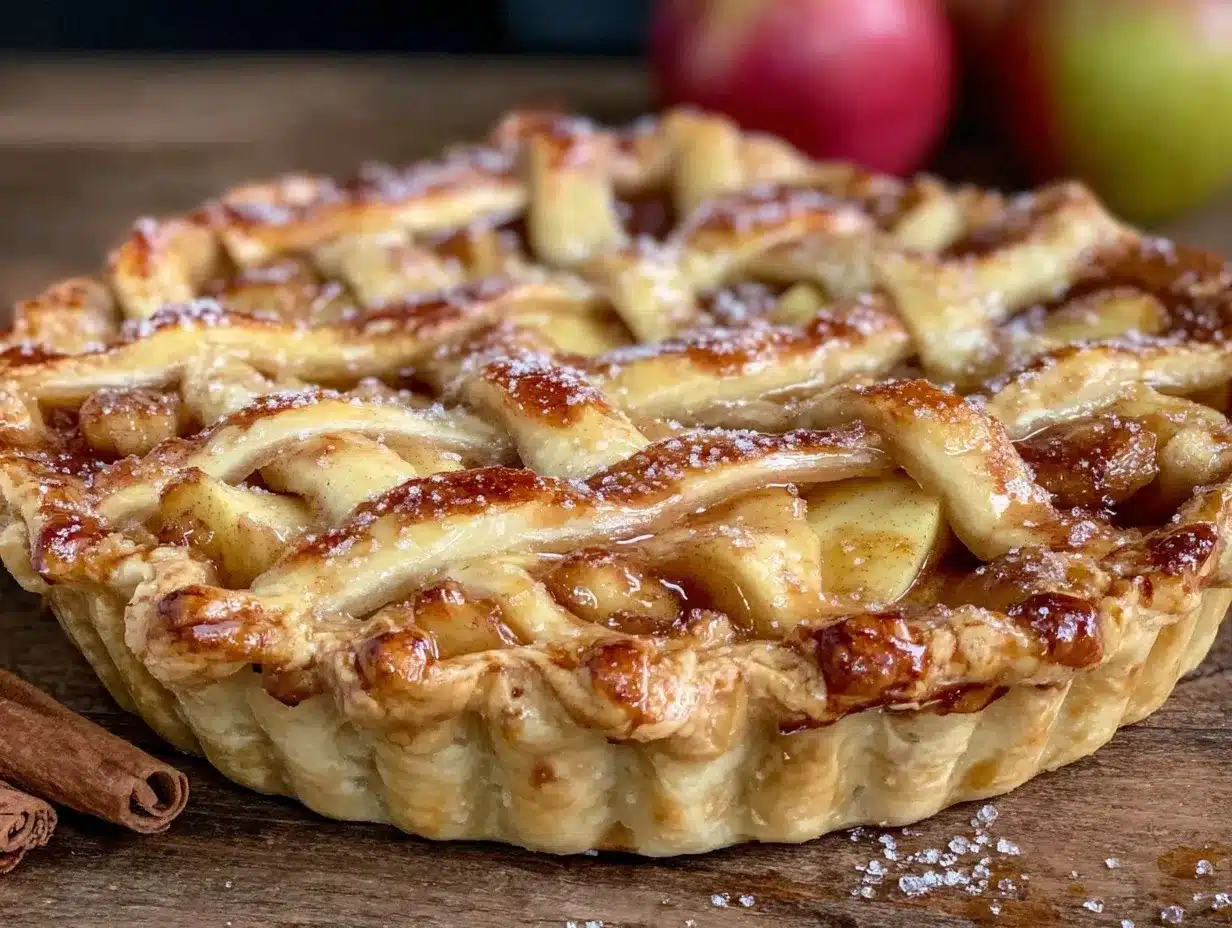
Let me tell you, the smell of cinnamon-spiced apples mingling with warm, buttery pastry wafting from my oven is enough to make anyone’s mouth water. The first time I baked this perfect classic apple pie with homemade flaky crust, I was instantly hooked. It was one of those rare moments where you pause, take a deep breath, and just smile because you know you’re onto something truly special.
Years ago, when I was knee-high to a grasshopper, my grandma used to make apple pies that seemed to capture the entire essence of fall in every bite. I tried to recreate her magic on a rainy weekend, fiddling with crust recipes and apple mixes. Honestly, I wish I had discovered this easy homemade flaky crust tutorial way sooner—it’s dangerously easy and delivers that pure, nostalgic comfort with every slice.
My family couldn’t stop sneaking pieces off the cooling rack (and I can’t really blame them). Whether it’s a cozy weekend treat, a holiday centerpiece, or the perfect pie to brighten up your Pinterest cookie board, this recipe fits every occasion like a glove. After testing it multiple times in the name of research, of course, it’s become a staple for family gatherings and gifting alike. Trust me, you’re going to want to bookmark this one.
Why You’ll Love This Recipe
Over the years, I’ve perfected this classic apple pie recipe, making sure it’s approachable yet impressive. Here’s why this recipe stands out:
- Quick & Easy: Comes together in under 90 minutes, perfect for last-minute dessert cravings or weekend baking projects.
- Simple Ingredients: No fancy grocery trips required; you probably have everything in your pantry and fridge already.
- Perfect for Any Occasion: Whether it’s a casual family dinner, a festive holiday, or a potluck, this pie shines every time.
- Crowd-Pleaser: Kids and adults alike rave about the perfect balance of tender apples and flaky crust.
- Unbelievably Delicious: The buttery, flaky crust paired with cinnamon-spiced apples is comfort food in its purest form.
This isn’t just any apple pie. The secret lies in the homemade flaky crust, crafted by a simple blend of cold butter and ice water, creating layers that practically melt on your tongue. Plus, the apple filling is perfectly seasoned with cinnamon and a touch of nutmeg, achieving a flavor profile that’s both classic and timeless. It’s the kind of pie that makes you close your eyes after the first bite, savoring a memory that feels like a warm hug.
Whether you’re aiming to impress guests without the stress or just want a slice of pure happiness, this recipe hits the mark every time.
What Ingredients You Will Need
This perfect classic apple pie recipe uses simple, wholesome ingredients to deliver bold flavor and a satisfying flaky texture without the fuss. Most are pantry staples, with a few fresh items that bring it all to life.
- For the flaky crust:
- 2 ½ cups (320g) all-purpose flour (I prefer King Arthur for consistent texture)
- 1 tsp salt
- 1 tbsp granulated sugar (adds a subtle sweetness)
- 1 cup (226g) unsalted butter, cold and cubed (use a high-fat butter for best flakiness)
- 6-8 tbsp ice water (keep it icy to avoid melting the butter)
- For the apple filling:
- 6-7 medium apples (about 3 lbs / 1.4kg), peeled, cored, and thinly sliced (I usually mix Granny Smith for tartness and Honeycrisp for sweetness)
- ¾ cup (150g) granulated sugar
- ¼ cup (55g) packed light brown sugar (adds depth)
- 2 tsp ground cinnamon
- ¼ tsp ground nutmeg
- 1 tbsp lemon juice (brightens flavors and prevents browning)
- 2 tbsp all-purpose flour (helps thicken the filling)
- 1 tsp vanilla extract (optional, but it adds warmth)
- For the topping:
- 1 egg, beaten (for egg wash, creates a golden crust)
- 1 tbsp coarse sugar (optional, for a sparkly finish)
If you’re feeling adventurous, you can swap all-purpose flour with almond flour for a gluten-free crust, but be warned—it changes the texture a bit. Also, if you prefer a dairy-free version, coconut oil works in place of butter, but the crust won’t be as flaky. For apples, seasonal swaps work great too; in summer, fresh peaches or pears can add a delightful twist!
Equipment Needed
Making this perfect classic apple pie requires a few kitchen tools, but nothing too fancy or intimidating.
- A 9-inch (23 cm) pie dish — glass or ceramic works great. I tend to use ceramic because it holds heat evenly.
- A large mixing bowl for tossing the apples.
- A pastry cutter or food processor to cut the butter into the flour — though you can manage by hand with a couple of butter knives if you don’t have one.
- A rolling pin — if you don’t have one, a clean wine bottle can work in a pinch.
- A sharp paring knife or apple corer for prepping the apples.
- A pastry brush for egg washing the crust.
Personally, I keep a bench scraper handy—it’s a game-changer for handling dough and cleaning up bits quickly. If you’re on a budget, many of these tools can be found inexpensively or substituted with household items you already own. And hey, the rustic charm of hand-rolled dough with a few cracks is part of the fun!
Preparation Method
- Make the crust: In a large bowl, whisk together the flour, salt, and sugar. Add the cold, cubed butter. Using a pastry cutter or your fingers, cut the butter into the flour until the mixture resembles coarse crumbs with pea-sized lumps. This step is key for flakiness. (Tip: Keep the butter cold; if it starts to get soft, pop the bowl in the fridge for 10 minutes.)
- Add ice water: Sprinkle the ice water over the mixture, a tablespoon at a time, gently mixing with a fork until the dough just comes together. Don’t overwork it—if the dough feels sticky or too wet, add a tiny bit more flour. Divide the dough into two equal discs, wrap in plastic wrap, and chill in the fridge for at least 1 hour. (This resting helps relax the gluten and firms up the butter.)
- Prep the apples: While the dough chills, peel, core, and thinly slice your apples. Toss them in a large bowl with the lemon juice to prevent browning. Stir in sugars, cinnamon, nutmeg, flour, and vanilla until everything is evenly coated. Let the mixture sit for 15 minutes so the flavors meld and juices start to release.
- Roll out the bottom crust: On a lightly floured surface, roll out one dough disc into a 12-inch (30 cm) circle. Transfer it carefully to your pie dish, letting the dough hang over the edges. (If it tears, just patch it up—no worries!) Press it gently into the dish, smoothing out air pockets.
- Add the filling: Spoon the apple filling into the crust, mounding it slightly in the center. The mixture should be juicy but not soupy; if it looks overly wet, add a little more flour next time.
- Roll out the top crust: Roll out the second dough disc to about 12 inches as well. You can either place it whole on top or cut it into strips for a lattice pattern. If you go lattice, weave the strips over the filling for a pretty finish.
- Seal the edges: Trim excess dough from edges, then crimp or pinch the edges to seal. This stops juices from leaking out during baking. (A fork or your fingers work just fine.)
- Egg wash and sugar: Brush the top crust with beaten egg for that golden shine. Sprinkle with coarse sugar for a lovely sparkle and crunch.
- Bake: Place the pie on a baking sheet to catch drips and bake in a preheated oven at 425°F (220°C) for 15 minutes. Then reduce heat to 350°F (175°C) and bake for an additional 40-50 minutes, or until the crust is golden and the filling bubbles. (If the edges brown too fast, cover them with foil.)
- Cool: Let the pie cool for at least 2 hours before slicing. This resting time allows the filling to set perfectly, so your slices hold together beautifully.
Pro tip: When rolling dough, rotate it frequently and dust lightly with flour to prevent sticking. And don’t rush the chilling step—cold dough is the secret behind those flaky layers you’ll love.
Cooking Tips & Techniques
Making a perfect classic apple pie might seem intimidating, but a few tricks can make all the difference.
- Cold butter is your best friend: The key to flaky crust is keeping the butter cold so it creates those beautiful layers as it melts during baking.
- Don’t overmix the dough: Overworking activates gluten, making the crust tough. Mix just until the dough comes together.
- Resting time is crucial: Chilling the dough and letting the pie cool before slicing helps with texture and flavor.
- Apple variety matters: Combining tart and sweet apples balances flavor and texture. Granny Smith plus Honeycrisp or Fuji is my go-to.
- Prevent soggy crust: Toss apples with flour and sugar to soak up excess liquid and bake on a sheet pan to catch drips.
- Watch baking times: Oven temps can vary, so check for bubbling filling and golden crust. Cover edges if they brown too fast.
For multitasking, prepare dough and filling ahead to save time on baking day. And if your crust cracks or tears, don’t sweat it—patching with extra dough or a sprinkle of flour works just fine. Honestly, the imperfections add character and homemade charm!
Variations & Adaptations
One of the joys of this perfect classic apple pie is how easy it is to make it your own.
- Gluten-Free Version: Swap all-purpose flour for a gluten-free blend and use coconut oil or vegan butter for the crust. The texture will be a bit different but still delicious.
- Spiced Apple Pear Pie: Add diced pears and a pinch of ground cloves or ginger to the filling for a fall-inspired twist.
- Caramel Apple Pie: Drizzle caramel sauce over the apple filling before adding the top crust for a richer, indulgent treat.
- Vegan Adaptation: Use plant-based butter and substitute the egg wash with almond milk or aquafaba for a shiny crust.
- Lattice vs. Full Crust: For a rustic look, go with a full top crust; for a pretty presentation, weave a lattice pattern.
I once tried adding a handful of toasted walnuts to the filling—totally optional but gave a nice crunch and nutty depth. Feel free to experiment based on what’s in your pantry or what season it is. It’s your pie, after all!
Serving & Storage Suggestions
This perfect classic apple pie is best served slightly warm or at room temperature. A scoop of vanilla ice cream or a dollop of freshly whipped cream makes it downright irresistible.
Pair it with a hot cup of coffee or a spiced chai tea to round out the cozy experience. For a brunch spread, slice it thin and serve alongside sharp cheddar cheese—trust me, it’s a game-changer.
To store, cover leftover pie tightly with plastic wrap or foil and refrigerate for up to 4 days. You can also freeze unbaked pies wrapped in plastic and foil for up to 3 months. When reheating, warm slices in a 350°F (175°C) oven for 10-15 minutes to bring back that fresh-baked feel.
Flavors often deepen after a day, so if you can wait, letting the pie rest overnight in the fridge is totally worth it. Just don’t wait too long—this pie tends to disappear fast!
Nutritional Information & Benefits
This classic apple pie recipe provides a comforting treat with moderate calories—roughly 350-400 calories per slice (1/8th of the pie), depending on serving size and toppings. Apples are a good source of fiber and vitamin C while cinnamon adds a dash of antioxidant goodness.
While this isn’t a low-sugar dessert, you can reduce sugar slightly or swap for natural sweeteners. Using whole ingredients and homemade dough means you avoid preservatives and additives found in store-bought pies.
For those with dietary restrictions, the recipe adapts well to gluten-free and vegan versions, making it accessible for many. Honestly, it’s a slice of heartwarming goodness that balances indulgence with wholesome ingredients.
Conclusion
In the end, this perfect classic apple pie with homemade flaky crust is more than just a dessert—it’s a slice of tradition, comfort, and simple joy. Whether you’re a seasoned baker or trying your hand at pie for the first time, this recipe guides you step-by-step to success.
Feel free to tweak the filling, swap the crust ingredients, or add your own flair. I love how this pie brings people together around the table, with smiles and second helpings all around. Don’t forget to share your own twists and moments with this recipe—I’d love to hear how it turns out for you!
Now, grab those apples and butter, and get ready to make a pie that’s bound to become a family favorite. Happy baking!
FAQs
Can I use frozen apples for the filling?
Fresh apples are best for texture, but if you use frozen, thaw and drain excess liquid before mixing to avoid soggy crust.
How do I prevent the crust edges from burning?
Cover the edges with foil halfway through baking to protect them while the center finishes cooking.
Can I prepare the pie crust in advance?
Absolutely! You can make the dough up to 2 days ahead and keep it wrapped in the fridge or freeze it for up to a month.
What’s the best way to reheat leftover pie?
Warm slices in a 350°F (175°C) oven for 10-15 minutes to restore that just-baked texture and flavor.
Can I make this pie vegan?
Yes, swap butter for plant-based alternatives and replace the egg wash with almond milk or aquafaba to keep the crust shiny.
Pin This Recipe!
Perfect Classic Apple Pie Recipe Easy Homemade Flaky Crust Tutorial

A classic apple pie recipe featuring a homemade flaky crust and cinnamon-spiced apple filling, perfect for any occasion and easy to make with simple ingredients.
- Prep Time: 20 minutes
- Cook Time: 1 hour 5 minutes
- Total Time: 1 hour 25 minutes
- Yield: 8 servings 1x
- Category: Dessert
- Cuisine: American
Ingredients
- 2 ½ cups (320g) all-purpose flour
- 1 tsp salt
- 1 tbsp granulated sugar
- 1 cup (226g) unsalted butter, cold and cubed
- 6–8 tbsp ice water
- 6–7 medium apples (about 3 lbs / 1.4kg), peeled, cored, and thinly sliced
- ¾ cup (150g) granulated sugar
- ¼ cup (55g) packed light brown sugar
- 2 tsp ground cinnamon
- ¼ tsp ground nutmeg
- 1 tbsp lemon juice
- 2 tbsp all-purpose flour
- 1 tsp vanilla extract (optional)
- 1 egg, beaten (for egg wash)
- 1 tbsp coarse sugar (optional)
Instructions
- Make the crust: In a large bowl, whisk together the flour, salt, and sugar. Add the cold, cubed butter. Using a pastry cutter or your fingers, cut the butter into the flour until the mixture resembles coarse crumbs with pea-sized lumps. Keep the butter cold; if it starts to get soft, chill the bowl for 10 minutes.
- Add ice water: Sprinkle the ice water over the mixture, a tablespoon at a time, gently mixing with a fork until the dough just comes together. Don’t overwork it. Divide the dough into two equal discs, wrap in plastic wrap, and chill in the fridge for at least 1 hour.
- Prep the apples: Peel, core, and thinly slice the apples. Toss them in a large bowl with lemon juice to prevent browning. Stir in sugars, cinnamon, nutmeg, flour, and vanilla until evenly coated. Let sit for 15 minutes.
- Roll out the bottom crust: On a lightly floured surface, roll out one dough disc into a 12-inch circle. Transfer to a 9-inch pie dish, letting dough hang over edges. Press gently into dish.
- Add the filling: Spoon the apple filling into the crust, mounding slightly in the center.
- Roll out the top crust: Roll out the second dough disc to about 12 inches. Place whole on top or cut into strips for a lattice pattern and weave over filling.
- Seal the edges: Trim excess dough and crimp or pinch edges to seal.
- Egg wash and sugar: Brush the top crust with beaten egg and sprinkle with coarse sugar.
- Bake: Place pie on a baking sheet. Bake at 425°F for 15 minutes, then reduce heat to 350°F and bake for 40-50 minutes until crust is golden and filling bubbles. Cover edges with foil if browning too fast.
- Cool: Let pie cool for at least 2 hours before slicing to allow filling to set.
Notes
Keep butter cold for flaky crust. Don’t overmix dough to avoid toughness. Chill dough for at least 1 hour. Use a mix of tart and sweet apples for best flavor. Cover crust edges with foil if browning too fast. Let pie cool for 2 hours before slicing. Can substitute gluten-free flour and coconut oil for gluten-free or vegan versions.
Nutrition
- Serving Size: 1 slice (1/8th of pi
- Calories: 375
- Sugar: 28
- Sodium: 210
- Fat: 18
- Saturated Fat: 11
- Carbohydrates: 52
- Fiber: 3
- Protein: 3
Keywords: apple pie, classic apple pie, homemade pie crust, flaky crust, cinnamon apple pie, easy apple pie, fall dessert, holiday pie