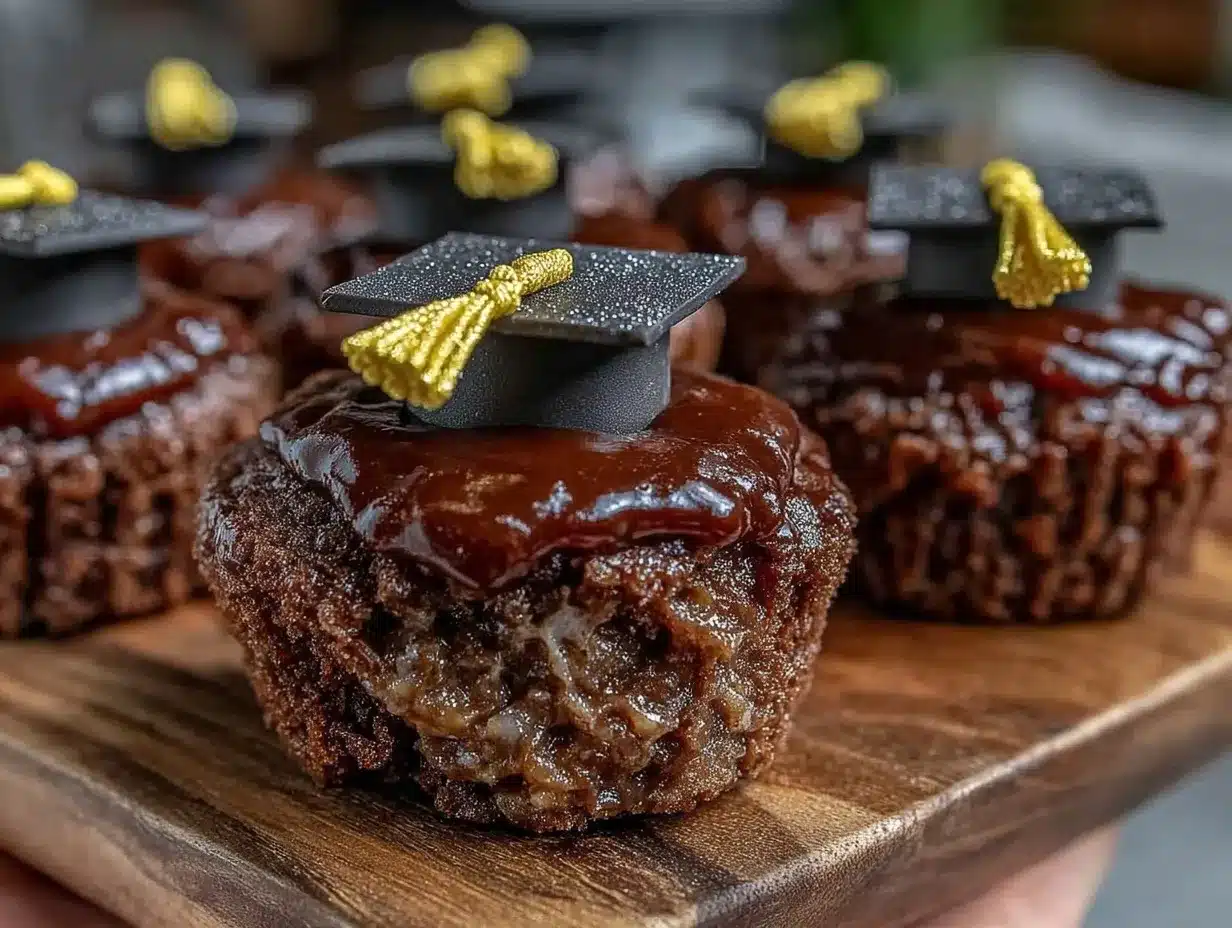
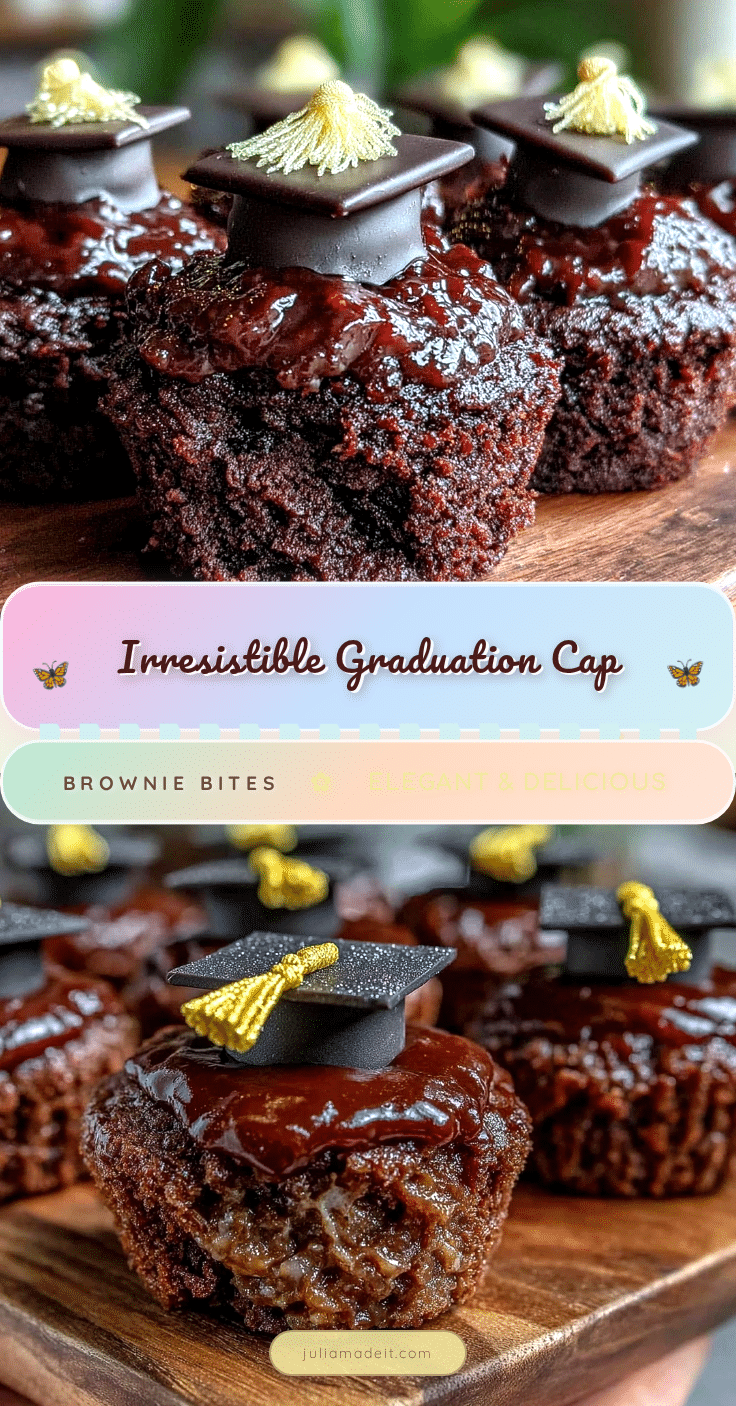
“Hey, can you bring something festive for the graduation party tomorrow?” My friend asked, almost offhandedly, just as I was juggling a dozen things at once. Honestly, I was seconds away from surrendering to a quick trip to the bakery, but then I remembered this little secret weapon: perfect graduation cap brownie bites. I’d whipped these up on a whim one weekend, mostly to impress my niece who’s obsessed with all things chocolate, and they turned out so well that everyone at the family get-together kept asking for the recipe.
The best part? These treats feel special but come together in about 15 minutes, which — let’s be real — is a lifesaver when you’re scrambling to pull a celebration together. The rich, fudgy brownie center topped with a simple but clever little “cap” made from a square of chocolate and a tiny tassel of icing makes them look like they walked right off a festive dessert table. They’re the kind of bites that make you pause, smile, and think, “Yeah, this is a celebration.”
There’s something about the smell of warm chocolate that snaps me back to those moments of pure joy and relief after a long day. These brownie bites have become my go-to for graduations, but honestly, they’re perfect for any kind of achievement or just a sweet pick-me-up. They’re simple, playful, and carry that quiet promise of a little celebration in every bite.
After making them a few times, I realized they’re not just about the sugar rush or the cute factor—they’re about marking milestones, big or small, with something homemade and heartfelt. That’s why these perfect graduation cap brownie bites have stuck with me. They bring a little ceremony to the everyday, and honestly, isn’t that what we all need?
Why You’ll Love This Recipe
After testing and tweaking this recipe across multiple celebrations (and not-so-celebratory days when chocolate was my comfort), I can say these brownie bites truly hit the spot. Here’s why they stand out:
- Quick & Easy: Ready in just 15 minutes from start to finish. Perfect when you need a last-minute treat that still looks thoughtfully made.
- Simple Ingredients: No exotic or hard-to-find items here—just pantry staples and basic baking supplies. You probably have everything on hand already.
- Perfect for Celebrations: These bites bring a festive vibe to graduations, parties, or any special moment that calls for a sweet nod.
- Crowd-Pleaser: Kids, adults, and even the picky eaters can’t resist these fudgy delights topped with a touch of fun.
- Unbelievably Delicious: That fudgy brownie texture paired with the crisp chocolate cap and a hint of vanilla icing is pure magic.
What sets this recipe apart is the little graduation cap detail—so simple yet so effective. I learned to make the caps by chopping dark chocolate into neat squares, then piping a tiny icing tassel. It’s a clever twist that transforms everyday brownies into a festive treat that feels personal. Plus, I’ve found using a good-quality cocoa powder (like Hershey’s Special Dark) really deepens the chocolate flavor without any fuss.
This recipe isn’t just another brownie—it’s the kind of bite that makes you pause, close your eyes, and savor a moment of celebration. Whether you’re hosting a graduation party or simply craving a sweet victory snack, these bites make the moment feel a little more special without the stress.
What Ingredients You Will Need
This recipe uses simple, wholesome ingredients to deliver bold chocolate flavor and a fudgy texture without any fuss. Most are pantry staples, and there’s room for easy swaps if needed.
- Unsalted butter (1/2 cup / 113g, melted) – Adds richness and keeps the brownies moist. I like using Land O Lakes for a clean buttery taste.
- Sugar (3/4 cup / 150g) – Regular granulated sugar works great here for that perfect balance of sweetness.
- Large eggs (2, room temperature) – These bind everything together and add moisture.
- Vanilla extract (1 tsp) – Adds warmth and depth to the chocolate flavor.
- All-purpose flour (1/2 cup / 65g) – Provides structure. For a gluten-free twist, swapping in almond flour works well.
- Cocoa powder (1/3 cup / 35g, unsweetened, preferably Dutch-process) – The star of the show for that rich chocolate taste. I recommend Hershey’s Special Dark for best results.
- Salt (1/4 tsp) – Balances sweetness and enhances flavor.
- Dark chocolate squares (about 24 pieces, roughly 1-inch squares) – For the graduation caps. You can chop a dark chocolate bar or use baking squares.
- Powdered sugar (1 cup / 120g) – For the icing tassels.
- Milk (1-2 tbsp / 15-30ml) – To thin the icing to the right consistency.
- Vanilla extract (1/2 tsp) – For the icing flavor.
If you want to add a pop of color for school colors, you can mix a tiny bit of food coloring into the icing. For a dairy-free alternative, swap the butter with coconut oil and the milk in the icing with almond or oat milk.
Equipment Needed
- Mixing bowls: A medium one for wet ingredients and a smaller one for dry is handy.
- Whisk or electric mixer: To combine ingredients smoothly. I usually just use a handheld whisk—less cleanup!
- 9×9-inch baking pan: For baking the brownies evenly. You can also use an 8×8-inch pan for thicker bites, just adjust baking time.
- Parchment paper: For lining the pan to prevent sticking and easy removal.
- Knife or chocolate chopper: To cut the chocolate into neat squares for the caps.
- Piping bag or zip-top bag: For icing the tassels. A toothpick can work too for tiny details.
- Cooling rack: To let the brownies cool thoroughly before decorating.
If you don’t have a piping bag, I’ve found that a simple plastic sandwich bag with a tiny corner snipped off does the trick perfectly for the icing tassels. Also, when I first started, I used a smaller pan and had to fudge the baking time, so sticking to the recommended size helps avoid under- or overbaking.
Preparation Method
- Preheat your oven to 350°F (175°C). Line a 9×9-inch (23×23 cm) baking pan with parchment paper, leaving some overhang for easy removal later. This usually takes about 10 minutes.
- Melt the butter: In a microwave-safe bowl, melt 1/2 cup (113g) unsalted butter until fully liquid—about 30 seconds to 1 minute. Let it cool slightly so it’s warm but not hot.
- Mix wet ingredients: In a medium bowl, whisk together the melted butter and 3/4 cup (150g) sugar until combined but don’t overbeat. Add 2 large eggs, one at a time, beating after each addition. Stir in 1 teaspoon vanilla extract.
- Combine dry ingredients: In a separate bowl, sift or whisk together 1/2 cup (65g) all-purpose flour, 1/3 cup (35g) unsweetened cocoa powder, and 1/4 teaspoon salt.
- Fold dry into wet: Gradually add the dry ingredients to the wet mixture, folding gently with a spatula just until combined. Avoid overmixing to keep the brownies fudgy.
- Pour and spread: Transfer the batter to the prepared pan and smooth the surface evenly. This takes about 1-2 minutes.
- Bake: Place in the oven and bake for 18-22 minutes. Start checking at 18 minutes by inserting a toothpick in the center—it should come out with a few moist crumbs but not wet batter.
- Cool completely: Remove from oven and let cool in the pan on a wire rack for at least 30 minutes. This step is key to making clean cuts later.
- Cut into squares: Use a sharp knife to cut the brownies into 1.5-inch (4 cm) squares. You should get about 24 pieces.
- Prepare the icing tassels: In a small bowl, whisk 1 cup (120g) powdered sugar with 1-2 tablespoons (15-30 ml) milk and 1/2 teaspoon vanilla extract until smooth and thick but pipeable. Transfer to a piping bag or zip-top bag.
- Assemble the caps: Place one dark chocolate square on top of each brownie bite. Pipe a small tassel from the icing on one corner of the chocolate square to mimic graduation caps.
- Set and serve: Let the icing firm up for 10-15 minutes before serving. You can refrigerate briefly to speed this up.
One tip from experience: if the chocolate squares are too thick, they can overpower the brownie texture, so aim for thin slices or small baking squares. Also, cooling the brownies completely before cutting and assembling helps prevent crumbly edges and messy frosting.
Cooking Tips & Techniques
Making the perfect graduation cap brownie bites isn’t just about following steps—it’s about the little tricks that make the difference. Here’s what I’ve learned:
- Use room temperature eggs: They blend better and give the batter a smooth, airy texture.
- Don’t overmix: Folding the dry into wet just until combined keeps your brownies tender and fudgy instead of cakey.
- Watch your baking time closely: Ovens vary, so start checking at 18 minutes. Overbaking dries out brownies, and underbaking leaves them gooey beyond what’s ideal for bite-size pieces.
- Chill your pan: If your kitchen is warm, you can pop the brownies in the fridge for 15 minutes before cutting. It firms them up and makes neater squares.
- Pipe practice: Before decorating the real brownies, try piping tassels on parchment to get comfortable with pressure and flow.
- Use a serrated knife: For cleaner cuts, a serrated knife is your friend, especially if the brownies are particularly fudgy.
I once tried rushing the cooling step (don’t do it), and the brownies fell apart when cutting. Learned the hard way that patience here pays off big time. Also, when I swapped plain cocoa for Dutch-process, the flavor deepened wonderfully. Little experiments like that make the recipe your own.
Variations & Adaptations
Want to switch things up? These brownie bites are easy to customize:
- Flavor twists: Add a teaspoon of espresso powder to the batter for a mocha kick. I tried this once for a friend who loves coffee, and it was a hit.
- Nutty crunch: Fold in 1/3 cup chopped toasted pecans or walnuts for texture variation.
- Gluten-free: Swap all-purpose flour with gluten-free 1-to-1 baking flour. I’ve used Bob’s Red Mill with success.
- Dairy-free: Replace butter with coconut oil and milk in the icing with almond milk for a vegan-friendly option.
- Seasonal colors: Tint the icing tassels with school colors or seasonal hues using natural food dyes.
For a fun twist, I once swapped the chocolate caps for mini sugar cookies cut into squares, which gave a softer top and was a fun surprise for the kids. You can also try melting white chocolate and drizzle it over the finished bites for a fancy look.
Serving & Storage Suggestions
These brownie bites shine best served at room temperature, letting the chocolate cap soften just slightly for that perfect bite. Arrange them on a festive platter lined with parchment or a colorful napkin to match the graduation theme.
Pair them with a cold glass of milk, a creamy vanilla sweet cream cold brew coffee from my favorite recipe, or even a scoop of vanilla ice cream for an extra treat. I find that pairing with a cold brew helps balance the rich chocolate and keeps things feeling fresh.
Store leftover bites in an airtight container at room temperature for up to 3 days or refrigerate for up to a week. If refrigerated, let them sit at room temp for 15 minutes before serving to bring back that fudgy softness.
For longer storage, freeze the bites (assembled) in a single layer on a baking sheet, then transfer to a sealed container for up to 3 months. Thaw overnight in the fridge and bring to room temperature before serving. The flavors actually deepen after a day or two, so if you’re prepping early, that’s a nice bonus.
Nutritional Information & Benefits
Estimated per bite (based on 24 servings):
| Calories | 110 |
|---|---|
| Fat | 6g |
| Carbohydrates | 14g |
| Sugar | 10g |
| Protein | 1.5g |
The recipe includes antioxidants from cocoa powder and a modest amount of protein from eggs. While indulgent, these bites can fit into a balanced diet especially when enjoyed in moderation during celebrations. For those with gluten sensitivity, the flour swap makes this accessible without losing the fudgy texture.
Personally, I appreciate that this recipe uses real ingredients and avoids artificial additives. It’s a treat that feels homemade and wholesome, matching well with a health-conscious but realistic lifestyle.
Conclusion
If you want a dessert that says “celebration” without the fuss, these perfect graduation cap brownie bites are your answer. They’re quick to make, look charmingly festive, and taste like the kind of treat you want to savor with friends and family.
Feel free to tweak the flavors or decorations based on your grad’s personality or party theme — that’s part of the fun. For me, these bites are more than just desserts. They’re little moments of joy and pride baked into chocolate squares.
So next time you hear “bring something sweet,” you know what to do. And if you want more crowd-pleasing homemade ideas, you might enjoy my cozy cheddar bay biscuits or the creamy vanilla sweet cream cold brew coffee recipe for a perfect pairing.
Happy celebrating—and happy baking!
FAQs About Graduation Cap Brownie Bites
Can I make these brownie bites ahead of time?
Yes! You can bake and assemble them a day in advance. Store in an airtight container at room temperature or refrigerate, then bring to room temp before serving.
What’s the best way to make neat chocolate squares for the caps?
Use a sharp knife to cut a dark chocolate bar into 1-inch squares. Chilling the chocolate briefly before cutting helps prevent melting and breakage.
Can I use a boxed brownie mix instead of making from scratch?
You can, but homemade gives better control over texture and flavor. If using a mix, choose a fudgy variety and reduce baking time slightly to keep bites moist.
How do I store leftover brownie bites?
Store in an airtight container at room temperature for up to 3 days or refrigerate for up to a week. They freeze well too for longer storage.
Can I customize the tassel colors for different school colors?
Absolutely! Just add a few drops of food coloring to the icing before piping to match any school or party theme.
Pin This Recipe!
Perfect Graduation Cap Brownie Bites

These quick and easy brownie bites feature a rich, fudgy center topped with a clever chocolate graduation cap and icing tassel, perfect for celebrations and last-minute treats.
- Prep Time: 10 minutes
- Cook Time: 18-22 minutes
- Total Time: 30-35 minutes
- Yield: 24 servings 1x
- Category: Dessert
- Cuisine: American
Ingredients
- 1/2 cup (113g) unsalted butter, melted
- 3/4 cup (150g) sugar
- 2 large eggs, room temperature
- 1 teaspoon vanilla extract
- 1/2 cup (65g) all-purpose flour
- 1/3 cup (35g) unsweetened cocoa powder, preferably Dutch-process
- 1/4 teaspoon salt
- About 24 dark chocolate squares (roughly 1-inch squares)
- 1 cup (120g) powdered sugar
- 1–2 tablespoons (15–30 ml) milk
- 1/2 teaspoon vanilla extract (for icing)
Instructions
- Preheat your oven to 350°F (175°C). Line a 9×9-inch baking pan with parchment paper, leaving some overhang for easy removal.
- Melt the butter in a microwave-safe bowl until fully liquid, about 30 seconds to 1 minute. Let it cool slightly.
- In a medium bowl, whisk together the melted butter and sugar until combined. Add eggs one at a time, beating after each addition. Stir in 1 teaspoon vanilla extract.
- In a separate bowl, sift or whisk together flour, cocoa powder, and salt.
- Gradually fold the dry ingredients into the wet mixture with a spatula just until combined. Avoid overmixing.
- Pour the batter into the prepared pan and smooth the surface evenly.
- Bake for 18-22 minutes, checking at 18 minutes with a toothpick; it should come out with a few moist crumbs but not wet batter.
- Remove from oven and cool completely in the pan on a wire rack for at least 30 minutes.
- Cut the brownies into 1.5-inch squares to yield about 24 pieces.
- Prepare the icing by whisking powdered sugar with milk and 1/2 teaspoon vanilla extract until smooth and pipeable. Transfer to a piping bag or zip-top bag.
- Place one dark chocolate square on top of each brownie bite. Pipe a small tassel of icing on one corner of the chocolate square to mimic graduation caps.
- Let the icing firm up for 10-15 minutes before serving. Refrigerate briefly to speed up if desired.
Notes
Use room temperature eggs for better batter texture. Avoid overmixing to keep brownies fudgy. Start checking baking at 18 minutes to avoid overbaking. Cool brownies completely before cutting and assembling for clean edges. Thin chocolate squares work best for caps. You can add food coloring to icing for custom tassel colors. For dairy-free, substitute butter with coconut oil and milk with almond or oat milk.
Nutrition
- Serving Size: 1 brownie bite (1.5-
- Calories: 110
- Sugar: 10
- Fat: 6
- Carbohydrates: 14
- Protein: 1.5
Keywords: brownie bites, graduation treats, chocolate brownies, quick dessert, celebration dessert, fudgy brownies, easy brownies