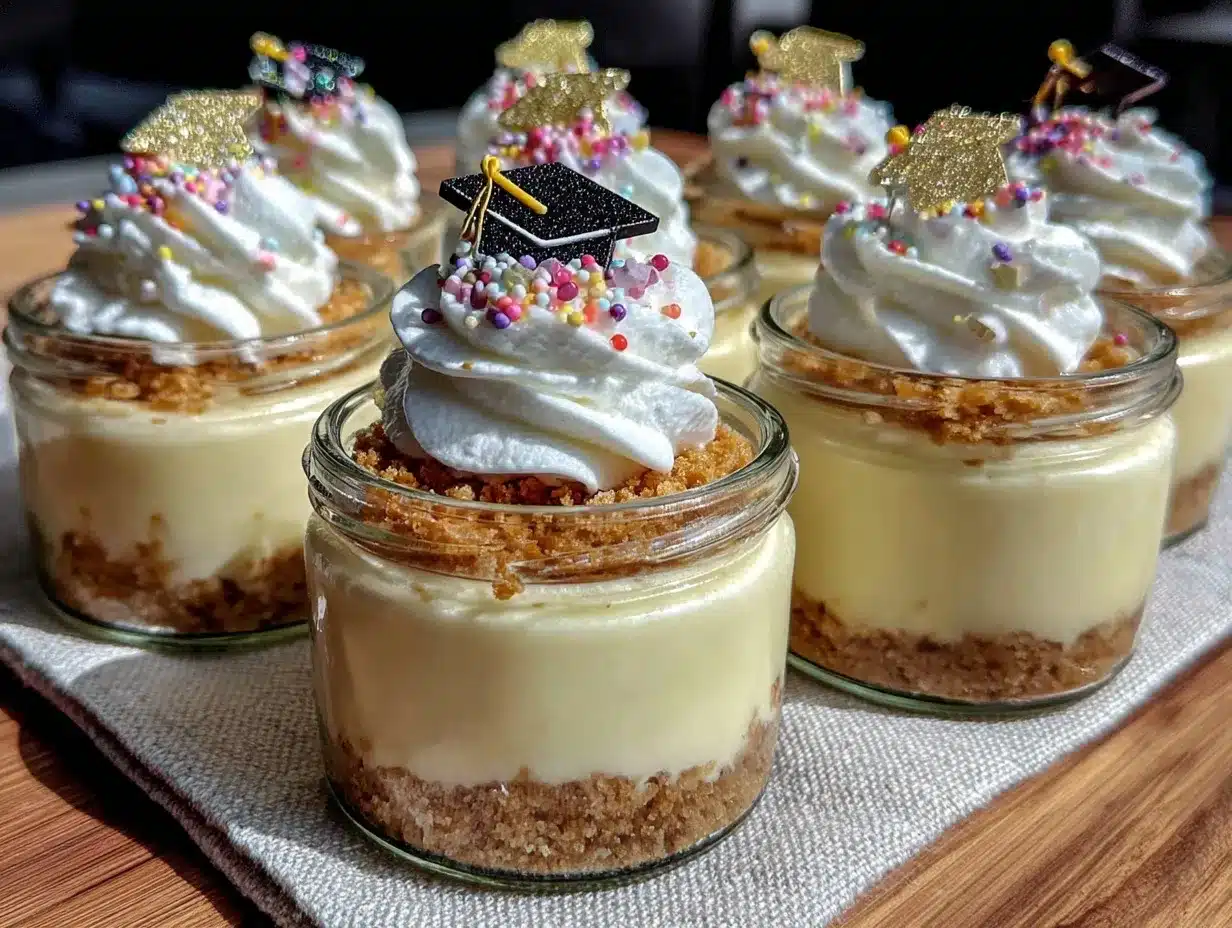
“Are you sure these are homemade?” my cousin asked, eyes wide as she lifted one of the tiny jars to her lips. Honestly, I hadn’t planned to make dessert that day — the graduation party was already swirling with enough chaos to make anyone’s head spin. But then I spotted those little mason jars hiding in the back of the pantry, and an idea sparked.
What started as a last-minute save turned into a delightful surprise. The cheesecakes, perfectly portioned and topped with fresh berries, quickly became the star of the afternoon. You know that feeling when something simple just clicks? Yeah, that. These mini graduation cheesecakes in jars weren’t just cute — they were creamy, rich, and exactly what everyone needed after hours of celebration and hugs.
My skepticism about making cheesecakes in such small containers faded as I saw the smiles and heard the requests for seconds. It was a quiet win in the middle of a busy day, a little moment of calm and sweetness. That’s why this recipe stuck with me — it’s not just a dessert, it’s a way to make celebrations feel a bit cozier, a bit more personal, and honestly, a lot more fun.
So, if you’re looking for a treat that’s easy to prep, lovely to look at, and perfect for sharing without the fuss, these mini cheesecakes in jars might just be your next go-to for any celebration — especially graduations.
Why You’ll Love This Recipe
After testing this recipe multiple times (yes, more than a few times in one week), I can confidently say it nails the balance between fuss-free and impressive. Here’s why it’s a keeper:
- Quick & Easy: Comes together in under 30 minutes of hands-on prep, leaving plenty of time to focus on the party itself.
- Simple Ingredients: No wild or hard-to-find items — just what you probably already have in your fridge and pantry.
- Perfect for Celebrations: Whether it’s graduation, birthdays, or any special occasion, these mini cheesecakes fit right in.
- Crowd-Pleaser: The creamy texture and sweet-tart berry topping get rave reviews from kids and adults alike.
- Unbelievably Delicious: The graham cracker crust adds a buttery crunch that pairs perfectly with the silky cheesecake filling.
This recipe isn’t just another cheesecake in a jar — it’s the one I trust to impress without stress. The secret? Whipping the cream cheese just right and adding a hint of vanilla that makes each bite melt in your mouth. Plus, serving them in jars means no slicing disasters, no messy plates, and a charming presentation that makes people smile. It’s the kind of dessert that makes you close your eyes after the first bite — pure comfort disguised in a fancy little package.
What Ingredients You Will Need
This recipe uses straightforward, wholesome ingredients to deliver bold flavor and a satisfyingly creamy texture without any drama. Most of these are pantry staples, making it easy to whip up whenever you need a quick celebration dessert.
- For the crust:
- 1 1/2 cups graham cracker crumbs (about 10 full sheets) — I prefer Honey Maid for the best texture
- 5 tablespoons unsalted butter, melted (adds richness and binds the crust)
- 2 tablespoons granulated sugar (balances the buttery crust)
- For the cheesecake filling:
- 16 oz (450g) cream cheese, softened (room temperature is key for smooth mixing)
- 1/2 cup granulated sugar
- 1 teaspoon pure vanilla extract (don’t skimp on the real stuff; it makes a difference)
- 2 large eggs, room temperature
- 1/2 cup sour cream (adds that tangy creaminess)
- For the topping:
- 1 cup fresh mixed berries (blueberries, raspberries, strawberries sliced) — in summer, swap in fresh local berries
- 2 tablespoons apricot jam (optional glaze for a shiny finish)
If you need a dairy-free option, swapping the cream cheese with a plant-based alternative works surprisingly well, and almond flour can replace graham crumbs for a gluten-free crust. I’ve tried both and they hold up nicely without losing too much of that classic cheesecake vibe.
Equipment Needed
- Mason jars or small glass jars with lids (4 to 6-ounce size) — clear jars make for a pretty presentation
- Mixing bowls (one large for the filling, one for the crust)
- Electric mixer or stand mixer (handheld works too but takes more elbow grease)
- Measuring cups and spoons (precision matters here!)
- Rubber spatula for scraping down bowl sides
- Baking sheet or roasting pan (for the water bath if you choose to bake the jars)
- Optional: small saucepan to warm jam glaze
If you don’t have a mixer, just make sure your cream cheese is super soft and be ready to stir a bit longer by hand. For a budget-friendly approach, repurposed jelly jars or baby food jars work in a pinch, but the classic mason jars really help with the aesthetic and ease of serving.
Preparation Method
- Preheat your oven to 325°F (160°C). This lower temperature helps prevent cracks in the cheesecake.
- Make the crust: In a medium bowl, combine 1 1/2 cups graham cracker crumbs, 5 tablespoons melted butter, and 2 tablespoons sugar. Mix until evenly moistened and the crumbs hold together when pressed.
- Fill each jar: Spoon about 2 tablespoons of the crust mixture into each jar. Press down firmly with the back of a spoon or your fingers to create an even, compact layer. This takes about 3 minutes.
- Prepare the filling: In a large bowl, beat 16 oz softened cream cheese with 1/2 cup sugar until smooth and creamy. This usually takes 2-3 minutes with an electric mixer.
- Add flavor: Mix in 1 teaspoon vanilla extract, then beat in 2 eggs one at a time, making sure each is fully incorporated before adding the next.
- Finish filling: Fold in 1/2 cup sour cream gently until just combined — overmixing can add air and cause cracks.
- Fill jars: Spoon the cheesecake filling over the crust in each jar, leaving a little space at the top (about 1/4 inch). The jars should be about 3/4 full.
- Bake in a water bath: Place jars in a baking pan and pour hot water halfway up the sides of the jars. This moist heat prevents cracking and keeps the texture silky. Bake for 35-40 minutes until the edges are set but the center still jiggles slightly.
- Cool and chill: Remove jars from the water bath carefully, let cool to room temperature, then refrigerate for at least 4 hours or overnight.
- Add topping: Before serving, gently warm 2 tablespoons apricot jam in a saucepan for about 30 seconds, brush over fresh berries, and spoon onto each cheesecake jar.
Pro tip: If you notice cracks forming, a quick fix is to smooth the top with a warm, damp knife. And don’t rush the chilling step — those hours in the fridge are what turn good into great.
Cooking Tips & Techniques
One thing I’ve learned the hard way (more than once) is that room temperature ingredients are non-negotiable here. Cold cream cheese or eggs make for lumpy batter, and nobody wants that. So, plan ahead and let them sit out for at least 30 minutes.
Also, a gentle water bath is your best friend in cheesecake baking. It keeps the oven environment moist and prevents that dreaded dry, cracked top. If you don’t have a roasting pan, a deep baking dish works just fine.
Another tip? Don’t overbake. The cheesecake should still have a slight wobble in the center when you pull it out. It firms up as it cools, so that jiggle is actually a good sign.
When pressing the crust into the jars, firm pressure helps avoid crumbly messes later on. I like to use the bottom of a shot glass for a nice even press.
Finally, layering the apricot glaze on berries adds a glossy, professional finish, but it’s optional if you want to keep things simple or avoid extra sugar.
Variations & Adaptations
- Chocolate swirl: Add 2 tablespoons melted dark chocolate to the cheesecake batter, swirling it gently before filling jars for a marbled effect.
- Berry compote topping: Instead of fresh berries, try a warm mixed berry compote made by simmering frozen berries with a bit of sugar and lemon zest.
- Nut crust: Swap graham crackers for crushed pecans or almonds mixed with a little coconut oil for a nutty twist.
- Dairy-free: Use vegan cream cheese and coconut yogurt in place of sour cream. Almond or oat milk can lighten the filling too.
- Mini tiramisu jars: Layer the cheesecake with espresso-soaked ladyfingers and dust with cocoa powder for an Italian-inspired version I once made for a friend’s graduation — it was a hit!
Serving & Storage Suggestions
These mini cheesecakes are best served chilled and straight from the fridge, but if you want a softer bite, let them sit out for 10 minutes before eating. The glass jars make for a charming individual presentation — perfect for passing around at a party without any mess.
Pair them with a fresh coffee like a creamy vanilla sweet cream cold brew to balance the richness, or serve alongside light finger foods like classic deviled eggs for a complete celebration spread.
Store leftovers tightly sealed in the fridge for up to 4 days. They also freeze well — just skip the fresh berries and glaze until serving. To reheat, thaw overnight in the fridge and brush on fresh topping before serving. Flavors deepen over time, making them even more enjoyable the next day.
Nutritional Information & Benefits
Each mini cheesecake jar roughly contains 250-300 calories depending on toppings. The cream cheese provides a good dose of protein and calcium, while the berries add antioxidants and fiber.
This dessert is naturally gluten-free if using gluten-free graham crackers or nut crust, and swapping ingredients can accommodate dairy-free or low-sugar diets. While indulgent, it’s a portion-controlled way to enjoy a classic treat without going overboard.
From a wellness perspective, I appreciate that these cheesecakes offer that comfort food satisfaction without the giant slice guilt. Perfect for celebrating milestones while keeping things balanced.
Conclusion
Perfect mini graduation cheesecakes in jars are more than just a recipe — they’re a little celebration in themselves. Easy to make, adorable to serve, and absolutely delicious, they’ve become my go-to whenever I want to impress without the stress.
Feel free to tweak the toppings or crust to match your taste or dietary needs. I love how versatile this recipe is — it invites creativity and personal flair while still delivering that classic cheesecake joy.
Next time you’re planning a gathering, big or small, these little jars of creamy happiness might just make your day a bit sweeter. And hey, if you try them, I’d love to hear how you make them your own!
FAQs about Mini Graduation Cheesecakes in Jars
Can I make these cheesecakes ahead of time?
Absolutely! Prepare and bake the jars a day or two in advance, keep them refrigerated, and add fresh toppings just before serving.
Do I have to bake the cheesecakes? Can they be no-bake?
While this recipe is baked for best texture, you can try a no-bake version using gelatin or whipped cream stabilizers, but the flavor and firmness will differ.
What size jars work best for this recipe?
4 to 6-ounce mason jars are ideal — they’re perfectly portioned and easy to handle at parties.
Can I freeze mini cheesecakes in jars?
Yes, freeze without the fresh berry topping and glaze. Thaw in the fridge overnight before serving and add fresh toppings.
What’s the best way to prevent cracks in the cheesecake?
Use room temperature ingredients, bake in a water bath, and avoid overmixing or overbaking. Cooling gradually also helps.
Pin This Recipe!
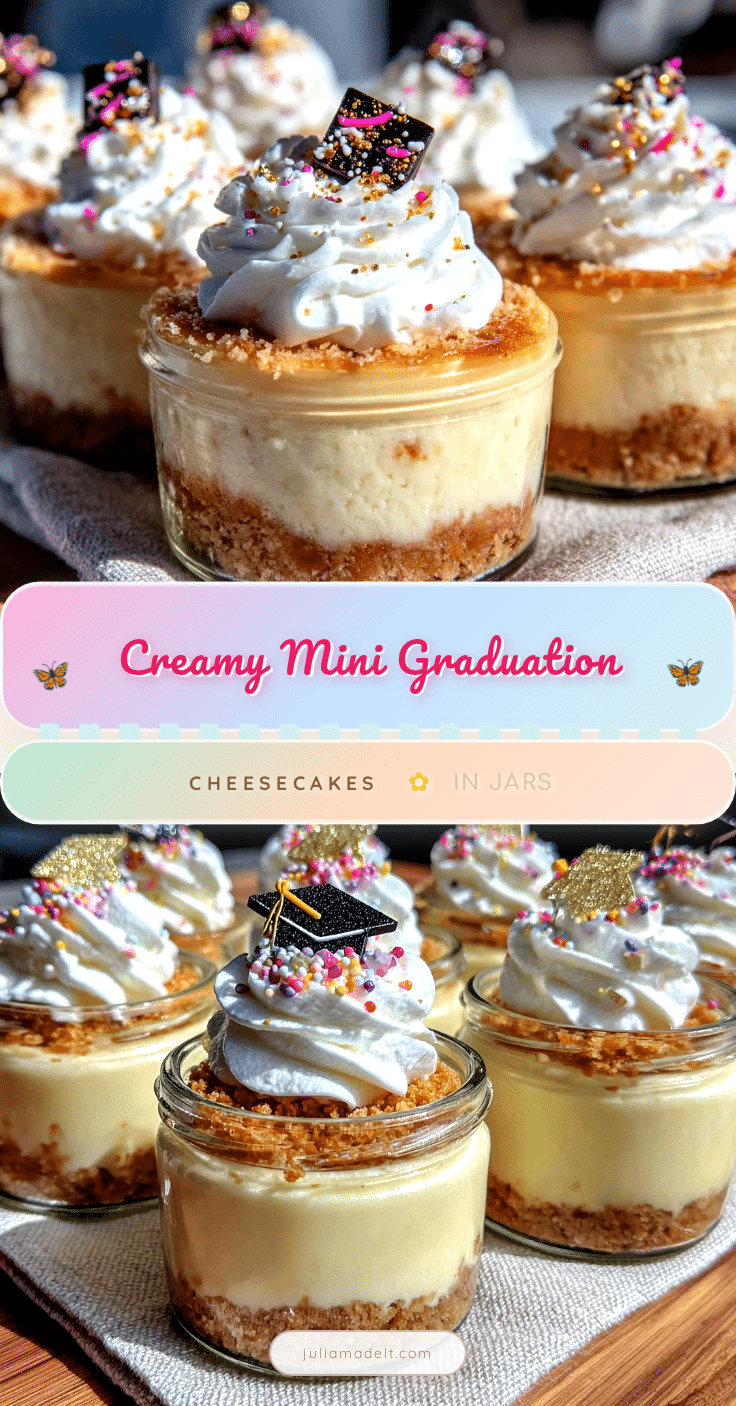
Perfect Mini Graduation Cheesecakes in Jars

These mini cheesecakes in jars are easy to prep, perfect for celebrations, and feature a creamy cheesecake filling with a buttery graham cracker crust topped with fresh berries and optional apricot glaze.
- Prep Time: 25 minutes
- Cook Time: 40 minutes
- Total Time: 5 hours 5 minutes
- Yield: 6 servings 1x
- Category: Dessert
- Cuisine: American
Ingredients
- 1 1/2 cups graham cracker crumbs (about 10 full sheets)
- 5 tablespoons unsalted butter, melted
- 2 tablespoons granulated sugar
- 16 oz (450g) cream cheese, softened
- 1/2 cup granulated sugar
- 1 teaspoon pure vanilla extract
- 2 large eggs, room temperature
- 1/2 cup sour cream
- 1 cup fresh mixed berries (blueberries, raspberries, sliced strawberries)
- 2 tablespoons apricot jam (optional glaze)
Instructions
- Preheat your oven to 325°F (160°C).
- In a medium bowl, combine graham cracker crumbs, melted butter, and sugar. Mix until evenly moistened and the crumbs hold together when pressed.
- Spoon about 2 tablespoons of the crust mixture into each jar. Press down firmly to create an even, compact layer.
- In a large bowl, beat softened cream cheese with sugar until smooth and creamy.
- Mix in vanilla extract, then beat in eggs one at a time, fully incorporating each before adding the next.
- Fold in sour cream gently until just combined.
- Spoon the cheesecake filling over the crust in each jar, filling about 3/4 full.
- Place jars in a baking pan and pour hot water halfway up the sides of the jars to create a water bath.
- Bake for 35-40 minutes until edges are set but center jiggles slightly.
- Remove jars from water bath, cool to room temperature, then refrigerate for at least 4 hours or overnight.
- Before serving, gently warm apricot jam and brush over fresh berries, then spoon berries onto each cheesecake jar.
Notes
Use room temperature ingredients to avoid lumps. Baking in a water bath prevents cracks and keeps texture silky. Do not overbake; cheesecake should have a slight wobble in the center when done. Press crust firmly to avoid crumbling. Apricot glaze on berries is optional but adds a glossy finish.
Nutrition
- Serving Size: One mini cheesecake
- Calories: 275
- Sugar: 16
- Sodium: 180
- Fat: 18
- Saturated Fat: 10
- Carbohydrates: 22
- Fiber: 2
- Protein: 5
Keywords: mini cheesecakes, cheesecake in jars, graduation dessert, easy cheesecake recipe, party dessert, individual cheesecakes