“Wait, you can ice a cookie to look like a cat?” my niece asked, peering over my shoulder as I squeezed the first black outline onto a sugar cookie. She was seven, so everything was still magic. But she wasn’t wrong.
That moment—standing in my kitchen with a bag of royal icing in one hand and a slightly lopsided cookie cutter in the other—is exactly how these Black Cat Halloween Sugar Cookies came to life. I had been testing Halloween cookie designs for weeks. Ghosts, pumpkins, spiderwebs. They were fine. But none of them had that spark, that thing that makes a kid (or, let’s be honest, an adult) stop scrolling and say, “I need to make those.”
Then I saw a black cat silhouette somewhere online, and it clicked. There’s something about a black cat, isn’t there? A little mysterious, a little playful, totally perfect for Halloween. I wanted to capture that energy in a cookie. Not too fussy, not too serious, just adorable enough that you’d feel bad biting its head off. (You get over it fast, though—they’re delicious.)
These cookies use a classic sugar cookie base that holds its shape beautifully, paired with a glossy royal icing that dries hard enough for stacking. The cat design looks complicated, but honestly? It’s mostly just outlines and flooding. If you can pipe a straight-ish line, you can make these. And the best part? They disappear faster than any pumpkin cookie I’ve ever made. I think that’s the magic of a black cat on a plate—it’s unexpected, it’s fun, and it tastes like butter and vanilla.
So whether you’re baking for a Halloween party, a school treat, or just because you want to sit alone with a batch of cookies and a cup of tea, these are the ones. They’re the recipe that turned me into the “cool aunt” for at least one afternoon. And that’s a pretty good legacy for a cookie.
Why You’ll Love This Recipe
I’ve tested a lot of sugar cookie recipes over the years. Some spread too much. Some taste like cardboard. Some look pretty but crack the second you try to ice them. These Black Cat Halloween Sugar Cookies are none of those things. Here’s why they work:
- No Spread, No Stress : The dough is sturdy enough to hold a sharp edge while baking. Your cat faces will look like cats, not blobs. I’ve learned the hard way that butter temperature and chill time matter here—so I’ve included all my best tricks to get it right the first time.
- Simple Ingredients : Butter, sugar, flour, eggs, vanilla. You probably already have everything in your pantry. No weird gums or specialty extracts. I tested this with both salted and unsalted butter, and both work fine—just adjust the added salt.
- Perfect for Halloween : Whether you’re making them for a costume party, a classroom treat, or just to leave out for the ghosts (they deserve snacks too), these cookies fit the vibe. They’re spooky but sweet, which is the whole point of Halloween baking.
- Crowd-Pleaser : I brought a batch to a friend’s Halloween get-together, and they were gone before the punch bowl was empty. Kids loved the cat faces. Adults loved the buttery crunch. Everyone loved that they didn’t taste like a prop.
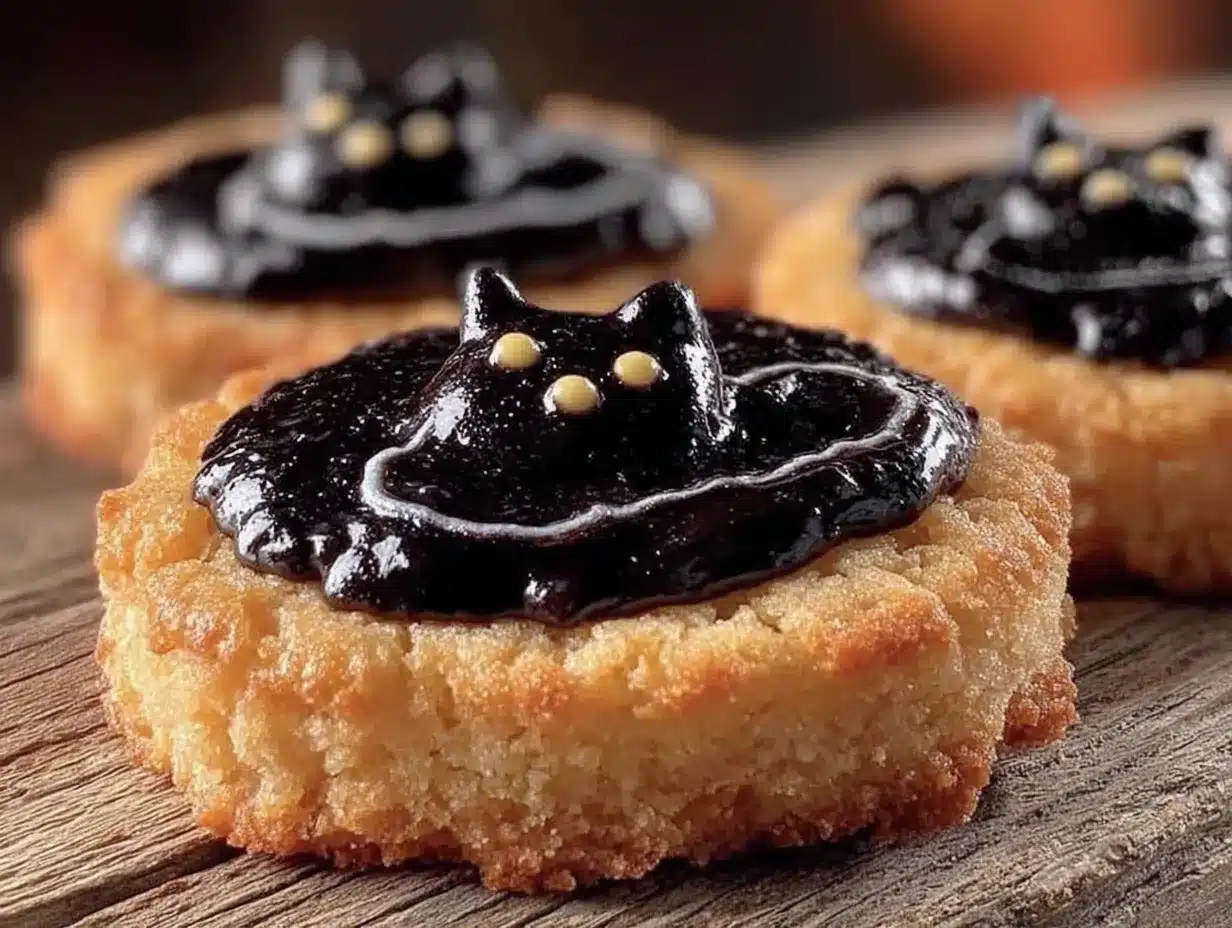
- Unbelievably Adorable : Let’s be real—you’re making these because they’re cute. And they are. The glossy black icing, the little yellow eyes, the tiny pink noses. They look like they jumped off a Halloween card and landed on your cookie sheet.
What makes these different from other sugar cookie recipes? It’s the balance. The dough is firm enough for detailed cutouts but tender enough to melt in your mouth. The royal icing is glossy but not runny, with a consistency that’s forgiving for beginners. I’ve included my exact icing thickness guide so you don’t end up with a puddle or a glue-like mess. These cookies are designed to look impressive without requiring a pastry degree. Trust me—if I can make a cat that looks like a cat, you can too.
What Ingredients You Will Need
This recipe uses simple, pantry-friendly ingredients to create cookies that taste as good as they look. Here’s everything you need, broken down by component.
For the Sugar Cookies
- Unsalted butter, 1 cup (2 sticks or 226g), softened to room temperature. I prefer unsalted so I can control the salt level. If you only have salted, reduce the added salt to ¼ teaspoon.
- Granulated sugar, 1 cup (200g). Regular white sugar gives these cookies a clean, crisp texture. No need for powdered sugar here—that changes the spread.
- Large egg, 1, at room temperature. Cold eggs can seize the butter mixture, so let yours sit out for 30 minutes before starting.
- Vanilla extract, 1½ teaspoons. Pure vanilla makes a difference. I use Nielsen-Massey for its rich flavor, but any good brand works.
- All-purpose flour, 2½ cups (312g), spooned and leveled. Don’t scoop directly from the bag—you’ll end up with too much flour and dry cookies. Spoon it into the measuring cup, then level with a knife.
- Baking powder, ½ teaspoon. This gives just enough lift without puffing the cookies into pillows.
- Salt, ½ teaspoon. Fine sea salt is best. It balances the sweetness and enhances the vanilla.
For the Royal Icing
- Powdered sugar, 4 cups (480g), sifted. Sifting is non-negotiable here. Lumps in powdered sugar become lumps in your icing, and nobody wants a lumpy cat nose.
- Meringue powder, 3 tablespoons. This stabilizes the icing and gives it that smooth, hard finish. I recommend Wilton brand—it’s reliable and available at most craft stores.
- Warm water, about 6-7 tablespoons. The exact amount depends on humidity and your powdered sugar. Start with 6, then add more a teaspoon at a time.
- Black gel food coloring, 1-2 teaspoons. Liquid coloring will thin the icing too much. Gel is concentrated and won’t affect consistency. I use Americolor Super Black—it’s incredibly dark with just a few drops.
- Yellow gel food coloring, for the eyes. A tiny amount goes a long way.
- Pink gel food coloring, for the noses. I like a soft, peachy pink rather than neon.
- White gel food coloring, optional, for highlights. A dot of white on the eyes makes the cats look alive.
Substitution Notes
If you’re dairy-free, you can substitute the butter with a high-quality vegan butter stick (not tub margarine). I’ve tested this with Earth Balance, and the cookies hold up well, though they’re slightly less tender. For a gluten-free version, use a 1:1 gluten-free baking flour blend that contains xanthan gum. I like Bob’s Red Mill for this recipe. The dough will be a bit softer, so chill it for an extra 30 minutes before rolling.
Equipment Needed
You don’t need a full bakery setup to make these Black Cat Halloween Sugar Cookies, but a few specific tools make the process much smoother.
- Cat-shaped cookie cutter : I used a 3-inch cat face cutter I found online. You can also use a simple round cutter and add ears by hand—just pinch the dough into points before baking. It’s rustic but charming.
- Rolling pin with thickness rings : These attach to your rolling pin and ensure the dough is evenly rolled to ¼-inch thick. Even thickness means even baking. If you don’t have rings, use two wooden dowels or chopsticks as guides.
- Piping bags : Small disposable piping bags are easiest for royal icing. I use 12-inch bags and snip a tiny tip off the end. No need for metal tips—a snipped bag works perfectly for outlines and flooding.
- Parchment paper or silicone baking mats : Parchment is my go-to. It prevents sticking without adding grease. Silicone mats work too, but cookies may spread slightly more.
- Baking sheets : Use light-colored, rimmed baking sheets. Dark sheets absorb more heat and can over-brown the bottoms of your cookies.
- Cooling rack : Cookies need to cool completely before icing. A wire rack speeds this up and prevents soggy bottoms.
- Small bowls and spoons : For dividing and coloring the icing. I use ramekins for small amounts of colored icing.
- Toothpicks : Essential for popping air bubbles in the icing and spreading it into tight corners.
If you don’t have a cat-shaped cutter, you can also use a pumpkin or bat cutter and adapt the icing design. The technique is the same—just adjust the face shapes. I’ve made these as ghost cats before by using a round cutter and piping ears. It’s all about having fun with it.
Preparation Method
Let’s get baking. This recipe makes about 24 cookies, depending on your cutter size. The process is broken into two main parts: the cookies and the icing. Plan for about 2 hours total, plus cooling and icing time.
Make the Cookie Dough
- In a large bowl, beat the softened butter and granulated sugar together with an electric mixer on medium speed until light and fluffy, about 3 minutes. Scrape the sides of the bowl halfway through. You want the mixture to look pale and airy—this is where the tenderness starts.
- Add the egg and vanilla extract, then beat on low until just combined. Don’t overmix here, or the dough can become tough. The mixture might look slightly curdled at this point—that’s fine.
- In a separate bowl, whisk together the flour, baking powder, and salt. Add the dry ingredients to the wet mixture in two additions, mixing on low speed after each. Stop as soon as the flour disappears. The dough should be soft but not sticky.
- Divide the dough in half, shape each half into a flat disk, and wrap tightly in plastic wrap. Refrigerate for at least 1 hour, or up to 3 days. Chilling is crucial—it prevents spreading and makes the dough easier to roll.
Roll and Cut the Cookies
- Preheat your oven to 350°F (175°C). Line two baking sheets with parchment paper.
- Lightly flour your work surface and rolling pin. Unwrap one disk of dough and roll it to ¼-inch thickness. If the dough cracks at the edges, let it sit at room temperature for 5 minutes to warm slightly.
- Dip your cookie cutter in flour to prevent sticking, then cut out as many cat faces as possible. Place them on the prepared baking sheets, spacing them about 2 inches apart. They don’t spread much, but a little breathing room helps.
- Gather the scraps, press them together gently (don’t knead), and re-roll once. The second roll will produce slightly less tender cookies, but they’re still delicious.
- Chill the cut cookies on the baking sheets for 15 minutes before baking. This extra chill locks in the shape. I’ve skipped this step before and ended up with oval cats—learn from my mistakes.
- Bake for 8-10 minutes, rotating the pans halfway through. The cookies should be set around the edges but still pale on top. They will firm up as they cool. Let them cool on the baking sheet for 5 minutes, then transfer to a wire rack to cool completely.
Prepare the Royal Icing
- In a large bowl, combine the sifted powdered sugar and meringue powder. Add 6 tablespoons of warm water and beat with an electric mixer on low speed until combined, then increase to medium-high and beat for 4-5 minutes. The icing should be thick, glossy, and hold a stiff peak when you lift the beater.
- Divide the icing into separate bowls. Color the largest portion black using the black gel food coloring. Start with ½ teaspoon, stir well, then add more until you reach your desired darkness. It will deepen slightly as it sits.
- Color small portions yellow and pink for the eyes and noses. Leave a small portion white for highlights, if using.
- Adjust the consistency of each colored icing for flooding. Add water ¼ teaspoon at a time until the icing flows off a spoon in a smooth ribbon and a dollop melts back into itself within 10 seconds. This is the “10-second consistency” that’s perfect for flooding. The black icing will need slightly more water than the others.
- Transfer each colored icing to a piping bag with a tiny snipped tip. For the black, snip a slightly larger opening for flooding. Keep the bags covered with a damp paper towel when not in use to prevent drying.
Decorate the Cookies
- Using the black icing with a small tip, pipe an outline around the edge of each cat face cookie. Follow the shape of the cutter—ears, cheeks, chin. Let the outlines dry for 10-15 minutes. This creates a dam to hold the flooded icing inside.
- Flood the inside of each cookie with the black icing. Use a toothpick to spread the icing into the ears and corners, and to pop any air bubbles. Work quickly but carefully—the icing sets fast.
- While the black icing is still wet, pipe two small yellow dots for the eyes and a tiny pink triangle or oval for the nose. The wet icing will help them settle in smoothly. If you want, add tiny white dots to the eyes for a cute, glossy look.
- Let the cookies dry completely, uncovered, at room temperature for 6-8 hours or overnight. The icing should be hard to the touch. Don’t stack them until fully dry, or you’ll smudge the faces.
Cooking Tips & Techniques
I’ve made these Black Cat Halloween Sugar Cookies at least a dozen times, and I’ve collected a few hard-won lessons along the way. Here’s what I wish someone had told me before I started.
Don’t skip the chill. I know it’s tempting to rush, but the dough needs that hour in the fridge. Without it, the butter is too soft, the cookies spread, and your cats end up looking like melted blobs. I once tried to speed things up by chilling the dough for only 20 minutes. The cookies spread into misshapen pancakes, and I spent an hour trying to carve cat faces out of the wreckage with a knife. It was not my finest baking moment.
Use a light hand with flour when rolling. Too much flour on the surface can dry out the dough and create a chalky texture. I dust my surface lightly, then add more only if the dough sticks. A silicone mat with measurement markings is my favorite tool for this—it helps me roll evenly without excess flour.
Test your icing consistency on a scrap cookie first. Before you start decorating the whole batch, pipe a small outline and flood it on a practice cookie. If the icing spreads too much and bleeds over the edge, add more powdered sugar. If it’s too stiff to spread smoothly, add a tiny drop of water. This five-minute test saves a lot of frustration.
Work in batches for the eyes and noses. Don’t try to pipe all the eyes at once, then all the noses. The black icing will start to set, and the features won’t sink in properly. Instead, decorate 4-5 cookies at a time: flood them, add the eyes and noses immediately, then move to the next batch. This keeps everything looking fresh and integrated.
If the icing dries out in the bag, add a drop of water and massage the bag gently. Royal icing can crust over quickly, especially in dry climates. Keep a damp paper towel over the open ends of your piping bags, and if the icing becomes too stiff to pipe, add a tiny amount of water and squeeze the bag a few times to rehydrate it.
Store decorated cookies in a single layer. Once the icing is fully dry (usually overnight), you can stack them with a sheet of parchment paper between layers. But honestly, I keep them in a single layer in an airtight container. They look prettier, and you don’t risk scratching the faces.
Variations & Adaptations
One of the best things about these Black Cat Halloween Sugar Cookies is how easy they are to customize. Here are a few ways to make them your own.
Spooky White Cats. Instead of black icing, use white gel food coloring to make ghost cats. Pipe the same cat face design but with white icing, then add black eyes and noses. They look like little spirits—perfect for a more ethereal Halloween vibe.
Pumpkin Patch Cats. Add a small pumpkin next to the cat face. After flooding the black cat, pipe a tiny orange pumpkin shape beside one ear. Add a green stem with a dot of green icing. It’s a cute twist that ties into fall themes.
Gluten-Free Version. Substitute the all-purpose flour with a 1:1 gluten-free baking flour blend that contains xanthan gum. The dough will be slightly softer, so chill it for an extra 30 minutes before rolling. The cookies won’t be quite as tender, but they’ll still taste great and hold their shape.
Vegan Adaptation. Use vegan butter sticks and a flax egg (1 tablespoon ground flaxseed mixed with 3 tablespoons water, let sit for 5 minutes). The dough will be a bit more delicate, so handle it gently. For the royal icing, use 3 tablespoons of aquafaba (the liquid from a can of chickpeas) instead of meringue powder and water. It works surprisingly well—just beat it until stiff peaks form before adding the powdered sugar.
Mini Cat Cookies. Use a smaller cat-shaped cutter (1-2 inches) for bite-sized treats. Reduce the baking time to 6-8 minutes. These are perfect for Halloween party favors or for packing in lunchboxes alongside a soft snickerdoodle cookie for a sweet contrast.
Flavor Twist. Add ½ teaspoon of almond extract along with the vanilla for a subtle nutty flavor that pairs beautifully with the buttery cookie base. Or add 1 tablespoon of cocoa powder to the dough for a chocolate version—though the black icing will hide it, the flavor will surprise and delight.
Serving & Storage Suggestions
These cookies are best served at room temperature, with the royal icing fully set and hard. Arrange them on a platter for Halloween parties, or package them in clear cellophane bags tied with orange or black ribbon for gifts. They make fantastic additions to a Halloween dessert table alongside a spiderweb brownie cheesecake for a truly spooky spread.
For a fun presentation, place the cookies on a black or orange cake stand. The contrast makes the cat faces pop. You can also scatter a few candy eyeballs or mini pumpkins around the platter for extra Halloween flair.
Storage: Store decorated cookies in an airtight container at room temperature for up to 2 weeks. The royal icing keeps them fresh and prevents them from going stale quickly. Do not refrigerate—the humidity can soften the icing and make it sticky. If you need to stack them, place a sheet of parchment paper between each layer, but be gentle; the icing is hard but can crack under pressure.
Freezing: You can freeze the undecorated baked cookies for up to 3 months. Wrap them tightly in plastic wrap and place them in a freezer-safe bag. When you’re ready to decorate, thaw them at room temperature for about an hour, then ice as directed. Do not freeze cookies after decorating—the icing will become brittle and may crack.
Reheating: These cookies don’t need reheating, but if you want a warm, soft cookie, pop one in a 300°F (150°C) oven for 3-4 minutes. The icing will soften slightly but won’t melt completely. Serve immediately with a glass of cold milk or a warm cup of tomato basil bisque for a cozy fall afternoon treat.
The flavor of these cookies actually improves after a day or two. The butter and vanilla meld together, and the royal icing sets into a perfect, snappy shell. If you can resist eating them all on day one, you’ll be rewarded on day two.
Nutritional Information & Benefits
Let’s be honest—these are sugar cookies with royal icing. They’re a treat, not a health food. But here’s the estimated nutritional breakdown per cookie (based on 24 cookies):
- Calories: 185
- Fat: 8g
- Carbohydrates: 27g
- Protein: 2g
- Sugar: 18g
- Sodium: 95mg
The butter provides a small amount of vitamin A, and the eggs add a touch of protein. But the real benefit here is the joy factor. Baking these cookies is a creative, relaxing activity that brings people together. Decorating them with kids or friends is a wonderful way to spend a fall afternoon. And sharing them—whether at a party, with coworkers, or as a surprise for a neighbor—creates connection.
If you’re looking for a slightly lighter option, you can reduce the sugar in the cookie dough by ¼ cup without affecting the texture too much. The royal icing is harder to reduce, since sugar is its structural base. But you can use less icing overall by piping thinner outlines and flooding with a lighter hand.
For those with dietary restrictions, the gluten-free and vegan variations above are excellent alternatives. Just note that the nutritional values will change with those substitutions.
Conclusion
These Black Cat Halloween Sugar Cookies have become my go-to Halloween treat for a reason. They’re adorable without being fussy, delicious without being complicated, and they always, always get a reaction. Whether you’re making them for a costume party, a school bake sale, or just to surprise your family on a crisp October evening, they deliver.
I love that each cookie has its own little personality. Some cats look grumpy. Some look surprised. Some look like they’re plotting something mischievous. That’s the beauty of hand-decorated cookies—they’re never perfect, and that’s what makes them perfect.
So go ahead and make a batch. Invite a friend over to ice them with you. Let your kids pipe lopsided eyes. Embrace the wobbly noses and the slightly smudged whiskers. These cookies are about having fun, celebrating the season, and eating something that tastes like butter and happiness.
If you make these, I’d love to hear about it. Drop a comment below with your best cat face design, or tag me in your photos. And if you’re looking for more Halloween baking inspiration, check out my witch finger cookies or mummy hot dogs for a savory-sweet combo that’s perfect for your Halloween spread.
Happy Halloween, and happy baking!
Frequently Asked Questions
Can I use a different cookie cutter shape?
Absolutely. While these instructions are written for a cat face cutter, you can use any shape you like—pumpkins, bats, ghosts, even simple circles. Just adjust the icing design to fit the shape. For round cookies, you can pipe cat ears directly onto the icing to create a cat face.
My royal icing is too runny. How do I fix it?
If your icing is too thin, add more sifted powdered sugar, one tablespoon at a time, and beat well. The icing should hold a ribbon that slowly melts back into itself. If it disappears immediately, it’s too thin. If it holds a stiff peak, it’s too thick. Adjust gradually until you reach that 10-second consistency.
Can I make the dough ahead of time?
Yes! The cookie dough can be refrigerated for up to 3 days or frozen for up to 3 months. If freezing, wrap the dough disks tightly in plastic wrap and place them in a freezer bag. Thaw in the refrigerator overnight before rolling and cutting.
Why did my cookies spread in the oven?
Spreading is usually caused by dough that’s too warm. Make sure you chill the dough for at least 1 hour before rolling, and chill the cut cookies on the baking sheet for 15 minutes before baking. Also, check that your butter was properly softened—if it was too soft, the dough will spread more.
How long do the decorated cookies last?
Stored in an airtight container at room temperature, decorated cookies will stay fresh for up to 2 weeks. The royal icing acts as a seal that keeps the cookies from going stale. Just make sure the icing is completely dry before storing, and keep them away from humidity.
Pin This Recipe!

Easy Black Cat Halloween Sugar Cookies with Royal Icing
These adorable black cat sugar cookies feature a buttery, tender sugar cookie base and glossy royal icing. They’re perfect for Halloween parties, school treats, or a fun baking project with kids.
- Prep Time: 1 hour 30 minutes
- Cook Time: 10 minutes
- Total Time: 2 hours (plus cooling and icing time)
- Yield: 24 cookies 1x
- Category: Dessert
- Cuisine: American
Ingredients
- 1 cup (2 sticks or 226g) unsalted butter, softened to room temperature
- 1 cup (200g) granulated sugar
- 1 large egg, at room temperature
- 1½ teaspoons vanilla extract
- 2½ cups (312g) all-purpose flour, spooned and leveled
- ½ teaspoon baking powder
- ½ teaspoon fine sea salt
- 4 cups (480g) powdered sugar, sifted
- 3 tablespoons meringue powder
- 6–7 tablespoons warm water
- 1–2 teaspoons black gel food coloring
- Yellow gel food coloring (for eyes)
- Pink gel food coloring (for noses)
- White gel food coloring (optional, for highlights)
Instructions
- In a large bowl, beat the softened butter and granulated sugar together with an electric mixer on medium speed until light and fluffy, about 3 minutes. Scrape the sides of the bowl halfway through.
- Add the egg and vanilla extract, then beat on low until just combined.
- In a separate bowl, whisk together the flour, baking powder, and salt. Add the dry ingredients to the wet mixture in two additions, mixing on low speed after each. Stop as soon as the flour disappears.
- Divide the dough in half, shape each half into a flat disk, and wrap tightly in plastic wrap. Refrigerate for at least 1 hour, or up to 3 days.
- Preheat your oven to 350°F (175°C). Line two baking sheets with parchment paper.
- Lightly flour your work surface and rolling pin. Unwrap one disk of dough and roll it to ¼-inch thickness.
- Dip your cookie cutter in flour to prevent sticking, then cut out as many cat faces as possible. Place them on the prepared baking sheets, spacing them about 2 inches apart.
- Gather the scraps, press them together gently, and re-roll once.
- Chill the cut cookies on the baking sheets for 15 minutes before baking.
- Bake for 8-10 minutes, rotating the pans halfway through. The cookies should be set around the edges but still pale on top. Let them cool on the baking sheet for 5 minutes, then transfer to a wire rack to cool completely.
- In a large bowl, combine the sifted powdered sugar and meringue powder. Add 6 tablespoons of warm water and beat with an electric mixer on low speed until combined, then increase to medium-high and beat for 4-5 minutes until thick, glossy, and holds a stiff peak.
- Divide the icing into separate bowls. Color the largest portion black using the black gel food coloring. Color small portions yellow and pink for the eyes and noses. Leave a small portion white for highlights, if using.
- Adjust the consistency of each colored icing for flooding. Add water ¼ teaspoon at a time until the icing flows off a spoon in a smooth ribbon and a dollop melts back into itself within 10 seconds.
- Transfer each colored icing to a piping bag with a tiny snipped tip. For the black, snip a slightly larger opening for flooding.
- Using the black icing with a small tip, pipe an outline around the edge of each cat face cookie. Let the outlines dry for 10-15 minutes.
- Flood the inside of each cookie with the black icing. Use a toothpick to spread the icing into the ears and corners, and to pop any air bubbles.
- While the black icing is still wet, pipe two small yellow dots for the eyes and a tiny pink triangle or oval for the nose. If desired, add tiny white dots to the eyes.
- Let the cookies dry completely, uncovered, at room temperature for 6-8 hours or overnight until the icing is hard to the touch.
Notes
Chill the dough for at least 1 hour to prevent spreading. For best results, chill cut cookies for 15 minutes before baking. Test icing consistency on a scrap cookie first. Work in batches of 4-5 cookies when adding eyes and noses to prevent the black icing from setting. Store decorated cookies in a single layer in an airtight container at room temperature for up to 2 weeks. Do not refrigerate.
Nutrition
- Serving Size: 1 cookie
- Calories: 185
- Sugar: 18
- Sodium: 95
- Fat: 8
- Saturated Fat: 5
- Carbohydrates: 27
- Protein: 2
Keywords: Halloween cookies, sugar cookies, black cat cookies, royal icing, Halloween baking, easy cookies, decorated cookies