My husband did not trust pork in the Instant Pot. He said it would be dry, tough, or worse—some sort of sad, pressurized boot leather. And honestly, I could not blame him. We had been burned before by other recipes promising “fall-apart tender” meat that came out tasting more like boiled shoe. So when I told him I was making apple cider braised pork for a Sunday dinner, he just raised an eyebrow and asked if we had takeout menus handy.
I had been testing this recipe for weeks. The first attempt was way too sour—too much cider, not enough balance. The second one was better, but the pork still had that weird pressure-cooker chewiness that I hate. But the third time? Something clicked. I added a splash of real maple syrup, let the pork rest in the pot for a full ten minutes after cooking, and suddenly the meat was doing that thing where it just surrenders under a fork. My husband took one bite and went quiet for a second. Then he asked for the recipe.
That is the moment I knew this one was a keeper. It is not just another Instant Pot recipe—it is the kind of meal that changes your mind about what a pressure cooker can actually do. The apple cider does not just flavor the pork; it tenderizes it, creating a broth that is sweet, tangy, and rich all at once. You get that deep, slow-cooked taste in a fraction of the time. And honestly? It is the kind of dinner that makes a Sunday feel like a Sunday, even if you started it at 4 PM.
So if you have ever been skeptical about making pork in the Instant Pot, I get it. I was too. But this recipe might just convert you.
Why You’ll Love This Recipe
This isn’t just another pork recipe you will forget about by Tuesday. It is the one you will actually look forward to making again. Here is why it stands out:
- Quick & Easy: From start to finish, this comes together in about an hour. No babysitting a pot on the stove for hours. The Instant Pot does all the heavy lifting while you get on with your day.
- Simple Ingredients: You likely already have most of these in your pantry—apple cider, garlic, onion, a few herbs. No hunting down weird specialty items at three different stores.
- Perfect for Fall Gatherings: This is the kind of dish you bring to a Friendsgiving, a cozy Sunday dinner, or a weeknight meal that needs to feel special. It pairs beautifully with so many sides.
- Crowd-Pleaser: I have served this to picky eaters, pork skeptics, and even my mother-in-law, who is famously hard to impress. Every single person asked for seconds.
- Unbelievably Tender: The apple cider does something magical here. It breaks down the meat without making it mushy. You get shreds that are juicy, not stringy.
What makes this recipe different from all the other braised pork recipes out there is the balance. Most versions are either too sweet or too savory. This one hits that perfect middle ground where the apple cider adds a subtle fruitiness without making it taste like dessert. And the technique—letting the pork rest in the pot after cooking—is the trick that keeps it from drying out. It is a small step, but it makes all the difference.
Honestly, this is the kind of recipe that makes you feel like you actually know what you are doing in the kitchen. It is comfort food that delivers every single time.
What Ingredients You Will Need
This recipe uses simple, wholesome ingredients that work together to create something truly special. Most are pantry staples, and the ones that are not are easy to find at any grocery store.
- Pork shoulder (3-4 pounds): Also called pork butt. This cut is perfect for braising because it has enough fat to stay moist during the pressure cooking. Look for one with good marbling. If you can find it, I prefer the brand Smithfield for consistent quality, but any store brand works fine. Trim off any large pieces of excess fat, but leave some—it adds flavor.
- Apple cider (2 cups): Not apple cider vinegar. Look for fresh, unfiltered apple cider in the refrigerated section. The cloudy kind is best. I usually grab a bottle from Martinelli’s if I am feeling fancy, but the store brand works just as well. Avoid apple juice—it is too sweet and lacks the tangy depth.
- Chicken broth (1 cup): Low-sodium is best so you can control the salt. I use Swanson or Kitchen Basics. You can also use vegetable broth if that is what you have on hand.
- Yellow onion (1 large): Diced. This adds a savory base that balances the sweetness of the apple cider. A sweet onion like Vidalia works too, but yellow onion is my go-to for its mild but present flavor.
- Garlic cloves (4-5): Minced. Fresh garlic is non-negotiable here. The jarred stuff just does not deliver the same punch.
- Maple syrup (2 tablespoons): Real maple syrup, not pancake syrup. This adds a subtle sweetness that rounds out the acidity of the cider. I like Maple Grove Farms for a reasonably priced option.
- Apple cider vinegar (1 tablespoon): Just a splash to brighten everything up. It sounds counterintuitive to add vinegar when you are already using cider, but trust me—it cuts through the richness.
- Dijon mustard (1 tablespoon): This adds a subtle tang and helps thicken the sauce slightly. I use Grey Poupon, but any brand works.
- Fresh thyme (4-5 sprigs): Or 1 teaspoon dried. Thyme and apple are a classic pairing. If you only have dried, add it at the beginning with the other spices.
- Bay leaves (2): These add an earthy, floral note that you cannot quite pinpoint but would miss if it were gone.
- Salt and black pepper: To taste. I use about 1 teaspoon of salt and ½ teaspoon of pepper, but adjust based on your preference.
- Olive oil (2 tablespoons): For searing the pork. Avocado oil works too if that is what you have.
Substitution Guidance: If you are avoiding pork, you can use a beef chuck roast instead—just increase the cooking time to 75 minutes. For a gluten-free option, this recipe is naturally gluten-free as long as you check your broth. And if you do not have apple cider, you can substitute with a mix of apple juice and a splash of lemon juice, though the flavor will be slightly less complex.
Equipment Needed
You do not need a ton of fancy tools for this recipe, which is part of what makes it so approachable. Here is what you will need:
- Instant Pot (6-quart or larger): This is the star of the show. A 6-quart is perfect for a 3-4 pound pork shoulder. If you have an 8-quart, it works just as well. I use a Duo Plus, but any model with a pressure cook function will do.
- Cutting board and sharp knife: For trimming the pork and dicing the onion. A good chef’s knife makes this step so much easier.
- Measuring cups and spoons: For accurate measurements. I cannot stress this enough—braising is forgiving, but measuring helps you get consistent results every time.
- Tongs: For flipping the pork during searing. Metal tongs with a good grip are best.
- Wooden spoon or spatula: For scraping up the browned bits from the bottom of the pot after searing. Those bits are pure flavor.
- Two forks: For shredding the pork once it is cooked. A pair of sturdy forks works better than a single fork.
- Fat separator (optional but helpful): If you want to skim the excess fat off the cooking liquid before serving. A gravy skimmer works too.
If you do not have a fat separator, do not worry—you can just let the liquid sit for a few minutes and spoon off the fat that rises to the top. And if you are using a different pressure cooker brand, the cooking time should be the same, just make sure you follow your model’s instructions for natural release.
Preparation Method
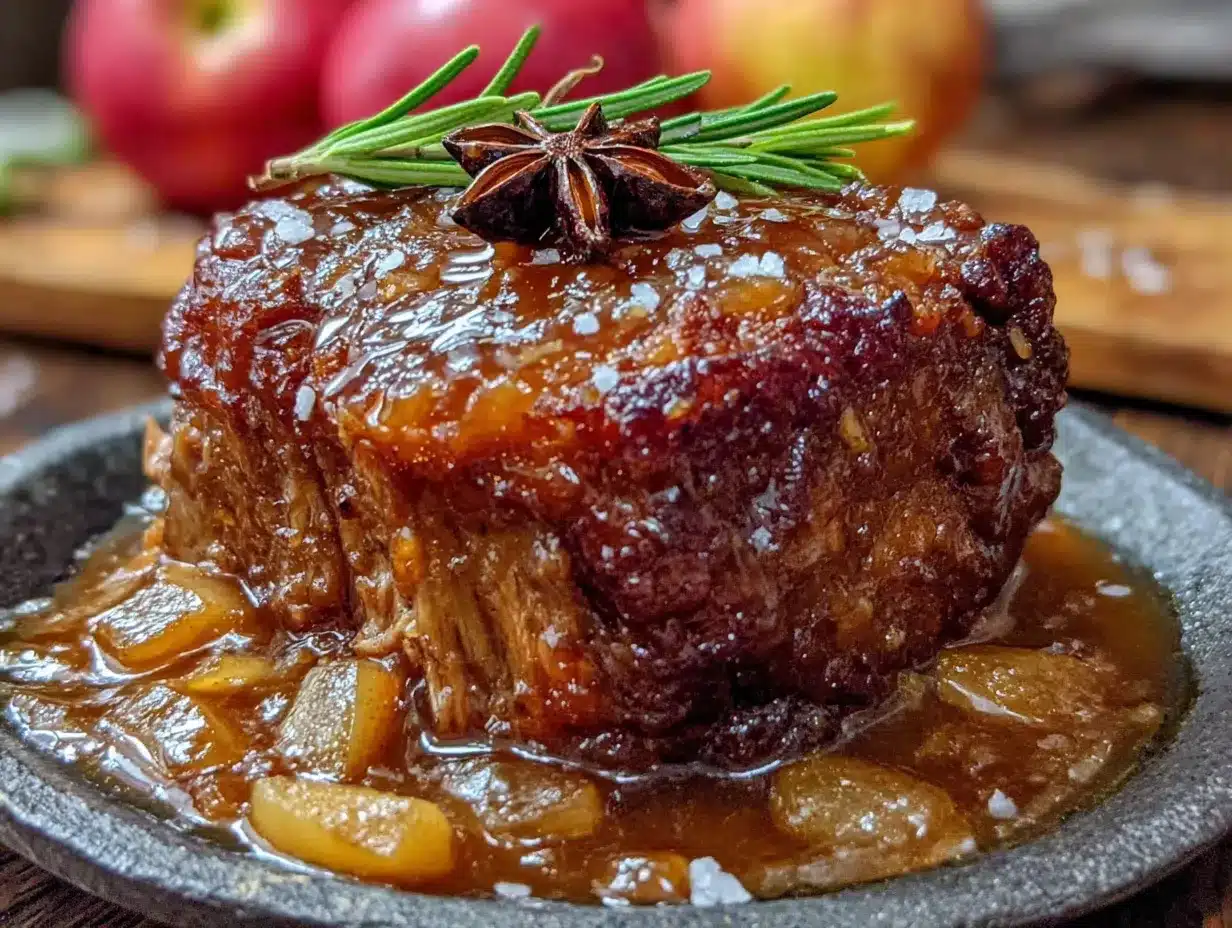
Alright, let’s get cooking. This is easier than you think, and each step builds on the last to create something truly delicious.
- Prep the pork: Pat the pork shoulder dry with paper towels. This is important—if it is wet, it will not sear properly. Cut it into 3-4 large chunks, about 2-3 inches each. Season generously with salt and black pepper on all sides. Let it sit at room temperature for about 15 minutes while you prep the other ingredients.
- Sear the pork: Turn your Instant Pot to the “Sauté” function and set it to “High.” Add the olive oil and let it heat up until it shimmers—about 2 minutes. Carefully place the pork chunks in the pot in a single layer. Do not overcrowd; you may need to do this in two batches. Sear each side for 3-4 minutes until deeply browned. The pork should release easily from the pot when it is ready to flip. If it sticks, give it another minute. Transfer the seared pork to a plate and set aside.
- Sauté the aromatics: Reduce the heat to “Sauté” on “Normal.” Add the diced onion to the pot and cook for 3-4 minutes, stirring occasionally, until it softens and starts to turn translucent. Add the minced garlic and cook for another 30 seconds until fragrant. Do not let the garlic burn—it will turn bitter.
- Deglaze the pot: Pour in about ½ cup of the apple cider and use your wooden spoon to scrape up all the browned bits from the bottom of the pot. This is where so much flavor lives. Let it simmer for about a minute, then add the remaining apple cider, chicken broth, maple syrup, apple cider vinegar, Dijon mustard, thyme sprigs, and bay leaves. Stir everything together.
- Return the pork: Place the seared pork chunks back into the pot, nestling them into the liquid. They should be mostly submerged—if not, add a little more broth or water. Do not worry if they are not fully covered; the pressure cooker will handle it.
- Pressure cook: Close the lid and set the valve to “Sealing.” Cook on “Manual” or “Pressure Cook” (High) for 60 minutes. Yes, a full hour. For larger chunks or a tougher cut, you can go up to 70 minutes, but 60 is usually perfect for a 3-4 pound shoulder.
- Natural release: Once the cooking time is up, let the pressure release naturally for at least 15 minutes. Do not quick release—this is crucial. The natural release allows the meat to relax and reabsorb some of the juices. After 15 minutes, you can carefully turn the valve to release any remaining steam.
- Shred the pork: Open the lid and use two forks to shred the pork right in the pot. It should fall apart with almost no effort. Remove the thyme sprigs and bay leaves and discard them.
- Thicken the sauce (optional): If you want a thicker sauce, turn the Instant Pot back to “Sauté” and let the liquid simmer for 5-7 minutes until it reduces slightly. You can also mix 1 tablespoon of cornstarch with 2 tablespoons of cold water and stir it in for a quicker thickener.
- Serve: Taste the sauce and adjust salt and pepper if needed. Serve the pork with a generous ladle of the cooking liquid over the top.
Pro tip: The pork will look a little pale when you first open the pot—do not panic. Once you shred it and toss it in the sauce, it will darken up beautifully. And do not skip the natural release. I learned the hard way that quick releasing makes the meat tough.
Cooking Tips & Techniques
I have made this recipe more times than I can count, and I have definitely made my share of mistakes along the way. Here are the lessons I learned so you do not have to:
- Do not skip the sear: I know it is tempting to just throw everything in the pot and let the pressure cooker do the work. But that browning step adds layers of flavor you simply cannot get any other way. The Maillard reaction is real, and it is your friend.
- Watch your liquid levels: The Instant Pot needs at least 1 cup of liquid to come to pressure, but too much liquid will make the meat watery. The 2 cups of cider plus 1 cup of broth is the sweet spot. I have tried adding more, and the sauce ends up too thin.
- Let it rest: After the natural release, let the pork sit in the liquid for another 5 minutes before shredding. This extra rest time lets the juices redistribute. I once got impatient and shredded immediately—the meat was fine, but not as juicy.
- Trim fat, but not all of it: Pork shoulder has a decent amount of fat. Trim off the big chunks, but leave some marbling. That fat renders during cooking and keeps the meat moist. If you trim too much, the pork can end up dry.
- Use a fat separator if you can: The cooking liquid is delicious, but it can be greasy. If you have a fat separator, use it. If not, let the liquid sit for a few minutes and spoon off the top layer of fat. It is a small step that makes a big difference in the final dish.
One mistake I made early on was using cheap apple cider that was mostly sugar water. The pork came out sweet in a cloying way, not the balanced kind of sweet you want. Spend the extra dollar on good cider—it is worth it.
Variations & Adaptations
This recipe is a great base, but do not be afraid to make it your own. Here are some ways I have tweaked it over the years:
- Spicy Version: Add 2-3 chipotle peppers in adobo sauce along with the broth. The smoky heat pairs surprisingly well with the apple cider. I did this once on a whim and it was a hit with my spice-loving friends.
- Herb Swap: If you do not have thyme, try rosemary or sage. Rosemary is a bit stronger, so use just 2 sprigs. Sage adds an earthy, almost peppery note that works beautifully with pork.
- Sweetener Swap: Instead of maple syrup, use honey or brown sugar. Honey will give a slightly floral sweetness, while brown sugar adds a deeper, molasses-like flavor. I have used both and honestly, they are all good—just different.
- Slow Cooker Adaptation: If you do not have an Instant Pot, you can make this in a slow cooker. Sear the pork and sauté the aromatics on the stove first, then transfer everything to the slow cooker and cook on low for 8 hours or high for 4-5 hours. The flavor will be slightly different—less concentrated—but still delicious.
- Gluten-Free: This recipe is naturally gluten-free as long as you use a gluten-free broth. Double-check your Dijon mustard too, though most brands are safe.
My personal favorite variation is adding a cinnamon stick and a star anise to the pot during cooking. It gives the pork a warm, almost spiced undertone that is incredible in the fall. I tried it one year for a Friendsgiving and it was the first dish to disappear.
Serving & Storage Suggestions
This pork is incredibly versatile. Here is how I like to serve it and how to store leftovers:
- Serving Temperature: Serve the pork hot, right after shredding. The sauce should be warm and ladled generously over the meat. If it cools down, just reheat it gently on the stove or in the microwave.
- Presentation: Pile the shredded pork on a platter and drizzle some of the cooking liquid over the top. Garnish with fresh thyme leaves or a sprinkle of chopped parsley for color. It is rustic, not fussy, and that is part of its charm.
- What to Serve With It: This pork is amazing over mashed potatoes, egg noodles, or creamy polenta. It also works great on a crusty roll for sandwiches. For a lighter option, serve it over a bed of arugula or with a fresh smashed cucumber salad on the side. The acidity of the salad cuts through the richness of the pork beautifully.
- Storage: Store leftover pork in an airtight container in the refrigerator for up to 4 days. The flavors actually deepen as it sits, so leftovers are often even better the next day. If you have extra cooking liquid, store it separately or pour it over the pork to keep it moist.
- Freezing: This pork freezes wonderfully. Let it cool completely, then transfer to a freezer-safe bag or container. Squeeze out as much air as possible and freeze for up to 3 months. To reheat, thaw in the refrigerator overnight and warm gently on the stove or in the microwave. Add a splash of broth or water if the sauce seems dry.
One thing I love about this recipe is how the flavors develop over time. The second day, the pork is even more infused with the apple cider and herbs. I often make a double batch just so I have leftovers for lunches.
Nutritional Information & Benefits
This is comfort food, but it is not without its nutritional perks. Here is a rough breakdown per serving (based on 8 servings):
- Calories: Approximately 350-400 per serving
- Protein: 30-35 grams
- Fat: 20-25 grams (varies based on trimming)
- Carbohydrates: 12-15 grams
- Sugar: 8-10 grams (mostly from the apple cider and maple syrup)
- Sodium: 500-700 mg (depends on broth and added salt)
Health Benefits: Pork shoulder is a good source of protein, B vitamins (especially B12 and B6), and minerals like zinc and selenium. Apple cider contains antioxidants and may help with digestion. The garlic and onions in this recipe are also known for their immune-supporting properties. Is this a health food? No. But it is a balanced meal that fits into a healthy diet when paired with vegetables or a whole grain.
Dietary Considerations: This recipe is naturally gluten-free and dairy-free. If you are watching your sodium, use low-sodium broth and go easy on the added salt. The apple cider adds sweetness without refined sugar, making it a better option than many braised dishes.
Personally, I love that this recipe feels indulgent without being over the top. It is the kind of meal that satisfies a craving without leaving you feeling heavy or sluggish.
Conclusion
This apple cider braised pork is the kind of recipe that makes you look forward to dinner all day. It is tender, flavorful, and surprisingly simple to pull off. Whether you are making it for a special occasion or just a regular Tuesday night, it delivers every single time.
I love how customizable it is—you can tweak the herbs, adjust the sweetness, or even turn it into tacos the next day. It is a recipe that grows with you. And honestly, it is the one that finally convinced my husband to trust the Instant Pot. That alone makes it a winner in my book.
If you try this recipe, I would love to hear how it turns out. Leave a comment below and let me know what variations you tried, or tag me in your photos on social media. And if you are looking for more cozy fall recipes, do not miss my cozy brown butter apple crisp or these tender crockpot pulled pork tacos for another great way to use pork.
Happy cooking, friends. I hope this recipe brings you as much joy as it has brought me.
Frequently Asked Questions
Can I use a different cut of pork for this recipe?
Yes, but with some adjustments. Pork shoulder is ideal because of its fat content. You can use pork loin, but it will be leaner and may dry out. Reduce the cooking time to 30-35 minutes and check for tenderness. Pork loin does not shred as easily, so you may want to slice it instead.
Do I need to use fresh apple cider or can I use apple juice?
Fresh apple cider is best because it has a tangy, complex flavor that apple juice lacks. Apple juice is much sweeter and more one-dimensional. If you only have apple juice, add a tablespoon of lemon juice to mimic the acidity of cider.
Can I make this recipe without an Instant Pot?
Absolutely. You can make it in a slow cooker or even a Dutch oven on the stove. For the slow cooker, sear the pork and sauté the aromatics first, then cook on low for 8 hours. For the Dutch oven, braise in the oven at 325°F for 2.5-3 hours, covered.
How do I prevent the pork from being dry?
The key is the natural release. Do not quick release the pressure—let it release naturally for at least 15 minutes. Also, make sure you are not overcooking the pork. 60 minutes on high pressure is perfect for a 3-4 pound shoulder. And do not trim all the fat; some fat is necessary for moisture.
Can I double this recipe?
Yes, but only if you have an 8-quart Instant Pot. A 6-quart pot can handle up to 4 pounds of pork comfortably. If you double the recipe, you may need to increase the cooking time to 70-75 minutes. Make sure the pork is submerged in liquid and do not fill the pot more than two-thirds full.
Pin This Recipe!

Easy Instant Pot Apple Cider Braised Pork

Tender, fall-apart pork shoulder braised in apple cider and herbs, made quickly in the Instant Pot. This recipe delivers deep, slow-cooked flavor in a fraction of the time, perfect for cozy dinners.
- Prep Time: 15 minutes
- Cook Time: 60 minutes
- Total Time: 1 hour 30 minutes
- Yield: 8 servings 1x
- Category: Main Course
- Cuisine: American
Ingredients
- 3–4 pounds pork shoulder (pork butt), trimmed and cut into 3-4 large chunks
- 2 cups apple cider (unfiltered, refrigerated)
- 1 cup low-sodium chicken broth
- 1 large yellow onion, diced
- 4–5 garlic cloves, minced
- 2 tablespoons real maple syrup
- 1 tablespoon apple cider vinegar
- 1 tablespoon Dijon mustard
- 4–5 sprigs fresh thyme (or 1 teaspoon dried)
- 2 bay leaves
- 1 teaspoon salt (or to taste)
- ½ teaspoon black pepper (or to taste)
- 2 tablespoons olive oil
Instructions
- Pat the pork shoulder dry with paper towels. Cut into 3-4 large chunks (2-3 inches each). Season generously with salt and black pepper on all sides. Let sit at room temperature for 15 minutes.
- Turn Instant Pot to ‘Sauté’ on High. Add olive oil and heat until shimmering (about 2 minutes). Sear pork chunks in a single layer (work in batches if needed) for 3-4 minutes per side until deeply browned. Transfer to a plate.
- Reduce heat to ‘Sauté’ on Normal. Add diced onion and cook 3-4 minutes until softened. Add minced garlic and cook 30 seconds until fragrant.
- Pour in ½ cup apple cider and scrape up browned bits from the bottom of the pot with a wooden spoon. Simmer 1 minute. Add remaining apple cider, chicken broth, maple syrup, apple cider vinegar, Dijon mustard, thyme sprigs, and bay leaves. Stir.
- Return seared pork to the pot, nestling into the liquid. Add more broth or water if needed to mostly submerge the meat.
- Close lid and set valve to ‘Sealing’. Cook on Manual/Pressure Cook (High) for 60 minutes.
- When cooking is done, let pressure release naturally for at least 15 minutes. Then carefully turn valve to release any remaining steam.
- Open lid. Remove thyme sprigs and bay leaves. Use two forks to shred the pork in the pot.
- Optional: For a thicker sauce, turn Instant Pot to ‘Sauté’ and simmer liquid 5-7 minutes to reduce. Or mix 1 tablespoon cornstarch with 2 tablespoons cold water and stir in.
- Taste and adjust salt and pepper. Serve pork with a generous ladle of cooking liquid.
Notes
Do not skip the natural release—it keeps the meat tender. Let the pork rest in the liquid for 5 minutes after shredding for extra juiciness. Good apple cider is key; avoid apple juice.
Nutrition
- Serving Size: 1 serving (about 1 c
- Calories: 375
- Sugar: 9
- Sodium: 600
- Fat: 22
- Saturated Fat: 7
- Carbohydrates: 14
- Fiber: 1
- Protein: 32
Keywords: Instant Pot pork, apple cider pork, braised pork, pressure cooker pork, fall dinner, easy pork recipe