I burned the bottom of my first batch of peanut butter granola bars three times before I figured out why no-bake bars could still go wrong. Honestly, I thought no-bake meant foolproof—just mix and chill, right? Nope. It turns out, the real trick is in the balance between sticky and dry ingredients, and the chill time is non-negotiable. For the longest time, I stuck with my slightly burnt edges because they tasted okay, but they were a pain to cut and even messier to eat.
One afternoon, while scrambling to pack snacks for a long road trip, I finally nailed the perfect chewy texture without a hint of burnt or crumbly bits. The smell of toasted oats mingled with warm peanut butter filled the kitchen, coaxing me to taste just one more piece (or three). It clicked that these bars aren’t just about convenience—they have to be satisfying, chewy, and hold together under pressure, literally and figuratively.
Making these bars became a quiet ritual, a way to reclaim control over snacks that don’t leave a sticky mess or a crumbled disaster in my bag. It’s kind of funny how a simple recipe taught me patience and precision, but that’s the truth. Now, even on rushed mornings, grabbing one of these chewy peanut butter granola bars feels like a small victory.
So, if you’ve ever wrestled with crumbly or rock-hard bars, you might find this recipe a little lifesaver. It’s exactly the kind of easy snack that sticks with you—in a good way.
Why You’ll Love This Recipe
Cooking these Easy Chewy No-Bake Peanut Butter Granola Bars felt like a mix of trial, error, and eventual triumph. After testing various ingredient ratios and chilling times, I found a sweet spot that works every single time. I want to share a few reasons why this recipe stands out from other granola bars you might have tried:
- Quick & Easy: Ready in under 20 minutes, plus chilling time, so it’s perfect for last-minute snack preps or when you just want something fast without turning on the oven.
- Simple Ingredients: You won’t need a specialty store run. Pantry staples like peanut butter, oats, and honey do the heavy lifting.
- Perfect for On-the-Go: These bars are great for school lunchboxes, hiking, or even a quick breakfast bite before a busy day.
- Crowd-Pleaser: The chewy texture and nutty flavor consistently get thumbs up from both kids and adults. (Even my picky nephew asked for seconds.)
- Unbelievably Delicious: The peanut butter flavor is front and center but balanced with just the right touch of sweetness and crunch from oats and mix-ins.
What makes these bars different? It’s the little details — like using natural peanut butter for a richer flavor and gently toasting the oats beforehand to sharpen their nuttiness. Plus, I’ve included a bit of vanilla and a pinch of salt to round out the flavors perfectly. This isn’t just another granola bar; it’s the kind of snack that makes you pause and savor that chewy, nutty goodness.
This recipe became my go-to when I wanted a fuss-free, wholesome snack without compromising taste or texture. It’s honestly one of those treats that feels homemade but demands zero baking skill. If you’re looking for a quick, reliable snack, these bars might just be your new best friend.
What Ingredients You Will Need
This recipe uses simple, wholesome ingredients to deliver bold flavor and satisfying texture without the fuss. Most ingredients are pantry staples, and you can easily swap a few to suit your preferences or dietary needs.
- Old-fashioned rolled oats (2 cups / 180g) – Toast these lightly for a deeper oat flavor. Avoid instant oats; rolled oats hold together better.
- Natural creamy peanut butter (1 cup / 250g) – I recommend brands like Smucker’s Natural or Justin’s for that authentic peanut flavor without excess sugar.
- Honey (½ cup / 170g) – Acts as the natural sweetener and binder. Feel free to substitute maple syrup if you want a vegan option.
- Light brown sugar (¼ cup / 50g) – Adds a mild caramel note and helps with chewiness.
- Vanilla extract (1 teaspoon) – A small addition that lifts the flavor profile.
- Salt (¼ teaspoon) – Balances the sweetness and enhances the peanut butter taste.
- Chopped nuts or seeds (optional, ½ cup / 60g) – Walnuts, almonds, or sunflower seeds add texture and nutrition.
- Mini chocolate chips (optional, ½ cup / 90g) – For a touch of indulgence that melts slightly into the bars.
If you want to make these gluten-free, just double-check that your oats are certified gluten-free. For a dairy-free or vegan twist, sub maple syrup for honey and skip any dairy-containing add-ins. I’ve also tried adding dried cranberries or raisins — they bring a pleasant chewiness and tartness that works well.
These ingredients come together to create a chewy bar that’s not too sticky or crumbly—exactly what you want from a grab-and-go snack.
Equipment Needed
- Mixing bowls: At least one large bowl to combine your ingredients comfortably.
- Wooden spoon or spatula: For mixing thick peanut butter and honey mixtures.
- Measuring cups and spoons: Accuracy here makes a difference in texture.
- Baking pan (8×8 inches / 20×20 cm): To press and set the bars. You can line it with parchment paper for easy removal.
- Stove or microwave: To gently warm the peanut butter, honey, and sugar mixture so everything blends smoothly.
- Optional: A baking sheet for toasting oats before mixing. I like using a rimmed sheet for even toasting without spillage.
You don’t need any fancy equipment here, which makes this a great beginner-friendly recipe. If you don’t have a baking pan, a glass or ceramic dish of similar size works fine. For cleanup, parchment paper lining is a lifesaver—trust me on that.
Preparation Method
- Toast the oats: Preheat your oven to 350°F (175°C). Spread 2 cups (180g) of rolled oats evenly on a rimmed baking sheet. Toast for about 8-10 minutes, stirring halfway until they smell nutty and are just lightly golden. This step boosts flavor and crunch. Let them cool completely before mixing.
- Prepare the binding mixture: In a medium saucepan, combine 1 cup (250g) natural peanut butter, ½ cup (170g) honey, and ¼ cup (50g) light brown sugar. Warm over low heat, stirring frequently, until the sugar dissolves and the mixture is smooth and glossy—about 3-4 minutes. Remove from heat and stir in 1 teaspoon vanilla extract and ¼ teaspoon salt.
- Mix dry ingredients: In a large bowl, combine the cooled toasted oats with any optional add-ins like ½ cup (60g) chopped nuts or ½ cup (90g) mini chocolate chips. Stir to blend evenly.
- Combine wet and dry: Pour the warm peanut butter mixture over the oats and mix quickly but thoroughly. Use a wooden spoon or spatula to fold and press the mixture together. It should be sticky but not too runny.
- Press into pan: Line an 8×8 inch (20×20 cm) baking pan with parchment paper, leaving some overhang for easy lifting. Transfer the mixture to the pan and press firmly with a spatula or your hands (lightly greased) into an even layer. Don’t skimp on pressing down—this helps bars hold together.
- Chill and set: Refrigerate the pan for at least 2 hours, preferably longer. This step is crucial for firm, chewy bars. Avoid rushing this part, or bars will be crumbly.
- Cut and serve: Once firm, lift the block out using the parchment overhang. Place on a cutting board and slice into 12 bars (about 2×3 inches / 5×7.5 cm each). Store extras in an airtight container in the fridge.
Watch out for overheating the peanut butter mixture—it shouldn’t boil or scorch. Stirring constantly helps prevent that. Also, pressing firmly into the pan can’t be overstated. I learned the hard way that loosely packed bars fall apart fast.
Cooking Tips & Techniques
Here are some tips that make these no-bake peanut butter granola bars a consistent hit:
- Toast oats carefully: Keep an eye on them so they don’t burn. Toasting adds depth but burnt oats are bitter.
- Use natural peanut butter: It’s less sweet and oily than commercial brands, which helps bars bind better without excess grease.
- Don’t skip chilling: It’s tempting to cut bars early, but chilling lets the mixture firm up so bars hold their shape.
- Press firmly: Use the bottom of a glass or your hands to compact the mixture; this prevents crumbling.
- Mix-ins: Adding nuts or chocolate chips can mess with texture if you add too much. Stick to about ½ cup total to keep bars cohesive.
- Timing multitasking: While oats toast, prep your wet ingredients. Saves time and keeps everything fresh.
I once tried using crunchy peanut butter, which made the bars too crumbly. Smooth is the way to go. Also, a light sprinkle of flaky sea salt on top before chilling adds a lovely contrast if you want to get fancy.
Variations & Adaptations
This recipe is pretty forgiving and easy to tweak. Here are a few ways to make it your own:
- Nut-free version: Swap peanut butter for sunflower seed butter to avoid nuts entirely.
- Chocolate lover’s twist: Stir in ¼ cup cocoa powder with the wet ingredients and add mini chocolate chips for a chocolaty punch.
- Fruit & nut mix: Add ½ cup chopped dried cranberries or raisins with your choice of nuts for a trail mix vibe.
- Protein boost: Mix in a scoop of your favorite protein powder to the wet ingredients for a post-workout snack.
- Seasonal swap: In warmer months, toss in chopped dried apricots or freeze-dried berries instead of chocolate chips.
Personally, I like swapping out honey for maple syrup in the fall when I’m craving richer, deeper flavors. It pairs nicely with cinnamon and a pinch of nutmeg stirred into the oats. If you want a vegan option, that’s the way to go.
Serving & Storage Suggestions
These granola bars are best served chilled or at room temperature. I find they hold together better straight from the fridge, especially on warm days. For a quick snack, pair them with a glass of milk or a cup of coffee for a satisfying pick-me-up.
If you’re packing these for lunch or hikes, wrap individual bars in parchment or beeswax wraps to keep them neat and portable. They hold up well in a backpack for several hours, but I wouldn’t leave them in direct sun—peanut butter gets melty.
Store leftovers in an airtight container in the refrigerator for up to a week. You can also freeze them for up to 3 months; just thaw at room temperature before eating. Over time, the flavors mellow and the bars get even chewier — kind of like a good cookie that’s been resting.
For a fun twist, serve bars broken into small pieces over yogurt or with fresh fruit, similar to the refreshing combo in my fresh watermelon cucumber feta salad. It’s a simple way to turn these bars into part of a light meal.
Nutritional Information & Benefits
Each bar (assuming 12 bars per batch) contains approximately:
| Nutrient | Amount |
|---|---|
| Calories | 180-200 kcal |
| Protein | 5g |
| Fat | 9g (mostly healthy fats from peanut butter) |
| Carbohydrates | 22g |
| Fiber | 3g |
| Sugar | 10g (from honey and brown sugar) |
Peanut butter provides heart-healthy monounsaturated fats and protein to keep you full longer. Oats are a great source of fiber and help with digestion. Using natural peanut butter and honey keeps added sugars to a minimum compared to packaged bars.
This recipe can fit into gluten-free and vegetarian diets easily—just check your oats if gluten is a concern. For those watching sugar intake, you can reduce the brown sugar slightly or swap honey for a lower-glycemic syrup.
From my experience, these bars make a balanced snack that satisfies cravings without the guilt. They’re a far better choice than many store-bought bars loaded with preservatives.
Conclusion
These Easy Chewy No-Bake Peanut Butter Granola Bars are the kind of simple recipe that wins you over with every bite. They’re straightforward to make, use everyday ingredients, and deliver that perfect chewy texture that’s surprisingly hard to get right—until now.
I love how adaptable this recipe is, letting you add your favorite mix-ins or switch things up based on what’s in your pantry. For me, it’s become a reliable snack that’s always ready when life gets hectic, yet it tastes homemade and thoughtful.
If you give these a try, I’d love to hear how you customize them or what your favorite add-ins are. Sharing your experience helps make this recipe better for everyone. Happy snacking!
Frequently Asked Questions
How long do no-bake granola bars last?
When stored in an airtight container in the refrigerator, these bars last up to one week. You can also freeze them for up to three months.
Can I use crunchy peanut butter instead of creamy?
You can, but the texture might be a bit more crumbly. Creamy peanut butter helps the bars stick together better.
Is there a vegan option for this recipe?
Yes! Replace honey with maple syrup or agave nectar, and make sure your mix-ins are vegan-friendly.
Can I add protein powder to these bars?
Absolutely. Adding a scoop of protein powder to the wet ingredients can boost protein content. Just be sure to adjust the liquid slightly if it gets too dry.
Why do my bars fall apart?
Common reasons include not pressing the mixture firmly into the pan or cutting the bars before they’ve fully chilled and set. Patience during the chilling step is key.
For a tasty dinner idea to pair with these snacks on a busy day, you might enjoy the flavorful cilantro lime grilled chicken drumsticks. And if you’re in the mood for a sweet treat later, the moist double chocolate chip zucchini bread is a wonderful homemade dessert option.
Pin This Recipe!

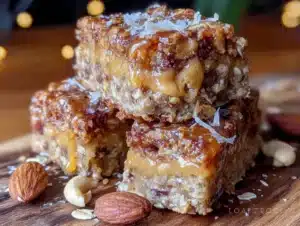
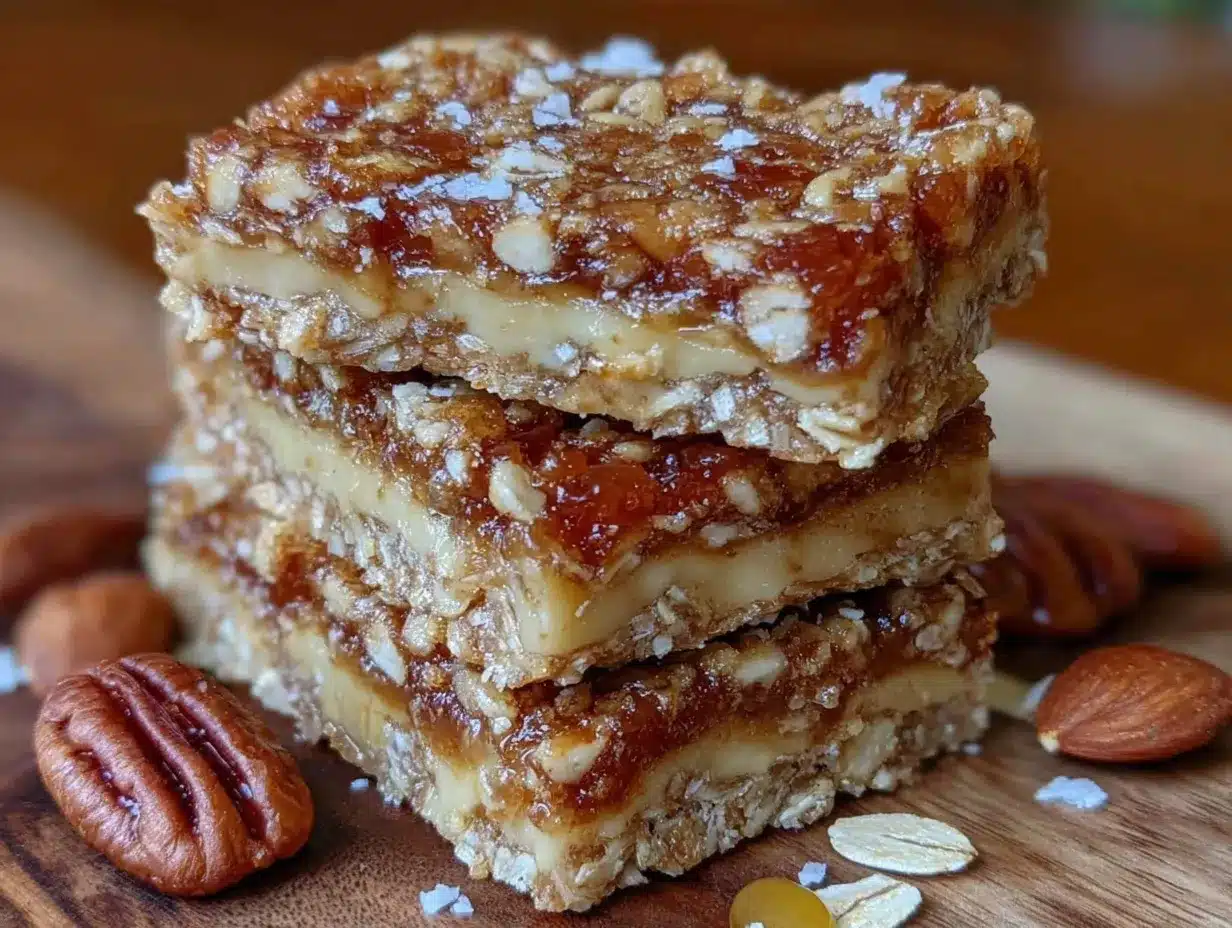
Easy Chewy No-Bake Peanut Butter Granola Bars
These no-bake granola bars are quick, easy, and perfect for on-the-go snacks. They have a chewy texture with a rich peanut butter flavor balanced by toasted oats and a touch of sweetness.
- Prep Time: 10 minutes
- Cook Time: 10 minutes
- Total Time: 2 hours 20 minutes
- Yield: 12 bars 1x
- Category: Snack
- Cuisine: American
Ingredients
- 2 cups (180g) old-fashioned rolled oats, toasted
- 1 cup (250g) natural creamy peanut butter
- ½ cup (170g) honey (or maple syrup for vegan option)
- ¼ cup (50g) light brown sugar
- 1 teaspoon vanilla extract
- ¼ teaspoon salt
- ½ cup (60g) chopped nuts or seeds (optional)
- ½ cup (90g) mini chocolate chips (optional)
Instructions
- Preheat oven to 350°F (175°C). Spread rolled oats evenly on a rimmed baking sheet and toast for 8-10 minutes, stirring halfway, until lightly golden and nutty. Let cool completely.
- In a medium saucepan, combine peanut butter, honey, and light brown sugar. Warm over low heat, stirring frequently until sugar dissolves and mixture is smooth and glossy (3-4 minutes). Remove from heat and stir in vanilla extract and salt.
- In a large bowl, combine cooled toasted oats with optional chopped nuts or chocolate chips. Stir to blend evenly.
- Pour warm peanut butter mixture over oats and mix quickly but thoroughly with a wooden spoon or spatula until sticky but not runny.
- Line an 8×8 inch (20×20 cm) baking pan with parchment paper, leaving overhang for easy lifting. Transfer mixture to pan and press firmly into an even layer.
- Refrigerate for at least 2 hours to set and firm up the bars.
- Lift the block out using parchment overhang and cut into 12 bars (about 2×3 inches each). Store extras in an airtight container in the refrigerator.
Notes
Do not overheat the peanut butter mixture to avoid scorching. Press the mixture firmly into the pan to prevent crumbling. Chill bars for at least 2 hours for best texture. Use natural creamy peanut butter for better binding. Optional add-ins should be limited to about ½ cup total to maintain bar cohesion. For vegan version, substitute honey with maple syrup and ensure mix-ins are vegan-friendly.
Nutrition
- Serving Size: 1 bar (about 2x3 inc
- Calories: 190
- Sugar: 10
- Sodium: 80
- Fat: 9
- Saturated Fat: 1.5
- Carbohydrates: 22
- Fiber: 3
- Protein: 5
Keywords: no-bake granola bars, peanut butter bars, chewy granola bars, quick snacks, easy granola bars, healthy snacks, peanut butter snack