“Mom, can you make those sandwiches with no crust again?” That little request hit me just as I was wiping flour off my hands from attempting yet another baking experiment. Honestly, I’d always thought those pre-packaged uncrustables were magical little things — perfect for lunches and snacks, and way too convenient to pass up. But one afternoon, with a jar of strawberry jam staring at me and some soft sandwich bread on the counter, I figured, why not try making them myself? No fancy tools, no mystery preservatives, just simple ingredients and a little kitchen patience.
What began as a casual “let’s see if this works” moment turned into a full-on obsession. I found myself making these easy homemade uncrustable sandwiches with strawberry jam multiple times in a week. The pure joy when I handed one off to my kiddo — perfectly sealed edges, jam safely tucked inside, no crumbly crust to fear — was a small but sweet victory. And honestly, it wasn’t just for the kids. I caught myself sneaking a couple with my afternoon tea. There’s something quietly comforting about biting into a soft, jammy pocket that feels like a hug from the inside.
Over time, I nailed down the best bread to use (soft, slightly fresh but not too fluffy), the perfect spread thickness, and a sealing technique that keeps the jam in place without making the sandwich soggy or messy. This recipe stuck because it’s simple, approachable, and nails that nostalgic feeling without the hassle or additives. You know, sometimes the easiest recipes bring the biggest smiles.
So if you’re looking for a no-fuss treat that’s kid-approved but also satisfies your sweet tooth, this homemade uncrustable sandwich recipe is a quiet little gem you’ll want to keep in your back pocket.
Why You’ll Love This Recipe
After testing and tweaking this easy homemade uncrustable sandwich recipe more times than I can count, here’s what makes it stand out:
- Quick & Easy: Takes less than 15 minutes from start to finish — perfect for rushed mornings or last-minute snack cravings.
- Simple Ingredients: Uses everyday staples like soft sandwich bread and your favorite strawberry jam, so no last-minute grocery runs.
- Perfect for Kids’ Lunchboxes: The no-crust design means less mess and more smiles at school or on the go.
- Crowd-Pleaser: Whether it’s a playdate or a casual family gathering, these sandwiches always disappear fast.
- Unbelievably Delicious: The soft bread and sweet strawberry jam pairing hits that nostalgic comfort food spot in a way store-bought versions just can’t match.
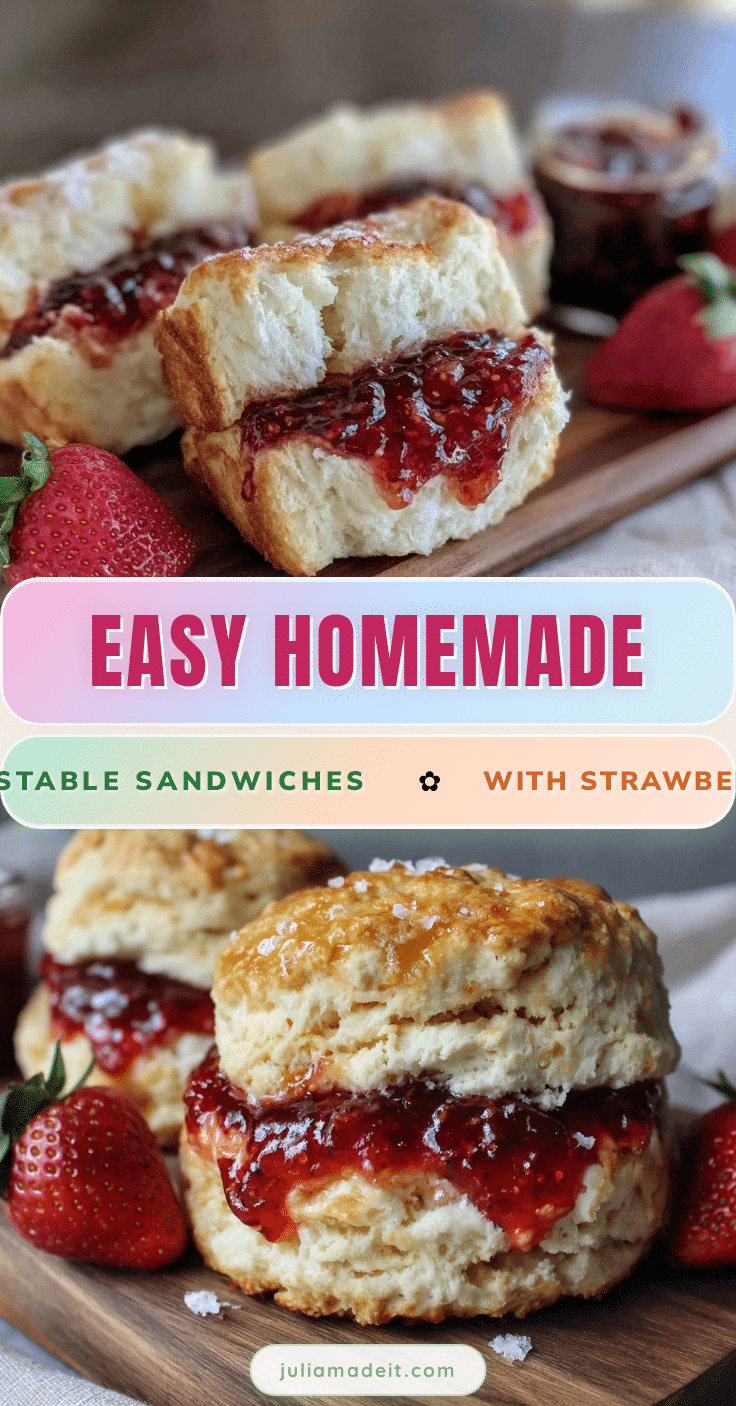
What really sets this recipe apart is the sealing technique I perfected — gently pressing the edges with a small round cutter to create a tight seal that keeps the jam from oozing out, which honestly was a game-changer for me. Plus, I recommend using a high-quality, all-fruit strawberry jam like Bonne Maman for that natural sweetness and just-right texture. It’s those little details that make it feel homemade and truly special.
This isn’t just another jam sandwich; it’s an easy way to make snack time feel thoughtful and fun without extra fuss. And if you’re curious about other quick and satisfying dishes, you might enjoy my quick creamy garlic butter shrimp linguine or these irresistible sopapilla cheesecake bars for a sweet finish after your snack session.
What Ingredients You Will Need
This easy homemade uncrustable sandwich recipe relies on a handful of simple, wholesome ingredients that come together for big flavor and texture — no fancy stuff needed.
- Soft Sandwich Bread: White or whole wheat, ideally fresh but slightly firm to hold the jam without tearing. I usually go for Nature’s Own or a similar brand for consistent softness.
- Strawberry Jam: Choose your favorite all-fruit jam or preserves. I recommend Bonne Maman Strawberry Preserves for a natural, sweet-tart balance.
- Butter or Cream Cheese (optional): Some like a thin layer of butter or cream cheese to add richness and to help prevent sogginess.
- Flour: Just a pinch for dusting your work surface and cutter edges to help with sealing.
While the jam is the star here, feel free to swap it for other flavors like grape, raspberry, or even honey for a different twist. For a dairy-free version, skip the butter or use a plant-based spread. The bread can also be substituted with gluten-free sandwich bread if needed — just choose a soft, pliable variety.
Equipment Needed
- Round Cookie Cutter or Glass: About 3 inches (7.5 cm) in diameter for cutting and sealing the sandwiches. A biscuit cutter works great.
- Rolling Pin (optional): To lightly flatten the bread slices for easier sealing, especially if your bread is very thick.
- Butter Knife or Small Spreader: For evenly spreading jam and optional butter or cream cheese.
- Baking Sheet or Plate: To place the prepared sandwiches before chilling or freezing.
- Parchment Paper or Plastic Wrap: For storing the sandwiches if freezing or packing.
If you don’t have a cookie cutter, a round drinking glass can double as one — just press firmly and twist gently to cut. I found that a proper cutter makes the process quicker and the edges seal better, but improvising works fine too. Keeping your tools clean and dry helps prevent tearing the bread while cutting.
Preparation Method

- Prepare Your Workspace (5 minutes): Lightly dust your countertop or cutting board with a pinch of flour to prevent sticking. Gather your bread, jam, and optional butter or cream cheese. If your bread is very thick, gently roll it flat with a rolling pin to about ¼ inch (6 mm) thickness for better sealing.
- Spread the Butter or Cream Cheese (optional) (2 minutes): On one slice of bread, spread a thin, even layer of softened butter or cream cheese. This little trick helps create a moisture barrier so the bread doesn’t get soggy from the jam.
- Apply the Strawberry Jam (3 minutes): On the other slice, spread about 1 tablespoon (15 ml) of strawberry jam evenly, leaving about ½ inch (1.3 cm) border around the edges. Don’t overload the jam — too much will cause leaks.
- Assemble the Sandwich (2 minutes): Place the jam-covered slice on top of the buttered slice (butter side down), aligning the edges carefully.
- Cut and Seal (5 minutes): Press the round cookie cutter firmly down through the sandwich, twisting slightly for a clean cut. Remove the excess bread around the edges. Then, press the cutter firmly along the edges again to seal the sandwich tightly. If you notice any gaps, gently pinch the bread edges together with your fingers.
- Chill or Freeze (optional, 10-15 minutes): For a firmer, easier-to-pack sandwich, place the uncrustables on a baking sheet lined with parchment paper and chill in the fridge or freezer until firm.
Tip: If the jam starts to squish out while sealing, wipe the cutter clean and lightly dust with flour before cutting the next sandwich. This little habit keeps edges neat and prevents sticking.
This method reliably makes sandwiches that hold together well. If you want to get creative, you can try a square cutter or even a fun shape for kids’ parties.
Cooking Tips & Techniques
Here are some lessons I picked up during my uncrustable sandwich trials that might save you from minor frustrations:
- Freshness Matters: Bread that’s too fresh and fluffy can tear easily. If your loaf is brand new and pillowy soft, try to gently compress it before assembling.
- Jam Thickness: Use a jam that’s not overly runny. Thicker jams or preserves keep the filling in place better and reduce sogginess.
- Seal Firmly: Pressing the edges twice with the cutter helps create a tight seal that won’t burst when packed or frozen.
- Dust Cutter with Flour: Keeps your edges clean and helps prevent bread from sticking to the cutter, which can rip the sandwich apart.
- Chill Before Packing: If you plan to pack these for lunchboxes, chilling or freezing them first makes handling easier and keeps the jam inside.
One time, I got a bit too generous with the jam and ended up with a sticky mess. Lesson learned: less is more! Also, I’ve found multitasking helps — prepare a batch of jam sandwiches while your high-protein smoothie bowls are chilling in the fridge for a quick, balanced snack combo.
Variations & Adaptations
Feel free to mix up this easy homemade uncrustable sandwich recipe to suit your taste or dietary needs:
- Flavor Swap: Replace strawberry jam with grape, raspberry, or even peanut butter and honey for a different flavor profile.
- Gluten-Free Option: Use gluten-free sandwich bread to make the recipe safe for gluten-sensitive eaters.
- Dairy-Free Version: Skip the butter or use a plant-based spread to keep it dairy-free and vegan-friendly.
- Frozen Fruit Filling: Mash fresh or frozen berries with a little honey for a fresh jam alternative.
- Fun Shapes for Parties: Use cookie cutters in shapes like stars or hearts to make snack time festive and exciting.
Once, I tried spreading a thin layer of almond butter underneath the jam — the combo was surprisingly delicious and added a subtle nutty richness. It’s a nice way to sneak in a little protein! For a handheld snack perfect for potlucks, these sandwiches fit right in and pair nicely with Mexican street corn esquites cups for a fun mix of sweet and savory bites.
Serving & Storage Suggestions
These easy homemade uncrustable sandwiches are best served chilled or at room temperature. They make a fantastic grab-and-go snack or lunchbox staple.
- Serving: Pack them in a lunchbox with some fresh fruit or carrot sticks for a balanced snack. They also pair well with a glass of cold milk or a cup of herbal tea.
- Storage: Wrap each sandwich tightly in plastic wrap or parchment paper to prevent drying out.
- Refrigeration: Store in the fridge for up to 3 days if you plan to eat them fresh.
- Freezing: Freeze wrapped sandwiches in an airtight container for up to 1 month. Thaw overnight in the fridge or for 30 minutes at room temperature before serving.
- Flavor Development: The jam flavor actually intensifies a bit after chilling, making the sandwiches even tastier the next day.
Nutritional Information & Benefits
Each easy homemade uncrustable sandwich with strawberry jam contains roughly:
| Nutrient | Amount (per sandwich) |
|---|---|
| Calories | 180-220 kcal |
| Carbohydrates | 30-35 g |
| Fat | 3-5 g (varies if butter/cream cheese used) |
| Protein | 4-6 g |
| Sugar | 10-15 g (from jam) |
The main ingredients are simple carbs and natural sugars, providing quick energy — perfect for active kids or a sweet afternoon pick-me-up. If using whole wheat or gluten-free bread, you gain extra fiber and nutrients. Choosing all-fruit jams adds antioxidants from berries, which is a nice bonus.
Keep in mind, this recipe contains gluten and may include dairy if butter or cream cheese is added. Adjust accordingly for allergies or preferences.
Conclusion
Easy homemade uncrustable sandwiches with strawberry jam have become a quiet favorite in my kitchen — a no-fuss snack that hits the nostalgic spot and works for all ages. The simple ingredients and straightforward method make it a reliable go-to when you want to whip up something both comforting and mess-free.
Whether you’re packing a lunchbox, preparing for a picnic, or just craving a quick sweet bite, this recipe adapts beautifully. I love how it offers a little homemade touch without feeling complicated. And honestly, watching the kids’ faces light up when they discover the crust-free goodness is a tiny joy I didn’t expect but deeply appreciate.
I’d love to hear how you customize your uncrustables or any fun twists you try — feel free to share your thoughts or questions below. Happy sandwich making!
Frequently Asked Questions
Can I use other types of bread for these sandwiches?
Absolutely! Soft sandwich bread works best, but you can use whole wheat, gluten-free, or even sandwich thins. Just make sure the bread isn’t too stale or too fresh and fluffy to avoid tearing.
How long can I store homemade uncrustable sandwiches?
They keep well in the fridge for up to 3 days wrapped tightly. For longer storage, freeze them for up to a month and thaw before eating.
Can I make these sandwiches with other fillings besides strawberry jam?
Yes! Grape, raspberry, peanut butter, or even honey are great substitutes. Just remember to use thicker spreads to avoid leaks.
Is it necessary to chill or freeze the sandwiches before packing?
Chilling helps the sandwiches firm up, making them easier to handle and less likely to squish or leak. It’s especially helpful if you’re packing them for school or travel.
Do I have to use a cookie cutter to make these sandwiches?
Not necessarily. A round glass or biscuit cutter works fine too. Just press firmly and twist gently to cut and seal the edges.
Pin This Recipe!
Easy Homemade Uncrustable Sandwiches with Strawberry Jam Recipe for Kids

A simple, no-fuss recipe for homemade uncrustable sandwiches filled with strawberry jam, perfect for kids’ lunchboxes and quick snacks.
- Prep Time: 10 minutes
- Cook Time: 0 minutes
- Total Time: 10-15 minutes
- Yield: 1 sandwich
- Category: Snack
- Cuisine: American
Ingredients
- Soft sandwich bread (white or whole wheat, slightly firm)
- Strawberry jam (all-fruit preserves recommended)
- Butter or cream cheese (optional, for moisture barrier)
- Flour (a pinch, for dusting work surface and cutter edges)
Instructions
- Lightly dust your countertop or cutting board with a pinch of flour to prevent sticking. Gather your bread, jam, and optional butter or cream cheese. If your bread is very thick, gently roll it flat with a rolling pin to about 1/4 inch thickness for better sealing.
- Spread a thin, even layer of softened butter or cream cheese on one slice of bread (optional).
- Spread about 1 tablespoon of strawberry jam evenly on the other slice, leaving about 1/2 inch border around the edges.
- Place the jam-covered slice on top of the buttered slice (butter side down), aligning the edges carefully.
- Press a round cookie cutter (about 3 inches diameter) firmly down through the sandwich, twisting slightly for a clean cut. Remove the excess bread around the edges.
- Press the cutter firmly along the edges again to seal the sandwich tightly. If there are any gaps, gently pinch the bread edges together with your fingers.
- Optionally, place the sandwiches on a baking sheet lined with parchment paper and chill in the fridge or freezer for 10-15 minutes to firm up before packing or serving.
Notes
Use slightly firm bread to avoid tearing. Dust cutter with flour between cuts to prevent sticking. Use thicker jams to reduce sogginess. Chilling sandwiches before packing helps them hold shape and prevents leaks. Butter or cream cheese layer helps prevent sogginess but is optional. Can substitute gluten-free bread and plant-based spreads for dietary needs.
Nutrition
- Serving Size: 1 sandwich
- Calories: 180220
- Sugar: 1015
- Fat: 35
- Carbohydrates: 3035
- Protein: 46
Keywords: uncrustable sandwiches, strawberry jam sandwich, kids lunchbox, no crust sandwich, homemade uncrustables, easy snack, jam sandwich