I figured a no-bake cheesecake bar would be a compromise—something that tasted okay but lacked that proper, dense, baked-in-the-oven texture. It took about one bite of this pumpkin version for that assumption to fall apart completely.
I was standing in my kitchen, spatula in hand, after sliding the pan into the fridge (not the oven, which felt almost rebellious). The layers were set, the cream cheese was silky, and the pumpkin had this deep, warm color that made the whole thing look like a little slice of autumn. I had planned to just taste-test the edge, you know, to make sure the crust held. But that first forkful? It was creamy, spiced just right, and had that satisfying snap of a buttery graham cracker base. No oven required, no water bath, no fuss.
That moment changed how I think about fall desserts. These easy no-bake pumpkin cheesecake bars are the real deal. They are rich without being heavy, sweet without being cloying, and they come together in a fraction of the time of a traditional cheesecake. Honestly, they might be better than the baked kind. And that is a realization I did not see coming.
Why You’ll Love This Recipe
Let me tell you why these bars have become my go-to for every fall gathering, from Thanksgiving to casual weeknight cravings. They are the kind of dessert that makes people close their eyes after the first bite—and then ask for the recipe before they finish the second.
- No Oven Required: Perfect for those days when your oven is occupied with a turkey or a skillet brown sugar peach cobbler, or when you just don’t want to turn it on. These bars set up beautifully in the fridge.
- Simple Ingredients: You probably have most of these in your pantry right now. No fancy extracts or hard-to-find spices—just classic pumpkin pie flavors and cream cheese.
- Perfect for Fall Gatherings: These bars are a showstopper on any dessert table. They slice cleanly, travel well, and everyone from kids to grandparents loves them.
- Crowd-Pleaser: I have brought these to potlucks and watched them disappear faster than the pumpkin pie. People cannot believe they are no-bake.
- Unbelievably Creamy: The texture is the real magic here. It is silky, smooth, and dense—exactly what you want from a cheesecake, but without the cracked tops or water bath anxiety.
What makes this recipe different from the rest? It is the balance. The pumpkin layer is spiced with cinnamon, ginger, and nutmeg, but it does not overpower the tangy cream cheese. The crust is buttery and stays crisp. And the whole thing comes together in under 30 minutes of active work. It is comfort food reimagined—faster, easier, but with the same soul-soothing satisfaction. Perfect for impressing guests without stress, or turning a simple Tuesday into something memorable.
What Ingredients You Will Need
This recipe uses simple, wholesome ingredients to deliver that bold pumpkin flavor and creamy texture without the fuss. Most of these are pantry staples, especially if you do any fall baking.
For the Graham Cracker Crust
- Graham cracker crumbs – 2 cups (about 16 full sheets, crushed). You can use store-bought crumbs to save time.
- Granulated sugar – ¼ cup, for a touch of sweetness in the base.
- Unsalted butter – ½ cup (1 stick), melted. I prefer salted butter in a pinch, just reduce the added salt elsewhere.
- Pinch of salt – A tiny pinch to balance the sweetness.
For the Pumpkin Cheesecake Layer
- Cream cheese – 16 ounces (two 8-ounce blocks), softened to room temperature. This is crucial for a smooth, lump-free filling. I recommend Philadelphia brand for the creamiest results.
- Granulated sugar – ¾ cup.
- Pumpkin puree – 1 cup (not pumpkin pie filling). Libby’s is my go-to for consistent texture and flavor.
- Heavy cream – ½ cup, for richness and that silky mouthfeel.
- Vanilla extract – 1 teaspoon, pure if you have it.
- Pumpkin pie spice – 2 teaspoons. You can make your own with 1 teaspoon cinnamon, ½ teaspoon ginger, ¼ teaspoon nutmeg, and ¼ teaspoon cloves.
- Cinnamon – ½ teaspoon, for extra warmth.
- Salt – ¼ teaspoon, to enhance all the flavors.
For the Whipped Topping (Optional but Recommended)
- Heavy cream – 1 cup, cold.
- Powdered sugar – 2 tablespoons.
- Vanilla extract – ½ teaspoon.
Substitution Guidance: For a gluten-free version, use gluten-free graham crackers or crushed gluten-free shortbread cookies. You can swap the heavy cream in the filling with full-fat coconut cream for a dairy-free option (just note the texture will be slightly less firm). If you do not have pumpkin pie spice, use a mix of cinnamon, ginger, nutmeg, and a tiny pinch of allspice.
Equipment Needed
You do not need much for these easy no-bake pumpkin cheesecake bars. That is part of the beauty.
- 9×9-inch baking pan – An 8×8-inch works too, your bars will just be a bit thicker. I prefer metal or glass for even chilling.
- Parchment paper – For lining the pan. This makes lifting the bars out a breeze. Leave some overhang on two sides.
- Mixing bowls – One medium for the crust, one large for the filling.
- Electric hand mixer or stand mixer – A hand mixer works perfectly. You need something to beat the cream cheese until smooth.
- Spatula – A rubber spatula for scraping down the bowl and spreading the layers evenly.
- Measuring cups and spoons – Standard set.
- Food processor or zip-top bag and rolling pin – For crushing graham crackers if you are not using pre-made crumbs. I honestly prefer the bag method—it is oddly satisfying and requires less cleanup.
That is it. No springform pan, no water bath, no candy thermometer. Just simple tools you already own.
Preparation Method
Let us walk through this step by step. I will include all the little details I have learned from making these bars more times than I can count.
Step 1: Prepare the Pan
Line your 9×9-inch baking pan with parchment paper. Leave about 2 inches of overhang on two opposite sides—these will be your handles later. Set the pan aside.
Step 2: Make the Crust
In a medium bowl, combine 2 cups of graham cracker crumbs, ¼ cup of granulated sugar, and a pinch of salt. Pour in ½ cup of melted butter and stir with a fork until the mixture looks like wet sand and holds together when you squeeze it. Press this mixture firmly into the bottom of your prepared pan. I use the bottom of a measuring cup to really pack it down—this prevents a crumbly crust later. Place the pan in the refrigerator while you make the filling.
Step 3: Beat the Cream Cheese
In a large mixing bowl, beat 16 ounces of softened cream cheese with an electric mixer on medium speed until it is completely smooth and fluffy. This takes about 2 minutes. Scrape down the sides of the bowl with a spatula. Do not skip this step—lumpy cream cheese makes for a lumpy filling.
Step 4: Add the Sugar and Spices
Add ¾ cup of granulated sugar, 2 teaspoons of pumpkin pie spice, ½ teaspoon of cinnamon, and ¼ teaspoon of salt. Beat on medium speed until everything is well combined and smooth, about 1 minute. Scrape the bowl again.
Step 5: Incorporate the Pumpkin and Cream
Add 1 cup of pumpkin puree, ½ cup of heavy cream, and 1 teaspoon of vanilla extract. Beat on low speed at first (so the pumpkin does not splash everywhere), then increase to medium and beat for about 1 minute until the mixture is uniform and silky. It should be a beautiful, pale orange color.
Step 6: Assemble the Bars
Remove the pan with the crust from the refrigerator. Pour the pumpkin cheesecake filling over the crust. Use your spatula to spread it evenly, all the way to the edges. Give the pan a gentle tap on the counter to release any air bubbles.
Step 7: Chill
Cover the pan with plastic wrap or aluminum foil and refrigerate for at least 6 hours, but overnight is best. I know, the waiting is the hardest part. But this chill time is essential for the bars to set up properly. They need to be firm enough to slice cleanly.
Step 8: Make the Whipped Topping (Optional)
Just before serving, pour 1 cup of cold heavy cream, 2 tablespoons of powdered sugar, and ½ teaspoon of vanilla extract into a chilled bowl. Beat with an electric mixer on medium-high speed until soft peaks form—about 2 to 3 minutes. Do not overbeat, or you will end up with butter.
Step 9: Slice and Serve
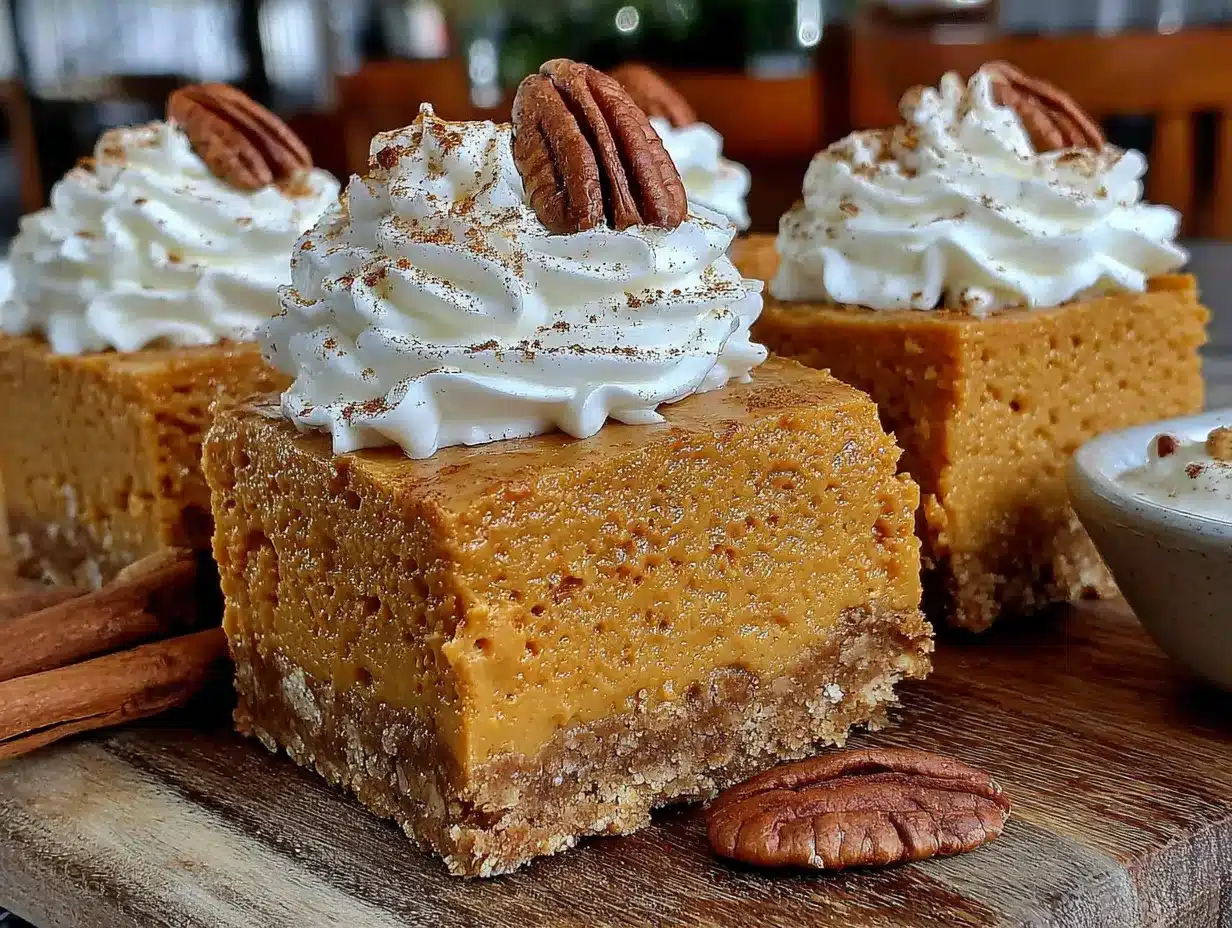
Once the bars are fully chilled and firm, use the parchment paper overhang to lift the entire block out of the pan. Place it on a cutting board. Use a sharp knife to slice into 9 or 16 squares (depending on how generous you are feeling). For clean slices, wipe the knife clean between cuts. Top each bar with a dollop of whipped cream and a dusting of cinnamon, if desired.
Cooking Tips & Techniques
Over the years, I have made a few mistakes with no-bake cheesecakes so you do not have to. Here is what I have learned.
- Room temperature cream cheese is non-negotiable. I know, it is tempting to use it straight from the fridge. But cold cream cheese will give you a lumpy filling no matter how long you beat it. Take it out of the fridge 30 to 60 minutes before you start.
- Do not overmix after adding the cream. Once you add the heavy cream, beat just until combined. Overmixing can incorporate too much air, which can cause the filling to be less dense and more mousse-like. We want that classic cheesecake density.
- Pack that crust. A loose crust is a sad crust. Really press it down firmly and evenly. I use the bottom of a flat measuring cup or a glass. This ensures the bars hold together when you slice them.
- Patience with the chill time. I once tried to rush this process and cut the bars after only 4 hours. They were a mess—soft, sticky, and they did not hold their shape. Six hours is the minimum. Overnight is the gold standard. Trust the process.
- For the cleanest slices, use a hot knife. Run your knife under hot water, wipe it dry, then slice. Repeat between each cut. This gives you those beautiful, Instagram-worthy edges.
Variations & Adaptations
This recipe is wonderfully flexible. Here are some ways I have changed it up depending on the occasion or what I have on hand.
- Gluten-Free: Use gluten-free graham crackers or crushed gluten-free shortbread cookies for the crust. The rest of the ingredients are naturally gluten-free.
- Dairy-Free: Use dairy-free cream cheese (I like Kite Hill or Violife) and full-fat coconut cream instead of heavy cream. The texture will be slightly softer, so I recommend chilling for a full 12 hours.
- Bourbon Pumpkin: Add 1 to 2 tablespoons of bourbon to the filling along with the vanilla. It adds a lovely warmth that pairs beautifully with the pumpkin and spice. I did this for a Friendsgiving once and it was a hit.
- Chocolate Twist: Melt ½ cup of semi-sweet chocolate chips and drizzle it over the crust before adding the filling. The chocolate sets up as the bars chill and adds a nice contrast to the pumpkin.
- Pecan Praline Topping: Before serving, top the bars with a sprinkle of chopped candied pecans and a drizzle of caramel sauce. It takes these bars from great to absolutely decadent.
- Pumpkin Chiffon: For a lighter, airier version, fold in 1 cup of whipped cream (made from ½ cup heavy cream) into the filling after it is mixed. This gives it a mousse-like texture that is still delicious.
Serving & Storage Suggestions
These easy no-bake pumpkin cheesecake bars are best served cold, straight from the refrigerator. The chilled texture is what makes them so satisfying—firm, creamy, and refreshing.
Presentation: Slice them into neat squares and arrange on a platter. A dollop of fresh whipped cream and a light dusting of cinnamon or pumpkin pie spice makes them look bakery-worthy. For a fall party, garnish with a few candied pecans or a tiny cinnamon stick.
Pairings: These bars pair beautifully with a hot cup of coffee, a spiced chai latte, or even a glass of cold milk. They also work well alongside a creamy roasted butternut squash soup for a cozy fall dinner party.
Storage: Store any leftover bars in an airtight container in the refrigerator for up to 5 days. The crust will stay crisp for the first 2 to 3 days, then it may soften slightly (still delicious, just different).
Freezing: These bars freeze beautifully. Once the bars are fully set, slice them into individual portions. Place them on a baking sheet lined with parchment paper and freeze until solid, about 2 hours. Then wrap each bar tightly in plastic wrap and store in a freezer-safe bag or container for up to 3 months. To thaw, transfer a bar to the refrigerator overnight. Do not thaw at room temperature, as the texture can become watery.
Flavor Development: Honestly, these bars taste even better on day two. The flavors meld together and deepen overnight. So do not be shy about making them a day ahead—it is actually the smart move.
Nutritional Information & Benefits
These bars are a treat, no doubt about it. But they do offer some redeeming qualities, especially compared to a traditional baked cheesecake.
- Estimated per bar (based on 9 servings): Calories: 410, Fat: 28g, Saturated Fat: 16g, Carbohydrates: 37g, Fiber: 1g, Sugar: 26g, Protein: 6g, Sodium: 310mg.
- Vitamin A: Pumpkin is packed with vitamin A, which is great for eye health and immune function. Each bar delivers a decent dose.
- Calcium: The cream cheese and heavy cream provide a good amount of calcium for bone health.
- Dietary Considerations: This recipe can be made gluten-free and dairy-free with simple substitutions. It is naturally low-carb if you use a keto-friendly crust (almond flour and butter).
- Allergens: Contains dairy, gluten (unless substituted), and may contain traces of tree nuts depending on your crust choice.
I am not a nutritionist, but I do believe in balance. These bars are a special occasion dessert, and they are absolutely worth every bite. The pumpkin adds a little something good, and the rest is pure, delicious indulgence.
Conclusion
These easy no-bake pumpkin cheesecake bars have become a staple in my fall baking rotation for a reason. They are simple enough for a weekday craving, impressive enough for a holiday table, and delicious enough to make you forget that no oven was ever involved. The creamy, spiced filling paired with that buttery, crisp crust is a combination that just works.
I love this recipe because it proves that you do not need fancy techniques or complicated steps to create something truly special. It is honest, straightforward, and deeply satisfying. Whether you are a seasoned baker or someone who has never made a cheesecake in your life, these bars will make you look like a pro.
So go ahead—give them a try. Customize them with your favorite toppings, make them ahead for your next gathering, or just keep them all to yourself (I will not tell). When you do, come back and let me know how they turned out in the comments. I would love to hear about your variations and how these bars became part of your fall tradition. Happy no-baking!
Frequently Asked Questions
Can I use pumpkin pie filling instead of pumpkin puree?
No, I do not recommend it. Pumpkin pie filling is pre-sweetened and pre-spiced, which will throw off the sugar and spice balance in this recipe. Stick with 100% pure pumpkin puree for the best results.
How long do these bars need to set in the fridge?
At least 6 hours, but overnight is ideal. The longer they chill, the firmer and cleaner the slices will be. Patience really pays off here.
Can I make these bars vegan?
Yes, you can. Use a vegan cream cheese (like Kite Hill or Violife), full-fat coconut cream instead of heavy cream, and a vegan butter or coconut oil for the crust. The texture will be slightly softer, so chill for a full 12 hours or more.
My crust is falling apart. What went wrong?
This usually happens if the crust was not packed firmly enough or if there was not enough butter. Make sure your butter is fully melted and mixed into the crumbs, and use the bottom of a measuring cup to really press the mixture down into the pan.
Can I freeze these pumpkin cheesecake bars?
Absolutely. Freeze them as individual slices, wrapped tightly in plastic wrap and stored in a freezer bag, for up to 3 months. Thaw in the refrigerator overnight before serving. They taste just as good as fresh.
Pin This Recipe!
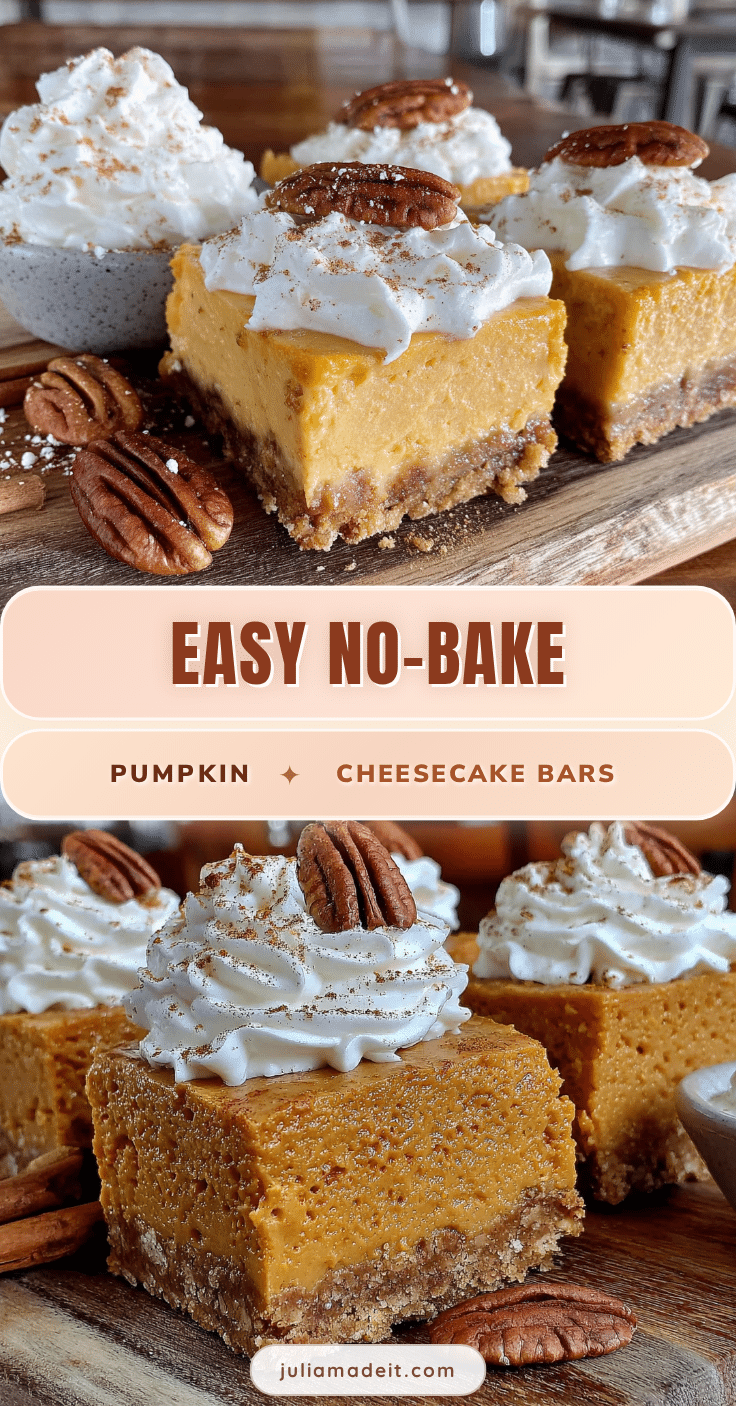
Easy No-Bake Pumpkin Cheesecake Bars: Best Fall Dessert
These easy no-bake pumpkin cheesecake bars are rich, creamy, and spiced just right, with a buttery graham cracker crust. No oven required, they come together in under 30 minutes of active work and are perfect for fall gatherings.
- Prep Time: 20 minutes
- Cook Time: 0 minutes
- Total Time: 6 hours 20 minutes (includes chilling)
- Yield: 9 to 16 servings 1x
- Category: Dessert
- Cuisine: American
Ingredients
- 2 cups graham cracker crumbs (about 16 full sheets, crushed)
- ¼ cup granulated sugar
- ½ cup unsalted butter, melted
- Pinch of salt
- 16 ounces cream cheese (two 8-ounce blocks), softened
- ¾ cup granulated sugar
- 1 cup pumpkin puree (not pumpkin pie filling)
- ½ cup heavy cream
- 1 teaspoon vanilla extract
- 2 teaspoons pumpkin pie spice
- ½ teaspoon cinnamon
- ¼ teaspoon salt
- 1 cup heavy cream (for whipped topping, optional)
- 2 tablespoons powdered sugar (for whipped topping, optional)
- ½ teaspoon vanilla extract (for whipped topping, optional)
Instructions
- Line a 9×9-inch baking pan with parchment paper, leaving about 2 inches of overhang on two opposite sides. Set aside.
- In a medium bowl, combine graham cracker crumbs, ¼ cup granulated sugar, and a pinch of salt. Pour in melted butter and stir until the mixture looks like wet sand and holds together when squeezed. Press firmly into the bottom of the prepared pan using the bottom of a measuring cup. Refrigerate while making the filling.
- In a large mixing bowl, beat softened cream cheese with an electric mixer on medium speed until completely smooth and fluffy, about 2 minutes. Scrape down the sides of the bowl.
- Add ¾ cup granulated sugar, pumpkin pie spice, cinnamon, and ¼ teaspoon salt. Beat on medium speed until well combined and smooth, about 1 minute. Scrape the bowl again.
- Add pumpkin puree, ½ cup heavy cream, and 1 teaspoon vanilla extract. Beat on low speed at first, then increase to medium and beat for about 1 minute until the mixture is uniform and silky.
- Remove the pan with the crust from the refrigerator. Pour the pumpkin cheesecake filling over the crust and spread evenly with a spatula. Gently tap the pan on the counter to release any air bubbles.
- Cover the pan with plastic wrap or aluminum foil and refrigerate for at least 6 hours, preferably overnight.
- Just before serving, make the whipped topping (optional): In a chilled bowl, beat 1 cup cold heavy cream, 2 tablespoons powdered sugar, and ½ teaspoon vanilla extract with an electric mixer on medium-high speed until soft peaks form, about 2 to 3 minutes.
- Once the bars are fully chilled and firm, use the parchment paper overhang to lift the entire block out of the pan. Place on a cutting board and slice into 9 or 16 squares using a sharp knife (wipe knife clean between cuts for clean slices). Top each bar with a dollop of whipped cream and a dusting of cinnamon, if desired.
Notes
Room temperature cream cheese is essential for a smooth filling. Do not overmix after adding the heavy cream. Pack the crust firmly to prevent crumbling. Chill for at least 6 hours, preferably overnight. For clean slices, use a hot knife wiped clean between cuts. Bars can be stored in an airtight container in the refrigerator for up to 5 days or frozen for up to 3 months.
Nutrition
- Serving Size: 1 bar (based on 9 se
- Calories: 410
- Sugar: 26
- Sodium: 310
- Fat: 28
- Saturated Fat: 16
- Carbohydrates: 37
- Fiber: 1
- Protein: 6
Keywords: no-bake pumpkin cheesecake bars, pumpkin cheesecake bars, no-bake cheesecake, fall dessert, pumpkin dessert, easy cheesecake bars