I want black velvet cake right now and I have everything except the will to make a layered situation. That’s the honest truth of how these Perfect Black Velvet Halloween Cupcakes with Orange Buttercream came to be. I was standing in my kitchen last October, staring at a bag of black cocoa powder I’d ordered on a whim, and I just couldn’t face the thought of torting cake layers and worrying about crumb coating. Cupcakes are faster, they’re forgiving, and honestly, they feel more festive for a Halloween party anyway.
The thing about black cocoa powder is that it’s not your average dutch-processed stuff. It’s the same type used in Oreos, and it gives baked goods that dramatic dark color and a subtle, almost smoky chocolate flavor. Pair that with a bright, tangy orange buttercream, and you’ve got the perfect Halloween dessert that actually tastes as good as it looks. No artificial coloring tricks, no weird aftertaste, just a really solid chocolate cupcake that happens to be pitch black.
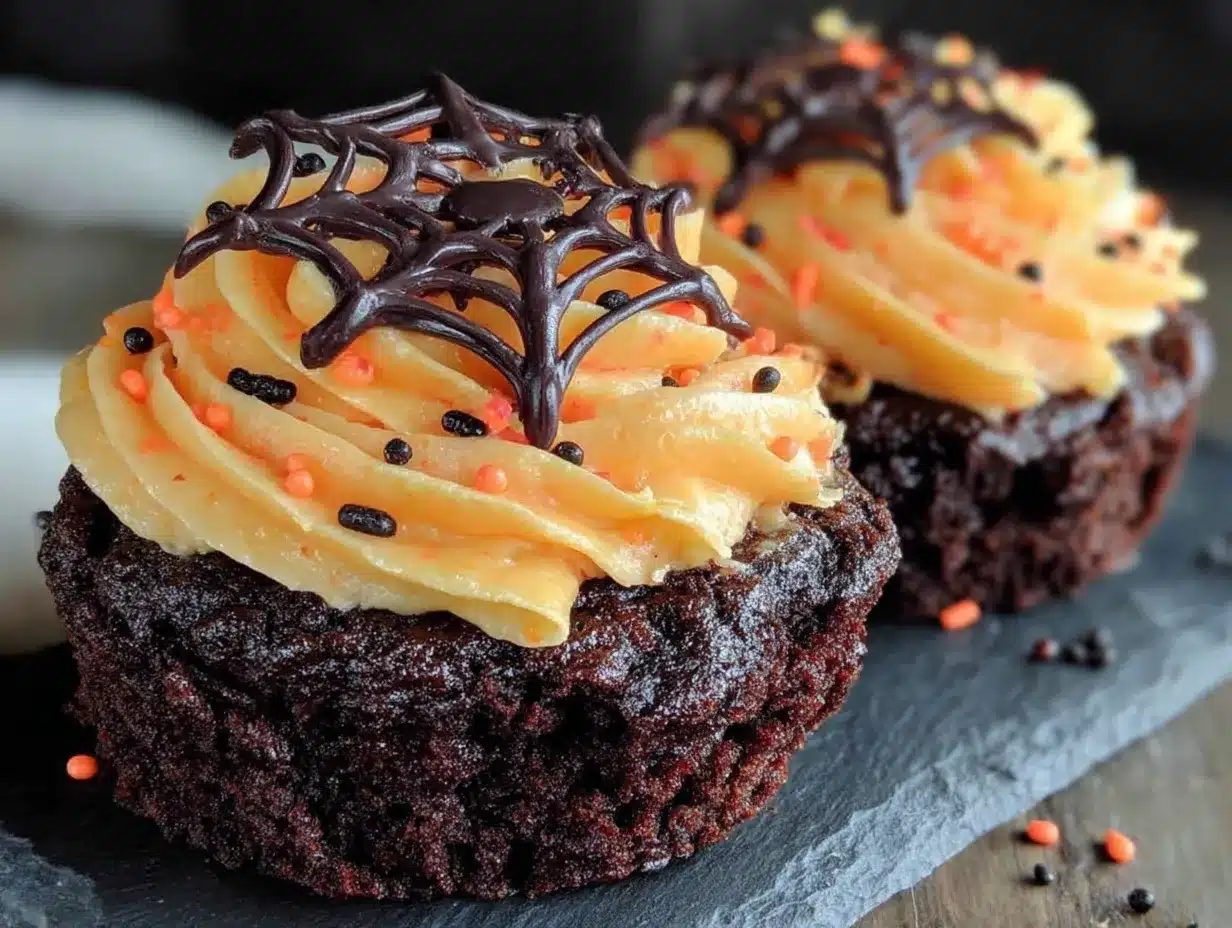
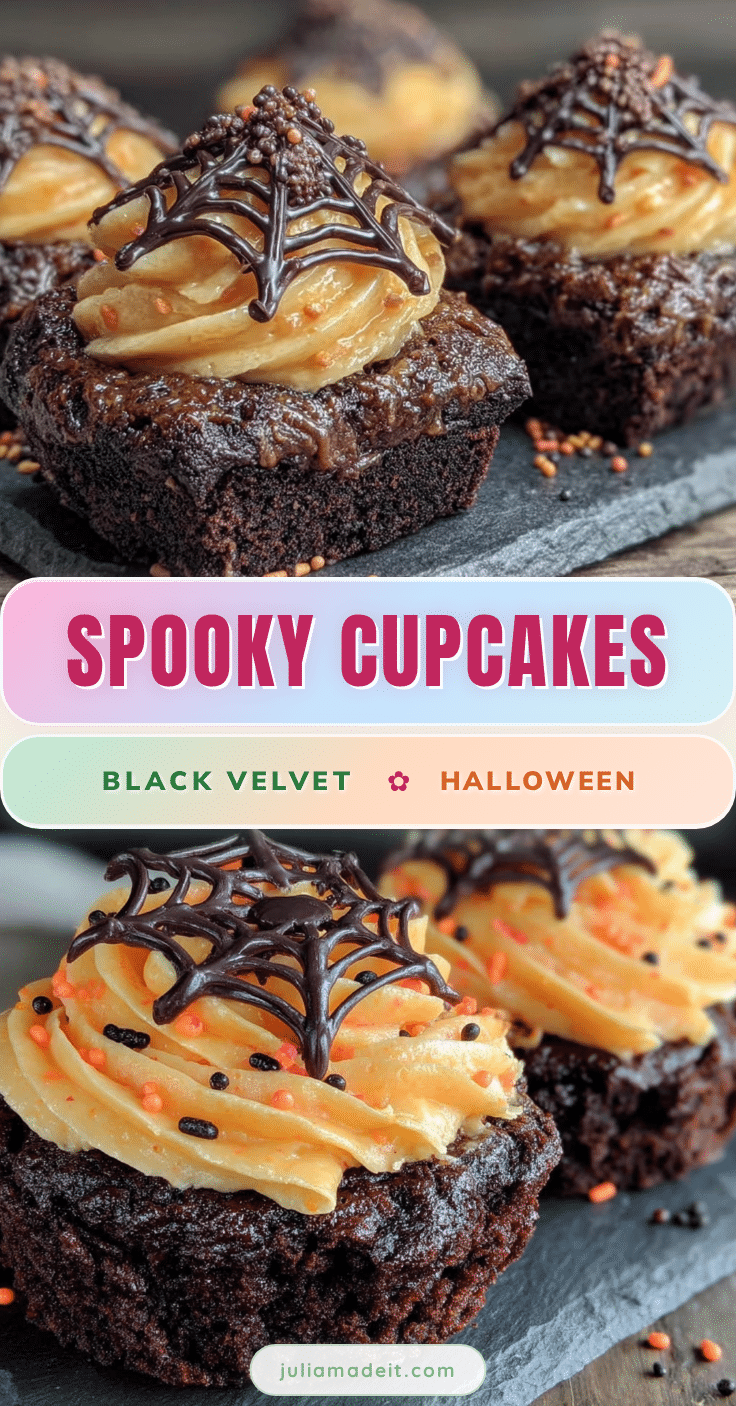
These cupcakes became my go-to for every Halloween gathering, and they always disappear first. There’s something about that color contrast that gets people, you know? The deep black cake against the vibrant orange frosting, it’s like edible Halloween decor. And the best part is that the flavor combo actually works, it’s not just a gimmick. The rich, dark chocolate gets cut by the citrusy sweetness of the buttercream, and it’s honestly one of the best things I’ve ever baked.
So if you’re looking for a show-stopping Halloween dessert that doesn’t require a ton of fuss, you’re in the right place. Let’s make some magic.
Why You’ll Love These Black Velvet Halloween Cupcakes
I’ve tested this recipe at least six times to get the texture just right, and let me tell you, there were some dry, crumbly failures along the way. But these cupcakes? They’re moist, tender, and have that perfect dome top that’s begging for a swirl of buttercream. Here’s why they’ll become your new Halloween staple.
- Quick & Easy: From start to finish, these come together in under an hour. The batter takes about 10 minutes to mix, and the cupcakes bake for 18 minutes flat. Perfect for last-minute Halloween party prep or a fun weekend baking project with the kids.
- Simple Ingredients: No weird stabilizers or hard-to-find items. You’ll need black cocoa powder, which you can find at most grocery stores or online, but everything else is a pantry staple. Flour, sugar, eggs, buttermilk, the usual suspects.
- Perfect for Halloween Parties: These cupcakes are the life of the party, literally. They look incredible on a dessert table, especially next to other seasonal treats like my Perfect Black Velvet Spider Web Halloween Cookies or a batch of Cozy Pumpkin Sugar Cookie Bars with Easy Orange Cream Cheese Frosting.
- Crowd-Pleaser: Kids love the dramatic black color, and adults appreciate the sophisticated chocolate flavor. I’ve never brought these to a gathering without someone asking for the recipe.
- Unbelievably Delicious: The texture is everything you want in a cupcake, light, moist, and fluffy. The black cocoa gives it that Oreo-like flavor that’s subtly different from regular chocolate cake, and the orange buttercream is the perfect bright counterpoint.
What makes these different from every other Halloween cupcake recipe out there is the balance. I spent a lot of time tweaking the ratio of black cocoa to all-purpose flour so the cupcakes aren’t dry or bitter. Black cocoa powder is more alkaline than regular cocoa, so it needs a little extra buttermilk to keep things tender. Trust me, I learned that the hard way after my first batch came out tasting like chalk.
This recipe isn’t just good for Halloween cupcakes, it’s the kind of dessert that makes you close your eyes after the first bite. The kind that makes you wonder why you don’t make black velvet cake more often. It’s comfort food with a spooky twist, and it’s guaranteed to impress.
What Ingredients You Will Need
This recipe uses simple, wholesome ingredients to deliver that dramatic black color and rich chocolate flavor. Most of these are pantry staples, and I’ve included notes on where to find the specialty items.
For the Black Velvet Cupcakes
- All-purpose flour, 1 ½ cups (180g) – Spoon and level for accuracy. Too much flour makes dense cupcakes.
- Black cocoa powder, ½ cup (50g) – This is the star. I recommend Rodelle or King Arthur brands for the deepest color and best flavor. Regular cocoa won’t give you that true black color.
- Granulated sugar, 1 cup (200g) – Standard white sugar keeps the texture light.
- Baking soda, 1 teaspoon – Helps the cupcakes rise and react with the buttermilk.
- Salt, ½ teaspoon – Balances the sweetness and enhances the chocolate flavor.
- Buttermilk, 1 cup (240ml) – Room temperature is crucial. The acidity tenderizes the gluten and activates the baking soda. No buttermilk? Add 1 tablespoon of lemon juice or vinegar to regular milk and let it sit for 5 minutes.
- Vegetable oil, ½ cup (120ml) – Keeps the cupcakes moist. Canola or avocado oil work too.
- Large eggs, 2, room temperature – Cold eggs can seize the batter. Let them sit on the counter for 30 minutes or place them in warm water for 5 minutes.
- Vanilla extract, 2 teaspoons – Pure vanilla adds depth. Imitation works in a pinch.
- White vinegar, 1 teaspoon – Sounds weird, but it reacts with the baking soda for extra lift and a tender crumb.
For the Orange Buttercream
- Unsalted butter, 1 cup (226g), softened – Let it sit out for at least an hour. It should be soft but not melty.
- Powdered sugar, 3-4 cups (360-480g) – Sift it if you want the smoothest frosting. I’m usually too lazy, but it does make a difference.
- Orange zest, 2 tablespoons from about 2 large oranges – Fresh zest is non-negotiable here. Bottled orange extract just isn’t the same.
- Orange juice, 2-3 tablespoons, fresh squeezed – Adds flavor and thins the frosting to the perfect consistency.
- Vanilla extract, 1 teaspoon – Rounds out the citrus flavor.
- Salt, a pinch – Cuts the sweetness.
- Orange gel food coloring, optional – If you want that vibrant Halloween orange, a tiny drop goes a long way. I use Americolor brand.
Equipment Needed
You don’t need a professional bakery setup for these cupcakes, but a few key tools will make your life easier.
- 12-cup muffin tin – Standard size works perfectly. If you have a non-stick one, great. If not, just use paper liners.
- Paper cupcake liners – I like using black or orange liners for Halloween, but white ones work too. The black cake will show through lighter liners, so keep that in mind.
- Mixing bowls – One large for dry ingredients, one medium for wet ingredients.
- Whisk and spatula – A whisk for combining dry ingredients and a rubber spatula for folding everything together.
- Electric hand mixer or stand mixer – For the buttercream. You can do it by hand, but your arm will hate you. I use my KitchenAid with the paddle attachment.
- Cooling rack – Essential for getting the cupcakes to room temperature before frosting. Frosting warm cupcakes is a disaster waiting to happen.
- Piping bag and star tip – I use a Wilton 1M tip for that classic swirl. A zip-top bag with the corner snipped off works in a pinch, but it won’t look as pretty.
- Cookie scoop or ice cream scoop – Ensures even-sized cupcakes that bake uniformly. I use a #20 scoop, which holds about 3 tablespoons.
If you don’t have a piping bag, you can always spread the frosting with an offset spatula. It won’t have that dramatic swirl, but it’ll taste just as good. And honestly, for a casual Halloween party, rustic-looking cupcakes have their own charm.
Preparation Method
Let’s get baking. This process is straightforward, but I’ve included all the little details that make the difference between a good cupcake and a great one.
Step 1: Preheat and Prep
Preheat your oven to 350°F (175°C). Line your muffin tin with 12 paper liners. This is non-negotiable, the black batter will stain your pan. Trust me, I learned that one the messy way.
Step 2: Mix Dry Ingredients
In a large mixing bowl, whisk together the flour, black cocoa powder, sugar, baking soda, and salt. Make sure there are no lumps. Black cocoa powder tends to clump, so really get in there with your whisk. If you see any stubborn lumps, you can sift the mixture, but I find a good whisking does the job.
Step 3: Combine Wet Ingredients
In a separate medium bowl, whisk together the buttermilk, vegetable oil, eggs, vanilla extract, and white vinegar. Whisk until everything is completely combined and the eggs are fully incorporated. The mixture should look smooth and slightly thick.
Step 4: Make the Batter
Pour the wet ingredients into the dry ingredients. Use a rubber spatula to fold everything together gently. Mix just until you no longer see streaks of flour. Overmixing will develop the gluten and make your cupcakes tough. A few small lumps are totally fine. The batter will be quite thin, almost like a pancake batter. That’s normal for black velvet cake.
Step 5: Fill the Liners
Use your cookie scoop to divide the batter evenly among the 12 liners. Each liner should be about ⅔ full. If you don’t have a scoop, use a measuring cup. Getting the batter level even helps them bake evenly. Don’t overfill, or you’ll get muffin tops that spill over the edges.
Step 6: Bake
Bake for 18-20 minutes, or until a toothpick inserted into the center of a cupcake comes out clean or with a few moist crumbs. The tops should spring back when lightly touched. Start checking at 16 minutes if your oven runs hot. Every oven is different, and I’ve had batches that were done at 17 minutes.
Step 7: Cool Completely
Let the cupcakes cool in the pan for 5 minutes. This allows them to set and makes them easier to handle. Then transfer them to a wire cooling rack to cool completely. This is crucial, absolutely do not frost them while they’re still warm. The buttercream will melt into a sad, greasy mess. I usually let them cool for at least 30 minutes, sometimes an hour if I’m being patient.
Step 8: Make the Orange Buttercream
While the cupcakes cool, make the frosting. In a large bowl (or the bowl of a stand mixer), beat the softened butter on medium speed for 2-3 minutes until it’s light, pale, and fluffy. This step is important, don’t rush it. Scrape down the sides of the bowl.
Add the powdered sugar one cup at a time, beating on low speed after each addition. The mixture will look dry and crumbly at first, but keep going. Add the orange zest, orange juice, vanilla extract, and a pinch of salt. Beat on medium-high speed for 2-3 minutes until the frosting is light, fluffy, and spreadable. If it’s too thick, add another tablespoon of orange juice. If it’s too thin, add more powdered sugar. If you want that vibrant orange color, add a tiny drop of orange gel food coloring and beat to combine. Remember, a little goes a long way.
Step 9: Frost and Decorate
Fit your piping bag with the star tip and fill it with the buttercream. Starting from the outside edge of the cupcake, pipe a continuous spiral toward the center, then lift straight up. If you’re not using a piping bag, use an offset spatula to swirl the frosting on top. Add any Halloween sprinkles or decorations immediately, before the frosting sets.
Cooking Tips & Techniques
I’ve made a lot of mistakes in the kitchen so you don’t have to. Here are the things I wish someone had told me before I started making black velvet cupcakes.
Black cocoa powder is not regular cocoa. It’s more alkaline and less sweet. If you try to substitute regular cocoa powder, your cupcakes will be brown, not black, and the flavor profile will be completely different. Stick with black cocoa for that Oreo-like taste and dramatic color.
Room temperature ingredients matter more than you think. Cold eggs and cold buttermilk can make your batter seize up and create a dense, uneven crumb. I know it’s annoying to wait, but it’s worth it. If you’re in a hurry, place your eggs in a bowl of warm water for 5 minutes and microwave your buttermilk for 15 seconds.
Don’t overmix the batter. I cannot stress this enough. Mix until the flour is just incorporated. Overmixing develops gluten, which makes cupcakes tough and rubbery. A few lumps are your friends. The batter will be thin, and that’s exactly how it should be.
The toothpick test is your best friend. But remember, a few moist crumbs are fine. Overbaked cupcakes are dry cupcakes. Start checking at 16 minutes. If the toothpick comes out clean, they’re done. If there’s wet batter, give them another minute or two.
For the fluffiest buttercream, beat the butter first. Don’t skip the initial creaming step. Beating the butter alone for a few minutes incorporates air and makes the frosting lighter. Then add the sugar gradually. If you dump it all in at once, you’ll be wearing a cloud of powdered sugar.
Fresh orange zest is non-negotiable. Bottled orange extract has a fake, almost chemical taste. The natural oils in fresh zest are what give this buttercream its bright, authentic flavor. Use a microplane or the fine side of a box grater, and be careful not to get any of the white pith, which is bitter.
Variations & Adaptations
One of the best things about this recipe is how versatile it is. Here are some ways to make it your own.
Gluten-Free Version: Substitute the all-purpose flour with a 1:1 gluten-free baking blend that contains xanthan gum. I’ve had great results with Bob’s Red Mill and King Arthur brands. The texture will be slightly more delicate, so handle the cupcakes gently.
Dairy-Free Version: Use a dairy-free buttermilk substitute by adding 1 tablespoon of lemon juice to 1 cup of unsweetened almond milk or oat milk. Let it sit for 5 minutes before using. For the buttercream, use a high-quality vegan butter stick, not the spreadable kind in a tub. I like Miyoko’s or Country Crock Plant Butter.
Spider Web Design: For an extra festive touch, pipe a small circle of white buttercream or royal icing in the center of each frosted cupcake. Use a toothpick to drag lines outward from the center to create a web pattern. It’s easier than it looks and always gets compliments.
Blood Drip Effect: Drizzle a little red gel icing or thinned raspberry jam over the top of the orange buttercream for a creepy blood effect. It’s perfect for a haunted Halloween party.
Chocolate Orange Version: Add ½ cup of mini chocolate chips to the batter for extra chocolatey goodness. The combination of black cocoa and orange is already amazing, but chocolate chips take it over the top.
Pumpkin Spice Twist: Swap the orange zest for pumpkin pie spice in the buttercream and add a pinch of cinnamon to the cupcake batter. It gives a warm, fall flavor that pairs beautifully with the black cocoa. This variation works great alongside a batch of Easy One-Bowl Pumpkin Cream Cheese Muffins with Cinnamon Sugar Streusel for a full Halloween dessert spread.
Serving & Storage Suggestions
These cupcakes are best served at room temperature. The buttercream softens slightly, and the cake is perfectly tender. If you’ve refrigerated them, let them sit out for 30 minutes before serving.
For a Halloween party, arrange them on a black or orange platter. Add some fake spider webs, plastic spiders, or candy eyeballs for a spooky touch. They pair beautifully with a warm cup of apple cider or a Creamy Brown Sugar Cinnamon Pumpkin Chai Latte for the ultimate fall treat.
Storage: Store unfrosted cupcakes in an airtight container at room temperature for up to 2 days. Frosted cupcakes should be stored in the refrigerator, but bring them to room temperature before serving for the best texture. The buttercream will firm up in the fridge, so give them at least 30 minutes on the counter.
Freezing: You can freeze unfrosted cupcakes for up to 3 months. Wrap each one individually in plastic wrap, then place them in a freezer-safe bag. Thaw at room temperature before frosting. I don’t recommend freezing frosted cupcakes, the buttercream can get grainy.
Make Ahead: The buttercream can be made up to 3 days in advance. Store it in an airtight container in the refrigerator. When you’re ready to use it, let it come to room temperature and then re-whip it with a mixer for a minute to bring back the fluffiness.
The flavors actually develop and deepen over time. Day-old cupcakes taste even more chocolatey and the orange flavor in the buttercream mellows out and becomes more integrated. So don’t stress about making them the day before, they might even be better.
Nutritional Information & Benefits
Let’s be real, these are cupcakes. They’re a treat, not a health food. But I believe in enjoying desserts in moderation, and knowing what’s in them helps with that.
Estimated per cupcake (with frosting):
- Calories: 380
- Fat: 18g
- Carbohydrates: 52g
- Protein: 4g
- Sugar: 38g
- Fiber: 2g
Potential Allergens: Contains wheat (gluten), dairy (butter, buttermilk), and eggs. Not suitable for those with celiac disease unless using gluten-free flour. The dairy can be substituted as noted in the variations section.
Health Highlights: Black cocoa powder is rich in antioxidants called flavonoids, which can help reduce inflammation and improve heart health. Oranges are packed with vitamin C, and while most of the fruit is used for zest and juice, you still get a tiny boost. The buttermilk adds calcium and probiotics. But honestly, eat these because they’re delicious, not because they’re healthy.
If you’re looking for a lighter option, you can reduce the sugar in the buttercream by using a sugar substitute like Swerve, but I find it changes the texture. Sometimes you just need the real thing, and that’s okay.
Conclusion
These Perfect Black Velvet Halloween Cupcakes with Orange Buttercream are everything I want in a Halloween dessert. They’re dramatic and spooky-looking, but they taste like a classic chocolate cupcake with a bright, citrusy twist. The black cocoa gives them that unique Oreo flavor, and the orange buttercream is so fresh and tangy it practically sings.
I love making these for Halloween parties because they always get that “wow” reaction. People see the black cake and expect something gimmicky or artificial-tasting, but then they take a bite and their eyes go wide. That’s the moment I live for as a baker.
Don’t be afraid to make these your own. Add sprinkles, change the frosting color, or pipe a spider web on top. The base recipe is solid, and it’s forgiving enough to handle your creative touches. If you try them, I’d love to hear how they turn out. Drop a comment below and let me know if you added any spooky decorations or if you came up with a fun variation. And if you’re looking for more Halloween baking inspiration, check out my Crispy Mummy Hot Dog Crescent Rolls for a savory option that’s just as fun.
Happy Halloween, and happy baking!
Frequently Asked Questions
Can I use regular cocoa powder instead of black cocoa powder?
You can, but the cupcakes won’t be black. They’ll be a dark brown, and the flavor will be more like traditional chocolate cake. Black cocoa powder has a unique, slightly smoky flavor that’s essential for the “black velvet” experience. If you can’t find it, you can use a mix of ¼ cup regular cocoa and ¼ cup black cocoa, but the color won’t be as dramatic.
Why are my cupcakes dry?
Overbaking is the most common culprit. Check your cupcakes at 16 minutes and pull them out as soon as a toothpick comes out clean. Also, make sure you’re measuring your flour correctly. Spoon it into the measuring cup and level it off. Scooping directly from the bag packs in too much flour, which leads to dry, dense cupcakes.
Can I make these cupcakes ahead of time?
Absolutely. You can bake the cupcakes up to 2 days in advance and store them in an airtight container at room temperature. Make the buttercream up to 3 days ahead and keep it in the fridge. When you’re ready to serve, bring the buttercream to room temperature, re-whip it, and frost the cupcakes. They’ll taste just as fresh.
How do I get that vibrant orange color in the buttercream?
Fresh orange zest gives the buttercream a beautiful natural color and intense flavor. For a brighter orange, add a tiny drop of orange gel food coloring. Liquid food coloring can thin out the frosting, so I recommend gel. Start with a toothpick’s worth and add more until you’re happy with the color.
Can I freeze these cupcakes?
Yes, but only the unfrosted ones. Wrap each cooled cupcake individually in plastic wrap, then place them in a freezer-safe bag. They’ll keep for up to 3 months. Thaw at room temperature before frosting. Frosted cupcakes don’t freeze well because the buttercream can become grainy and the texture changes.
Pin This Recipe!
Perfect Black Velvet Halloween Cupcakes with Easy Orange Buttercream
These dramatic black velvet cupcakes are moist, tender, and topped with a bright, tangy orange buttercream. Made with black cocoa powder for that Oreo-like flavor, they’re the perfect show-stopping Halloween dessert that tastes as good as it looks.
- Prep Time: 15 minutes
- Cook Time: 18 minutes
- Total Time: 33 minutes
- Yield: 12 cupcakes 1x
- Category: Dessert
- Cuisine: American
Ingredients
- 1 ½ cups (180g) all-purpose flour
- ½ cup (50g) black cocoa powder
- 1 cup (200g) granulated sugar
- 1 teaspoon baking soda
- ½ teaspoon salt
- 1 cup (240ml) buttermilk, room temperature
- ½ cup (120ml) vegetable oil
- 2 large eggs, room temperature
- 2 teaspoons vanilla extract
- 1 teaspoon white vinegar
- 1 cup (226g) unsalted butter, softened
- 3–4 cups (360-480g) powdered sugar
- 2 tablespoons orange zest (from about 2 large oranges)
- 2–3 tablespoons fresh orange juice
- 1 teaspoon vanilla extract
- Pinch of salt
- Orange gel food coloring (optional)
Instructions
- Preheat oven to 350°F (175°C). Line a 12-cup muffin tin with paper liners.
- In a large bowl, whisk together flour, black cocoa powder, sugar, baking soda, and salt until no lumps remain.
- In a separate medium bowl, whisk together buttermilk, vegetable oil, eggs, vanilla extract, and white vinegar until smooth.
- Pour wet ingredients into dry ingredients. Fold gently with a rubber spatula until just combined (a few lumps are fine). Batter will be thin.
- Divide batter evenly among the 12 liners, filling each about ⅔ full.
- Bake for 18-20 minutes, or until a toothpick inserted in the center comes out clean or with a few moist crumbs. Cool in pan for 5 minutes, then transfer to a wire rack to cool completely.
- For the buttercream: In a large bowl, beat softened butter on medium speed for 2-3 minutes until light and fluffy.
- Add powdered sugar one cup at a time, beating on low after each addition. Add orange zest, orange juice, vanilla extract, and salt. Beat on medium-high for 2-3 minutes until fluffy. Add orange gel food coloring if desired.
- Once cupcakes are completely cool, pipe or spread buttercream on top. Decorate with Halloween sprinkles or decorations immediately.
Notes
Black cocoa powder is essential for the dramatic black color and Oreo-like flavor; regular cocoa will not work. Room temperature ingredients are crucial for best texture. Do not overmix the batter. Cupcakes can be stored unfrosted at room temperature for up to 2 days, or frozen for up to 3 months. Buttercream can be made up to 3 days ahead and refrigerated.
Nutrition
- Serving Size: 1 cupcake
- Calories: 380
- Sugar: 38
- Sodium: 220
- Fat: 18
- Saturated Fat: 8
- Carbohydrates: 52
- Fiber: 2
- Protein: 4
Keywords: black velvet cupcakes, Halloween cupcakes, orange buttercream, black cocoa cupcakes, Halloween dessert, chocolate cupcakes