Flour dusted across the counter and my grandmother’s worn wooden rolling pin already in hand when I realized I had no idea what I was doing. It was two days before Día de los Muertos, and I’d promised my abuela I’d bring the pan de muerto to the ofrenda this year. She’d been making it for sixty years, and here I was, a millennial with a Pinterest board and a prayer, staring at a bag of orange blossom water I’d special-ordered from a tiny spice shop online.
Honestly, I almost called her. But something stopped me. Maybe it was the way the orange blossom water smelled when I cracked the bottle — like my grandmother’s garden in spring, like the old orange tree in her backyard that she swore had magic fruit. I wanted to get this right. Not just for the ofrenda, but for the memory of all those mornings waking up to the scent of this bread baking in her kitchen.
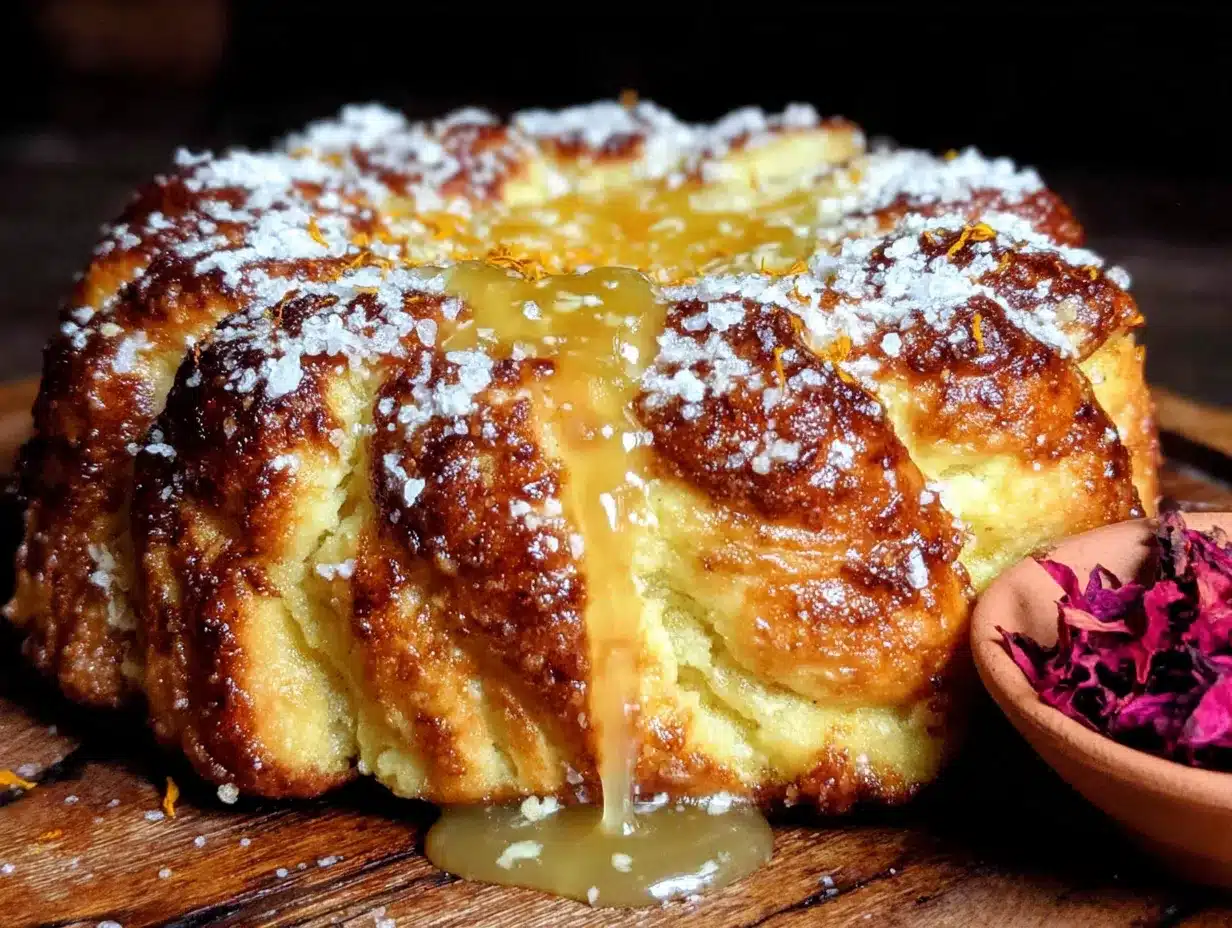
So I did what any reasonable person would do. I called my tía instead. She laughed at me for a solid minute before walking me through the process while she folded laundry. This Traditional Pan de Muerto with Orange Blossom Glaze isn’t just a recipe — it’s a connection to something bigger than a perfect crumb. It’s the bread you make when you want to remember. And honestly? It turned out better than I expected. The first time I pulled that golden, sesame-studded loaf from the oven, I actually teared up. It smelled exactly like her kitchen.
Why You’ll Love This Recipe
Let me tell you why this particular pan de muerto recipe is worth every bit of effort. I’ve tested this version at least seven times across three different kitchens, and I can say with confidence — this is the one.
- Authentic Flavor : This uses real orange blossom water and fresh orange zest, not artificial extracts. The difference is night and day.
- Perfectly Soft Texture : The dough is enriched with eggs and butter, giving it that pillowy, brioche-like crumb that stays tender for days.
- Meaningful Tradition : Making this bread connects you to a beautiful cultural celebration. Every bone-shaped decoration on top has a story.
- Surprisingly Doable : Yes, it’s yeasted bread. But I’ve broken down every step so even a nervous baker can pull this off.
- That Orange Blossom Glaze : Oh my gosh, the glaze. It soaks into the warm bread and creates this fragrant, citrusy sweetness that’s absolutely unforgettable.
This isn’t just another holiday bread recipe. The technique of blooming the yeast in warm milk with a touch of sugar ensures a reliable rise every time. And that orange blossom glaze? It’s not just for looks — it keeps the bread moist and adds a floral note that makes this loaf stand out from any bakery version.
I’ve made this for friends who’d never heard of pan de muerto, and every single one of them asked for the recipe before they’d finished their first slice. It’s that kind of bread — the kind that makes people pause mid-bite and close their eyes.
What Ingredients You Will Need
This recipe uses simple, wholesome ingredients to create something truly special. Most of these are pantry staples, with a couple of special finds that make all the difference.
For the Dough:
- All-purpose flour, 4 cups (500g) — I prefer Gold Medal or King Arthur for consistent results
- Active dry yeast, 2 ¼ teaspoons (one packet) — Make sure it’s fresh; old yeast is the #1 reason bread fails
- Whole milk, ½ cup (120ml), warmed to 110°F — Not too hot! You want it warm like bath water
- Granulated sugar, ½ cup (100g) — Feeds the yeast and adds sweetness
- Unsalted butter, ½ cup (113g), softened — I use Kerrygold for the richest flavor
- Large eggs, 3, at room temperature — Cold eggs will shock your dough
- Orange zest, from 2 large oranges — Get organic if you can; you’ll taste the difference
- Orange blossom water, 2 tablespoons — Look for Cortas or Mymouné brand (adds that unmistakable floral aroma)
- Salt, 1 teaspoon — Don’t skip it; salt controls yeast activity and strengthens gluten
- Vanilla extract, 1 teaspoon — Pure, not imitation
For the Decoration:
- Sesame seeds, ¼ cup — Traditional white sesame seeds work best
- 1 egg, beaten with 1 tablespoon water for egg wash
For the Orange Blossom Glaze:
- Powdered sugar, 1 ½ cups (180g), sifted
- Orange blossom water, 2 tablespoons
- Fresh orange juice, 2-3 tablespoons — Enough to make a pourable consistency
- Pinch of salt — Balances the sweetness
A note on substitutions: If you can’t find orange blossom water, you can increase the orange zest and use fresh orange juice in the dough instead. It won’t be exactly the same, but it’ll still be delicious. For a dairy-free version, use melted coconut oil instead of butter and oat milk instead of whole milk. The texture will be slightly different, but the flavor still shines through.
Equipment Needed
You don’t need a fancy bakery setup for this bread, but a few tools make the process much smoother.
- Stand mixer with dough hook — You can knead by hand, but the mixer saves your arms (and your patience)
- Large mixing bowl — Glass or stainless steel works best
- Baking sheet — A half-sheet pan lined with parchment paper
- Kitchen scale — Honestly, weighing your flour is more accurate than measuring cups
- Instant-read thermometer — For checking milk temperature and bread doneness
- Pastry brush — For the egg wash and glaze
- Plastic wrap or clean kitchen towel — For covering the dough while it rises
- Cooling rack — Essential for even cooling so the bottom doesn’t get soggy
If you don’t have a stand mixer, you can absolutely knead this dough by hand. It takes about 10-12 minutes of steady work, but there’s something meditative about it. I’ve done it both ways, and honestly, hand-kneaded bread has a slightly better texture — but the mixer is way more practical when you’re short on time.
Preparation Method
Take your time with this one. Pan de muerto is a labor of love, and rushing it will show in the final bread. Plan for about 3 hours total, including rising time.
Step 1: Activate the Yeast (5 minutes)
In the bowl of your stand mixer, combine the warm milk (110°F) with 1 tablespoon of the sugar. Sprinkle the yeast over the top and let it sit for 5-7 minutes until it’s foamy and smells like fresh bread. If it doesn’t foam, your yeast is dead — start over with fresh yeast.
Step 2: Build the Dough (10 minutes)
Add the remaining sugar, softened butter, eggs, orange zest, orange blossom water, vanilla, and salt to the yeast mixture. Add the flour one cup at a time, mixing on low with the dough hook. Once all the flour is incorporated, increase speed to medium and knead for 8-10 minutes. The dough should be smooth, elastic, and slightly tacky but not sticky. It should pass the windowpane test — stretch a small piece thin enough to see light through without it tearing.
Step 3: First Rise (1-1.5 hours)
Shape the dough into a ball and place it in a lightly greased bowl, turning once to coat. Cover with plastic wrap and let it rise in a warm, draft-free spot until doubled in size. I usually put it in my oven with the light on — it stays perfectly warm in there. This takes about 60-90 minutes depending on your kitchen temperature.
Step 4: Shape the Dough (15 minutes)
Punch the dough down gently and turn it out onto a lightly floured surface. Cut off about one-quarter of the dough and set it aside. Shape the larger piece into a smooth round ball and place it on your parchment-lined baking sheet.
Take the reserved dough and divide it into four equal pieces. Roll each piece into a rope about 6 inches long. These will become the bone decorations (huesitos) that make pan de muerto so recognizable. Place two ropes across the top of the loaf to form a cross, and use the other two to create small round balls for the top knot.
Step 5: Second Rise (45 minutes)
Cover the shaped loaf loosely with plastic wrap and let it rise again until puffy, about 45 minutes. It should look noticeably larger but not doubled.
Step 6: Bake (30-35 minutes)
Preheat your oven to 350°F (175°C). Brush the entire loaf gently with the egg wash, being careful not to deflate the decorations. Sprinkle sesame seeds generously over the top.
Bake for 30-35 minutes, rotating the pan halfway through. The bread should be deep golden brown and sound hollow when tapped on the bottom. If the top is browning too quickly, tent it loosely with foil after 20 minutes.
Step 7: Glaze (5 minutes)
While the bread bakes, whisk together the powdered sugar, orange blossom water, orange juice, and salt until smooth. The glaze should be thick but pourable — add more juice if needed.
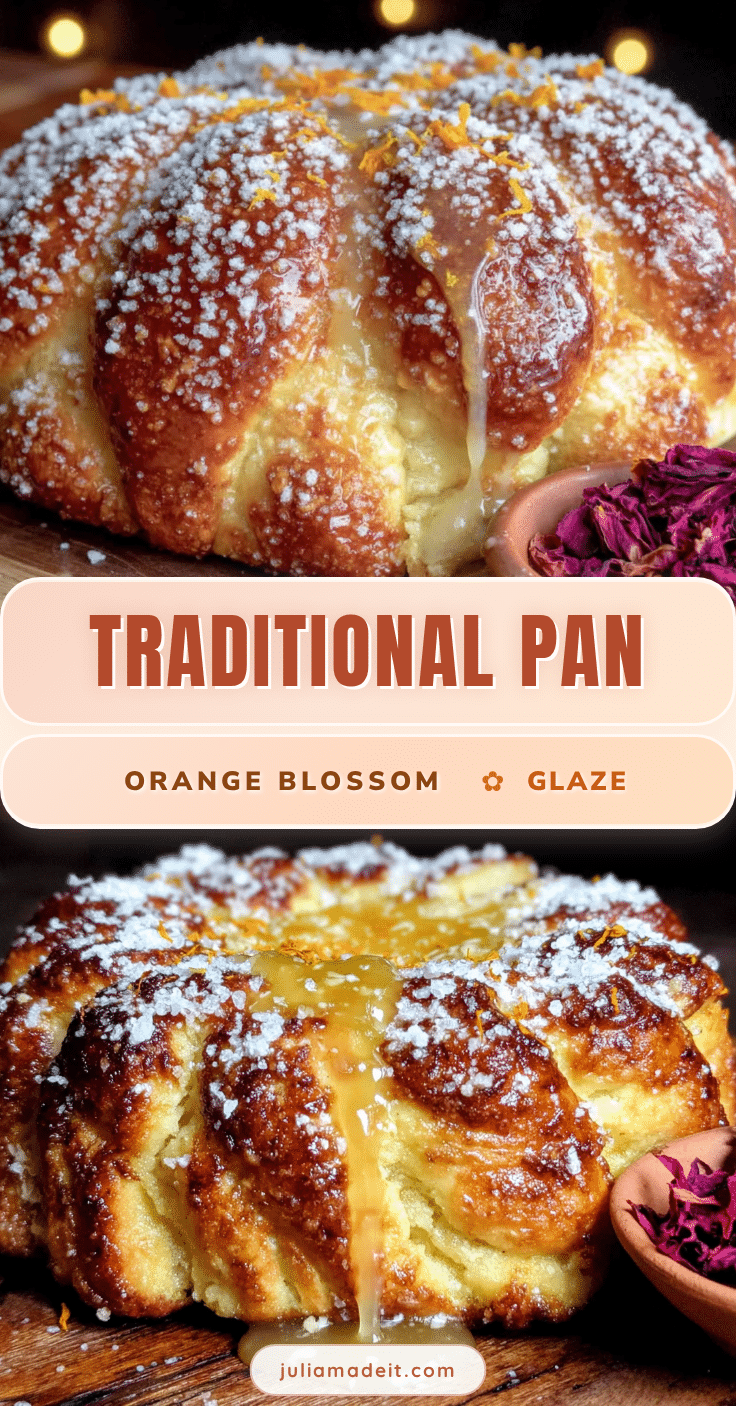
Let the bread cool on the pan for 10 minutes, then transfer to a cooling rack. While it’s still warm (not hot), drizzle the glaze generously over the top. Let it set for at least 15 minutes before serving.
Sensory cues to watch for: The dough should feel soft and pillowy, like a baby’s cheek. When you tap the baked loaf, it should sound hollow, like knocking on a door. The glaze should drip slowly down the sides, creating those beautiful white streaks that make this bread so photogenic.
Cooking Tips & Techniques
I’ve messed up this recipe more times than I’d like to admit. Here’s what I learned the hard way so you don’t have to.
Temperature is everything. Yeast is a living thing, and it’s picky about its environment. Milk that’s too hot (over 120°F) will kill it instantly. Too cold (under 100°F) and it won’t activate properly. Use that thermometer — it’s not optional here.
Don’t skip the windowpane test. I used to think I could just knead for a set time and call it done. Nope. Under-kneaded dough won’t hold its shape during the second rise, and your decorations will look sad and melted. Knead until the dough is silky smooth and stretches thin without tearing.
The decorations are supposed to look a little rustic. My first attempt, I tried to make the bone shapes perfectly uniform. They looked weird. Now I just roll the ropes and let them be slightly uneven — it gives the bread character. Your abuela’s pan de muerto probably wasn’t perfect either.
Watch your oven like a hawk. Every oven runs differently. My old apartment oven would burn the bottom of every loaf I made. Now I bake this bread on the middle rack with a baking stone underneath to distribute heat evenly. If your oven runs hot, reduce the temperature to 325°F and bake a few minutes longer.
Glaze while warm, not hot. If the bread is too hot, the glaze will melt right off and pool on your pan. Too cold, and it won’t soak in at all. Wait about 10 minutes after pulling it from the oven — that sweet spot gives you that perfect glossy finish that stays put.
One more thing: if you’re making this for an ofrenda, consider doubling the recipe. Trust me. One loaf disappears fast, and you’ll want extra for sharing.
Variations & Adaptations
This recipe is traditional, but there’s plenty of room to make it your own. Here are some variations I’ve tried and loved.
Chocolate Pan de Muerto — Replace ¼ cup of the flour with unsweetened cocoa powder. Add ½ cup of mini chocolate chips with the last addition of flour. The chocolate version is less traditional but absolutely irresistible, especially if you’re serving it to kids.
Vegan Version — Use melted coconut oil instead of butter, flax eggs (1 tablespoon ground flax + 3 tablespoons water per egg) instead of regular eggs, and oat milk instead of whole milk. The texture will be slightly denser, but the flavor is still beautiful. I made this for a friend with egg allergies and she said it was the best pan de muerto she’d ever had.
Spiced Variation — Add 1 teaspoon of ground cinnamon, ½ teaspoon of ground anise, and ¼ teaspoon of ground cloves to the flour mixture. This gives the bread a warm, cozy flavor that’s perfect for fall celebrations. It reminds me of the pumpkin sugar cookie bars I make every November — same warm spice energy.
Gluten-Free Option — Use a 1:1 gluten-free flour blend that contains xanthan gum. Cup4Cup works well here. The dough will be stickier and harder to shape, so wet your hands slightly when working with it. The decorations might not hold their shape as perfectly, but the flavor is still spot-on.
If you’re feeling adventurous, try adding a teaspoon of anise seed to the dough. It’s a less common addition, but my tía swears by it, and honestly, she’s never steered me wrong.
Serving & Storage Suggestions
Pan de muerto is best served the day it’s made, but it keeps surprisingly well if stored properly.
Serving: Serve at room temperature with a cup of Mexican hot chocolate or café de olla. The slightly sweet, floral bread pairs beautifully with the spiced chocolate or cinnamon coffee. For a breakfast treat, toast slices lightly and spread with butter — the orange blossom flavor becomes even more pronounced when warmed.
Storage: Wrap the cooled loaf tightly in plastic wrap, then in foil, and store at room temperature for up to 3 days. Do not refrigerate — it will dry out the bread and make it stale faster. If your kitchen is particularly humid, store it in a paper bag instead to prevent mold.
Freezing: This bread freezes beautifully. Wrap the cooled, unglazed loaf in plastic wrap, then foil, and freeze for up to 3 months. When you’re ready to serve, thaw overnight at room temperature, then warm in a 300°F oven for 10 minutes before glazing. I always freeze one loaf to enjoy after the holiday — it’s like finding a little gift in your freezer.
Reheating: For that fresh-baked taste, wrap slices in foil and warm in a 325°F oven for 5-7 minutes. The microwave works in a pinch, but it makes the bread chewy. If you’re glazing leftovers, reheat the glaze slightly and drizzle fresh — it makes a world of difference.
Fun fact: the flavor actually improves on day two. The orange blossom water continues to mellow and meld with the other ingredients, creating a more complex taste. So don’t stress if you’re making it a day ahead.
Nutritional Information & Benefits
Let’s be real — pan de muerto is a celebration bread, not a health food. But it does have some redeeming qualities beyond its deliciousness.
Per slice (1/12 of loaf):
Calories: 285 | Fat: 9g | Carbohydrates: 46g | Fiber: 1g | Sugar: 18g | Protein: 6g
Health highlights: The orange zest provides a good dose of vitamin C and antioxidants. The eggs add high-quality protein and healthy fats. And while it’s not exactly a superfood, there’s something to be said for the emotional and cultural nourishment this bread provides.
Dietary considerations: This recipe contains gluten, dairy, and eggs. It can be adapted for vegan or gluten-free diets using the substitutions listed above. If you’re watching your sugar intake, you can reduce the sugar in the dough by a quarter cup, but the glaze really needs the full amount for proper texture.
I personally love that this bread uses real, whole ingredients — no preservatives, no artificial flavors, nothing weird. Just butter, eggs, flour, and that beautiful orange blossom water. It’s the kind of food that feeds more than just your body.
Conclusion
Making Traditional Pan de Muerto with Orange Blossom Glaze is more than just baking a loaf of bread. It’s a way of honoring those who came before us, of keeping traditions alive in our own kitchens, and of creating something beautiful with our own hands.
I still think about that first loaf I made — how nervous I was, how my kitchen smelled like my grandmother’s house, how I cried a little when I took that first bite. This bread has a way of connecting us to something bigger than ourselves.
Whether you’re making this for Día de los Muertos, for a fall gathering, or just because you want to try something new and meaningful, I hope you give it a shot. Don’t worry if your decorations aren’t perfect. Don’t stress if the glaze drips a little funny. The bread will still be delicious, and the people you share it with will feel the love you put into it.
I’d love to hear how yours turns out! Drop a comment below and tell me about your pan de muerto experience. Did you add your own twist? Did you make it for a special occasion? Share your stories — I read every single one.
And if you’re looking for more cozy fall baking, check out my brown butter apple crisp or these blueberry lemon zest muffins — they’re both perfect for this time of year.
Happy baking, friends. And remember — the best bread is the one made with intention.
Frequently Asked Questions
Can I make pan de muerto without orange blossom water?
Yes! If you can’t find orange blossom water, increase the orange zest to 3 tablespoons and add an extra tablespoon of fresh orange juice to the dough. The flavor won’t be as floral, but it’ll still be delicious. You can also substitute rose water, though the flavor profile will be different.
Why didn’t my dough rise?
This is usually a yeast problem. Either your yeast was old (check the expiration date), your milk was too hot (killed the yeast), or your kitchen was too cold. Always test your yeast by letting it foam in warm milk with sugar before adding other ingredients. If it doesn’t foam after 10 minutes, start over with fresh yeast.
Can I freeze pan de muerto?
Absolutely. Freeze the unglazed loaf wrapped tightly in plastic wrap and foil for up to 3 months. Thaw overnight at room temperature, warm in a 300°F oven for 10 minutes, then glaze. The glaze doesn’t freeze well, so always add it fresh.
How do I know when the bread is fully baked?
The bread should be deep golden brown on top and sound hollow when you tap the bottom. An instant-read thermometer inserted into the center should read 190-200°F. If the top is browning too quickly but the center isn’t done, tent the loaf with foil and continue baking.
Can I make this bread ahead of time?
Yes! The dough can be made a day ahead and refrigerated after the first rise. Punch it down, cover tightly, and refrigerate overnight. The next day, let it come to room temperature for about an hour before shaping and proceeding with the second rise. The flavor actually develops more complexity with this cold fermentation method.
Pin This Recipe!
Traditional Pan de Muerto with Orange Blossom Glaze
This traditional Pan de Muerto with Orange Blossom Glaze is a soft, brioche-like bread enriched with eggs and butter, scented with orange blossom water and fresh orange zest. It’s a meaningful Día de los Muertos tradition that connects you to a beautiful cultural celebration.
- Prep Time: 30 minutes
- Cook Time: 30-35 minutes
- Total Time: 3 hours (including rising time)
- Yield: 12 servings 1x
- Category: Bread
- Cuisine: Mexican
Ingredients
- 4 cups (500g) all-purpose flour
- 2 ¼ teaspoons (one packet) active dry yeast
- ½ cup (120ml) whole milk, warmed to 110°F
- ½ cup (100g) granulated sugar
- ½ cup (113g) unsalted butter, softened
- 3 large eggs, at room temperature
- Zest from 2 large oranges
- 2 tablespoons orange blossom water
- 1 teaspoon salt
- 1 teaspoon vanilla extract
- ¼ cup sesame seeds
- 1 egg, beaten with 1 tablespoon water (for egg wash)
- 1 ½ cups (180g) powdered sugar, sifted
- 2 tablespoons orange blossom water (for glaze)
- 2–3 tablespoons fresh orange juice
- Pinch of salt (for glaze)
Instructions
- Activate the yeast: In the bowl of a stand mixer, combine warm milk (110°F) with 1 tablespoon of the sugar. Sprinkle yeast over the top and let sit for 5-7 minutes until foamy.
- Build the dough: Add remaining sugar, softened butter, eggs, orange zest, orange blossom water, vanilla, and salt to the yeast mixture. Add flour one cup at a time, mixing on low with the dough hook. Once incorporated, increase speed to medium and knead for 8-10 minutes until smooth, elastic, and passes the windowpane test.
- First rise: Shape dough into a ball, place in a lightly greased bowl, turning once to coat. Cover with plastic wrap and let rise in a warm, draft-free spot until doubled in size, about 1-1.5 hours.
- Shape the dough: Punch down dough and turn onto a lightly floured surface. Cut off about one-quarter of the dough and set aside. Shape the larger piece into a smooth round ball and place on a parchment-lined baking sheet. Divide reserved dough into four equal pieces, roll each into a 6-inch rope. Place two ropes across the top of the loaf to form a cross, and use the other two to create small round balls for the top knot.
- Second rise: Cover shaped loaf loosely with plastic wrap and let rise until puffy, about 45 minutes.
- Bake: Preheat oven to 350°F (175°C). Brush loaf gently with egg wash, sprinkle sesame seeds generously over the top. Bake for 30-35 minutes, rotating halfway through, until deep golden brown and hollow when tapped. Tent with foil after 20 minutes if browning too quickly.
- Glaze: While bread bakes, whisk together powdered sugar, orange blossom water, orange juice, and salt until smooth. Let bread cool on pan for 10 minutes, then transfer to a cooling rack. While still warm, drizzle glaze generously over the top. Let set for at least 15 minutes before serving.
Notes
Temperature is everything—use a thermometer for milk. Don’t skip the windowpane test. Decorations should look rustic. Glaze while warm, not hot. For best results, use real orange blossom water (Cortas or Mymouné brand). The flavor improves on day two.
Nutrition
- Serving Size: 1 slice (1/12 of loa
- Calories: 285
- Sugar: 18
- Sodium: 200
- Fat: 9
- Saturated Fat: 5
- Carbohydrates: 46
- Fiber: 1
- Protein: 6
Keywords: pan de muerto, day of the dead bread, orange blossom bread, mexican sweet bread, dia de los muertos recipe, traditional mexican bread, holiday bread