The container of marshmallow fluff was gone before I even finished drizzling. My sister had swiped it off the counter and was eating it straight from the spoon, mid-conversation, like it was the most normal thing in the world. I was trying to get the last cookie photographed, and she just stood there, grinning, with marshmallow stuck to her chin. That’s when I knew these cookies were going to be a problem. A delicious, wonderful, I-need-to-make-a-second-batch-right-now kind of problem.
It started, honestly, because I was cold. It was one of those grey January afternoons where the heat kicks on and off and nothing sounds better than wrapping your hands around a warm mug. I wanted hot cocoa, but I also wanted something chewy. Something with a little crunch. I stared at the bag of chocolate chips in my pantry, then at the jar of marshmallow fluff, and the idea just clicked. What if I took everything I loved about a hot cocoa bar—the rich chocolate, the pillowy marshmallows, the sprinkles and crushed candy canes—and turned it into a cookie?
I won’t pretend the first batch was perfect. They were a little flat, honestly. The marshmallow melted into a sticky puddle that glued them to the parchment paper. But the flavor was there. That deep, almost fudgy chocolate base with little pockets of gooey marshmallow and a salty-sweet finish. I tweaked the recipe three more times that week, testing different ratios of butter to sugar, chilling the dough longer, and finally figuring out the trick to keeping the marshmallow drizzle intact.
These Ultimate Hot Cocoa Bar Cookies with Marshmallow Drizzle are my favorite kind of recipe. They look impressive, they taste like a hug, and they come together with ingredients you probably already have. They’re the cookie version of curling up by the fire with your favorite mug, and I think you’re going to love them.
Why You’ll Love This Recipe
Let me tell you why these cookies are going to become your new go-to. I’ve tested this recipe more times than I care to admit, and every single batch disappeared faster than I expected. Here’s what makes them special:
- Rich, Fudgy Chocolate Base – This isn’t a thin, crispy cookie. It’s thick, soft, and intensely chocolatey, just like a good cup of hot cocoa.
- Gooey Marshmallow Pockets – We’re not just mixing marshmallows into the dough. We’re tucking them inside so they melt into little pools of sweetness.
- That Satisfying Crunch – Crushed candy canes or chocolate sprinkles on top add the perfect texture contrast. It’s like the whipped cream and sprinkles on your hot cocoa.
- Simple Pantry Ingredients – No weird specialty items here. Butter, sugar, eggs, flour, cocoa powder, and marshmallow fluff. You probably have most of it already.
- Perfect for Holiday Baking – These cookies are a showstopper for cookie swaps, Christmas parties, or just a cozy night in. They look like you spent hours, but they’re actually pretty straightforward.
- Crowd-Pleaser – Kids love the marshmallow drizzle. Adults love the rich chocolate flavor. Everyone loves the crunch. I’ve never had anyone eat just one.
- Make-Ahead Friendly – The dough freezes beautifully, and the baked cookies stay soft for days. You can prep them in advance and bake when you’re ready.
What really sets this recipe apart is the technique. Instead of just mixing everything together, we’re layering the marshmallow into the center of each cookie. This keeps the marshmallow from burning or turning into a sticky mess, and it creates that perfect gooey surprise in every bite. Plus, the marshmallow drizzle on top isn’t just for looks—it adds a light, fluffy sweetness that balances the dark cocoa perfectly.
What Ingredients You Will Need
This recipe uses simple, everyday ingredients to create something truly special. The key is using good-quality cocoa powder and making sure your butter is at the right temperature. Here’s what you’ll need:
For the Cookie Dough
- 1 cup (2 sticks) unsalted butter, softened to room temperature – I prefer using European-style butter like Kerrygold for a richer flavor, but any unsalted butter works great.
- 1 cup granulated sugar – Adds sweetness and helps create that soft, chewy texture.
- 1 cup packed light brown sugar – The molasses in brown sugar adds moisture and a subtle caramel note that pairs beautifully with chocolate.
- 2 large eggs, room temperature – Room temperature eggs mix more evenly into the batter, creating a smoother dough.
- 2 teaspoons vanilla extract – Pure vanilla extract makes a difference here. Imitation vanilla will work, but the flavor won’t be as rich.
- 2 ½ cups all-purpose flour – Spoon and level your flour for the most accurate measurement. Scooping directly from the bag can pack it down and make your cookies dry.
- ½ cup unsweetened cocoa powder – I recommend Dutch-processed cocoa for a deeper, more mellow chocolate flavor. Natural cocoa powder works too, but the cookies will be slightly more bitter.
- 1 teaspoon baking soda – Helps the cookies spread and rise just enough.
- ½ teaspoon salt – Don’t skip this. Salt enhances the chocolate flavor and balances the sweetness.
- 1 cup semi-sweet chocolate chips – Adds extra chocolate chunks throughout the dough. You can use dark chocolate chips if you prefer a less sweet cookie.
For the Marshmallow Filling
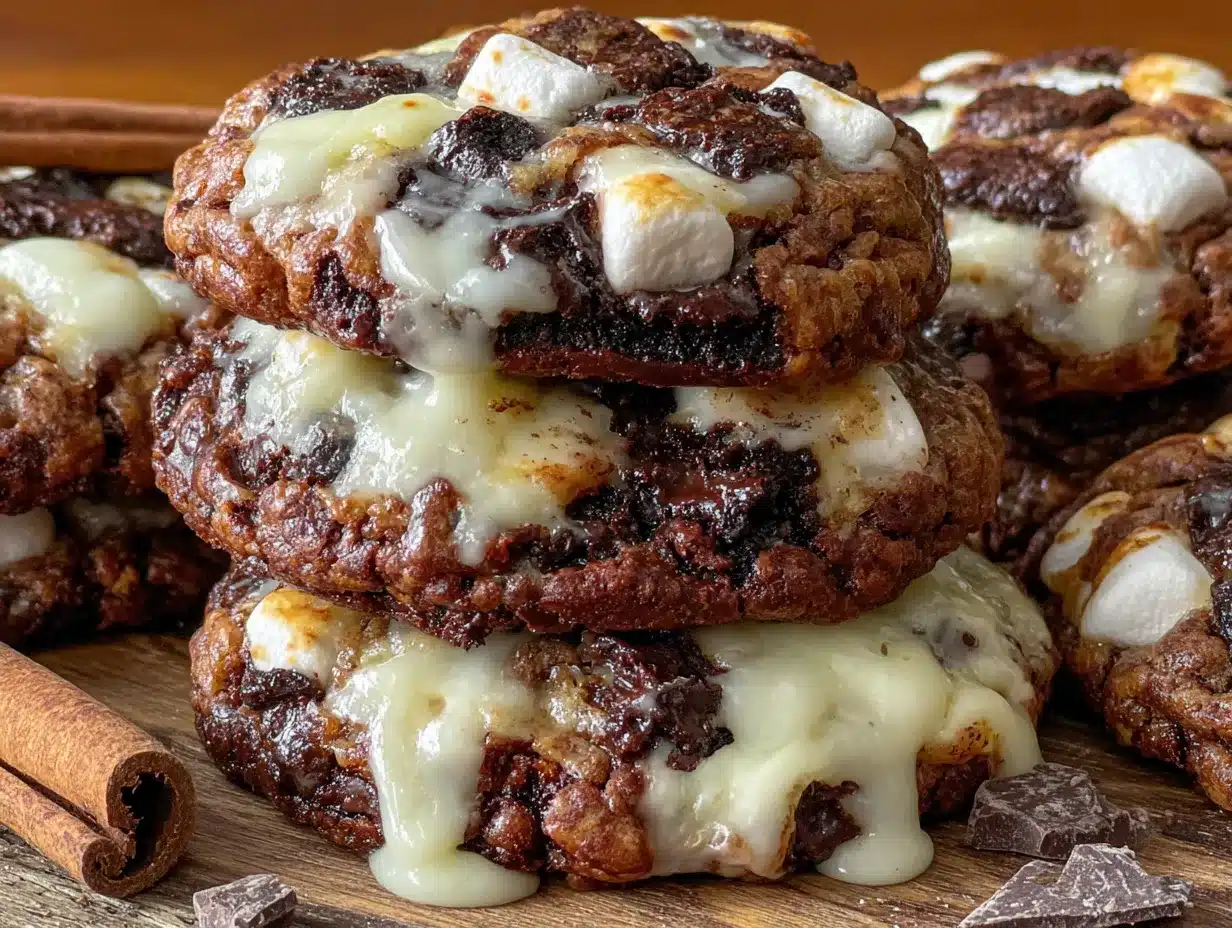
- ½ cup marshmallow fluff (or 12-15 mini marshmallows per cookie) – Marshmallow fluff is easier to work with, but mini marshmallows create more defined gooey pockets. I’ve used both, and honestly, I prefer the fluff for a smoother texture.
For the Marshmallow Drizzle
- ½ cup marshmallow fluff – You’ll need a separate portion for the drizzle.
- 1-2 teaspoons milk – Thins the fluff to a drizzling consistency. Start with one teaspoon and add more if needed.
- Optional toppings – Crushed candy canes, festive sprinkles, mini chocolate chips, or a light dusting of powdered sugar. Get creative!
Ingredient Note: If you’re looking for a dairy-free option, you can substitute the butter with a high-quality vegan butter stick (not margarine) and use a dairy-free milk alternative in the drizzle. The texture will be slightly different, but still delicious.
Equipment Needed
You don’t need a lot of fancy equipment for this recipe, which is one of the reasons I love it. Here’s what you’ll need:
- Stand mixer or hand mixer – A stand mixer makes creaming the butter and sugar effortless, but a hand mixer works just as well. You can even do it by hand if you’re up for a little arm workout.
- Large mixing bowls – One for the dry ingredients, one for the wet ingredients, and one for the dough.
- Baking sheets – I recommend using light-colored, rimmed baking sheets. Dark sheets can cause the bottoms of the cookies to brown too quickly.
- Parchment paper or silicone baking mat – Parchment paper is non-negotiable here. The marshmallow can stick to the pan, and parchment makes cleanup a breeze.
- Cookie scoop (2-tablespoon size) – For evenly sized cookies. A 1.5-tablespoon scoop works too for smaller cookies.
- Cooling rack – Lets air circulate around the cookies so they cool evenly and don’t get soggy on the bottom.
- Small piping bag or zip-top bag – For drizzling the marshmallow fluff. A zip-top bag with a tiny corner snipped off works perfectly.
- Rolling pin or meat mallet – For crushing candy canes (if using). Place them in a zip-top bag and give them a few good whacks.
Budget-Friendly Tip: If you don’t have a stand mixer, a hand mixer is a great affordable alternative. I used one for years before upgrading, and it still gets the job done perfectly.
Preparation Method
Alright, let’s get baking. Follow these steps carefully, and you’ll have the most incredible hot cocoa bar cookies. I’ve included all my little tricks and troubleshooting tips along the way.
Step 1: Prep Your Ingredients
Take your butter and eggs out of the refrigerator about 30 minutes before you start baking. They need to be at room temperature for the creaming process to work properly. While you’re waiting, measure out your dry ingredients. In a medium bowl, whisk together the flour, cocoa powder, baking soda, and salt. Set this aside.
Step 2: Cream the Butter and Sugars
In the bowl of your stand mixer (or a large bowl with a hand mixer), beat the softened butter, granulated sugar, and brown sugar together on medium speed for about 3-4 minutes. You want it to be light, fluffy, and pale in color. Don’t rush this step—proper creaming incorporates air into the dough, which gives the cookies their soft, tender texture. Scrape down the sides of the bowl halfway through.
Step 3: Add the Eggs and Vanilla
Add the eggs one at a time, beating well after each addition. Then mix in the vanilla extract. The mixture might look a little curdled at this point, but that’s totally normal. Don’t worry, it will come together once you add the dry ingredients.
Step 4: Mix in the Dry Ingredients
With the mixer on low speed, gradually add the flour mixture. Mix just until the flour disappears—overmixing at this point will make the cookies tough. You should have a soft, slightly sticky dough. Fold in the chocolate chips with a spatula.
Step 5: Chill the Dough (Crucial Step!)
Cover the bowl with plastic wrap and refrigerate the dough for at least 30 minutes. This is non-negotiable. Chilling the dough prevents the cookies from spreading too much in the oven, and it allows the flavors to meld together. You can chill it for up to 48 hours if you want to prep ahead.
Step 6: Preheat and Prep
Preheat your oven to 350°F (175°C). Line two baking sheets with parchment paper. While the oven is heating, take the dough out of the fridge and let it sit at room temperature for about 5 minutes—it will be easier to scoop.
Step 7: Assemble the Cookies
Using a 2-tablespoon cookie scoop, scoop out a ball of dough. Flatten it slightly in your palm. Place about 1 teaspoon of marshmallow fluff (or 3-4 mini marshmallows) in the center. Then, scoop another ball of dough, flatten it, and place it on top. Gently press the edges together to seal the marshmallow inside. Roll it into a smooth ball. Repeat with the remaining dough and marshmallow. You should get about 18-20 cookies.
Step 8: Bake
Place the cookie balls about 2 inches apart on the prepared baking sheets. Bake for 10-12 minutes. The cookies will look slightly puffed and the edges will be set, but the centers will still look soft and slightly underdone. That’s exactly what you want. They’ll continue to set as they cool. Do not overbake—this is the most common mistake. Overbaked cookies will be dry and crumbly instead of soft and fudgy.
Step 9: Cool Completely
Let the cookies cool on the baking sheet for 5 minutes. This allows them to firm up enough to transfer. Then, carefully move them to a cooling rack to cool completely. Don’t skip this step, or the marshmallow filling might leak out.
Step 10: Make the Marshmallow Drizzle
While the cookies are cooling, make the drizzle. In a small microwave-safe bowl, combine the remaining ½ cup of marshmallow fluff with 1 teaspoon of milk. Microwave for 10-15 seconds, then stir. If it’s still too thick, add another teaspoon of milk and stir again. You want a consistency that’s thick but pourable—like a thin glaze. Transfer to a small piping bag or a zip-top bag with a tiny corner snipped off.
Step 11: Drizzle and Decorate
Once the cookies are completely cool, drizzle the marshmallow mixture over the tops in a zigzag pattern. Immediately sprinkle with your chosen toppings—crushed candy canes, sprinkles, mini chocolate chips, or a mix of everything. Let the drizzle set for about 10-15 minutes before serving.
Cooking Tips & Techniques
I’ve made a lot of cookies in my day, and I’ve definitely learned a few things the hard way. Here are my best tips for perfect hot cocoa bar cookies every single time:
- Don’t skip the chill time. I know it’s tempting to rush, but cold dough is the secret to thick, chewy cookies. Warm dough spreads into thin, flat discs. Trust me on this one.
- Seal the marshmallow completely. When you’re assembling the cookies, make sure the marshmallow is fully encased in dough. Any exposed marshmallow will leak out and burn on the baking sheet. Pinch the seams well.
- Use a light-colored baking sheet. Dark sheets absorb more heat and can cause the bottoms of your cookies to brown too quickly. If you only have dark sheets, reduce the baking time by a minute or two.
- Rotate your baking sheets halfway through. Ovens have hot spots. Rotating the pans from top to bottom and front to back ensures even baking.
- Let them rest on the pan. Those 5 minutes of cooling on the baking sheet are crucial. The cookies are fragile right out of the oven, and moving them too soon can cause them to fall apart.
- For the drizzle, less is more. You don’t need to drown the cookies. A thin, elegant drizzle looks beautiful and doesn’t overwhelm the chocolate flavor.
- Toast the marshmallow fluff. If you want an even more authentic hot cocoa experience, you can use a kitchen torch to lightly toast the marshmallow drizzle after it sets. It adds a subtle smoky flavor that’s incredible.
I once forgot to chill my dough and ended up with a giant cookie pancake. It still tasted good (let’s be real, it’s chocolate), but it wasn’t the cookie I was going for. Learn from my mistakes!
Variations & Adaptations
One of the best things about this recipe is how easily it adapts. Here are some of my favorite variations:
- Peppermint Hot Cocoa Cookies – Add ½ teaspoon of peppermint extract to the dough along with the vanilla. Top with crushed candy canes and a drizzle of white chocolate for a festive twist.
- S’mores Hot Cocoa Cookies – Replace the marshmallow fluff filling with a square of milk chocolate and a few mini marshmallows. Top with crushed graham crackers before baking.
- Spicy Mexican Hot Cocoa Cookies – Add 1 teaspoon of ground cinnamon and a pinch of cayenne pepper to the dry ingredients. The warmth of the spice pairs beautifully with the rich chocolate.
- Gluten-Free Version – Substitute the all-purpose flour with a 1:1 gluten-free baking flour blend. I’ve tested this with Bob’s Red Mill, and it works perfectly. No other adjustments needed.
- Vegan Version – Use vegan butter sticks, a flax egg (1 tablespoon ground flaxseed + 3 tablespoons water), and dairy-free chocolate chips. The texture will be slightly denser, but still delicious.
- White Chocolate Raspberry – Swap the semi-sweet chocolate chips for white chocolate chips and add ½ cup of freeze-dried raspberries to the dough. The tartness of the raspberries cuts through the sweetness beautifully.
My personal favorite is the peppermint version. I make a big batch every December and bring them to our family cookie exchange. They disappear faster than almost anything else on the table.
Serving & Storage Suggestions
These cookies are best served slightly warm, when the marshmallow filling is still soft and gooey. If you’re serving them at a party, you can pop them in a 300°F oven for 3-4 minutes to re-warm them just before serving. They’re also delicious at room temperature, especially the next day when the flavors have had time to meld.
For serving, I love to arrange them on a large platter with a few mugs of hot cocoa and some extra toppings on the side. It makes for a beautiful, interactive dessert spread that everyone loves. They also pair wonderfully with a cold glass of milk or a scoop of vanilla ice cream.
Storage: Store the cookies in an airtight container at room temperature for up to 5 days. Place a piece of parchment paper between layers to prevent them from sticking together. Do not refrigerate them—the fridge will dry them out and make the marshmallow drizzle hard.
Freezing: You can freeze the unbaked cookie dough balls for up to 3 months. Place them on a baking sheet and freeze until solid, then transfer to a freezer bag. When you’re ready to bake, add 2-3 minutes to the baking time. You can also freeze the baked cookies for up to 2 months. Thaw at room temperature and re-warm in the oven if desired.
Reheating: For that fresh-from-the-oven experience, microwave a single cookie for 10-15 seconds. For a larger batch, place them on a baking sheet in a 300°F oven for 5 minutes.
Nutritional Information & Benefits
Let’s be real—these are a treat, not a health food. But that doesn’t mean they can’t be part of a balanced lifestyle. Here’s the estimated nutritional breakdown per cookie (based on 20 cookies):
| Nutrient | Amount per Cookie |
|---|---|
| Calories | 245 |
| Total Fat | 12g |
| Saturated Fat | 7g |
| Cholesterol | 45mg |
| Sodium | 115mg |
| Total Carbohydrates | 33g |
| Dietary Fiber | 2g |
| Sugars | 21g |
| Protein | 3g |
Health Highlights: Dark cocoa powder is rich in antioxidants called flavonoids, which can support heart health. The small amount of fiber in the cookies comes from the cocoa and flour. And honestly, sometimes the best thing you can do for your mental health is enjoy a delicious cookie without guilt. Balance is key, and these cookies are worth every single bite.
Dietary Considerations: This recipe contains gluten, dairy, and eggs. For gluten-free and vegan options, see the Variations section above. The cookies are nut-free as written, making them a safe choice for school events or parties.
Conclusion
These Ultimate Hot Cocoa Bar Cookies with Marshmallow Drizzle are everything I love about baking. They’re cozy, they’re decadent, and they bring people together. Every time I make them, I’m reminded of that grey January afternoon when a simple craving turned into something so much better. They’re the cookie equivalent of a warm blanket and a crackling fire.
I really hope you give these a try. Don’t be afraid to make them your own—switch up the toppings, try a different chocolate, or double the batch because they disappear fast. And when you do make them, I’d love to hear about it. Leave a comment below, tag me in your photos, or tell me what variation you came up with. There’s nothing I love more than seeing these cookies bring a little joy to someone else’s kitchen.
Happy baking, friends. Stay cozy.
Frequently Asked Questions
Can I use store-bought cookie dough for this recipe?
You can, but I don’t recommend it. The texture and flavor of homemade dough are much better, and store-bought dough often doesn’t hold up well when you try to stuff it with marshmallow. If you’re short on time, make the dough ahead and chill it—you’ll thank yourself later.
Why did my cookies spread too much?
This usually happens for one of three reasons: the dough wasn’t chilled long enough, the butter was too soft, or you used too much sugar. Make sure your butter is softened but not melted, and always chill the dough for at least 30 minutes. If your cookies are still spreading, try adding an extra 2 tablespoons of flour to the dough.
Can I use mini marshmallows instead of marshmallow fluff?
Absolutely. Mini marshmallows create more defined gooey pockets, while marshmallow fluff gives a smoother, more uniform filling. Both work great. Just make sure the marshmallows are fully encased in dough so they don’t melt into a sticky mess on the baking sheet.
How do I keep the marshmallow drizzle from getting too hard?
The key is not to overheat the marshmallow fluff when you’re making the drizzle. Heat it in short bursts (10-15 seconds) and stir between each one. Adding a little milk helps keep it soft and pourable. If it does get too hard, just microwave it for another 5 seconds and stir.
Can I make these cookies for a cookie swap?
Yes, and they’ll be the star of the show. Just make sure the marshmallow drizzle is fully set before you stack them. I recommend transporting them in a single layer in an airtight container. If you’re worried about the drizzle smudging, you can drizzle them right before you serve them at the swap.
Pin This Recipe!
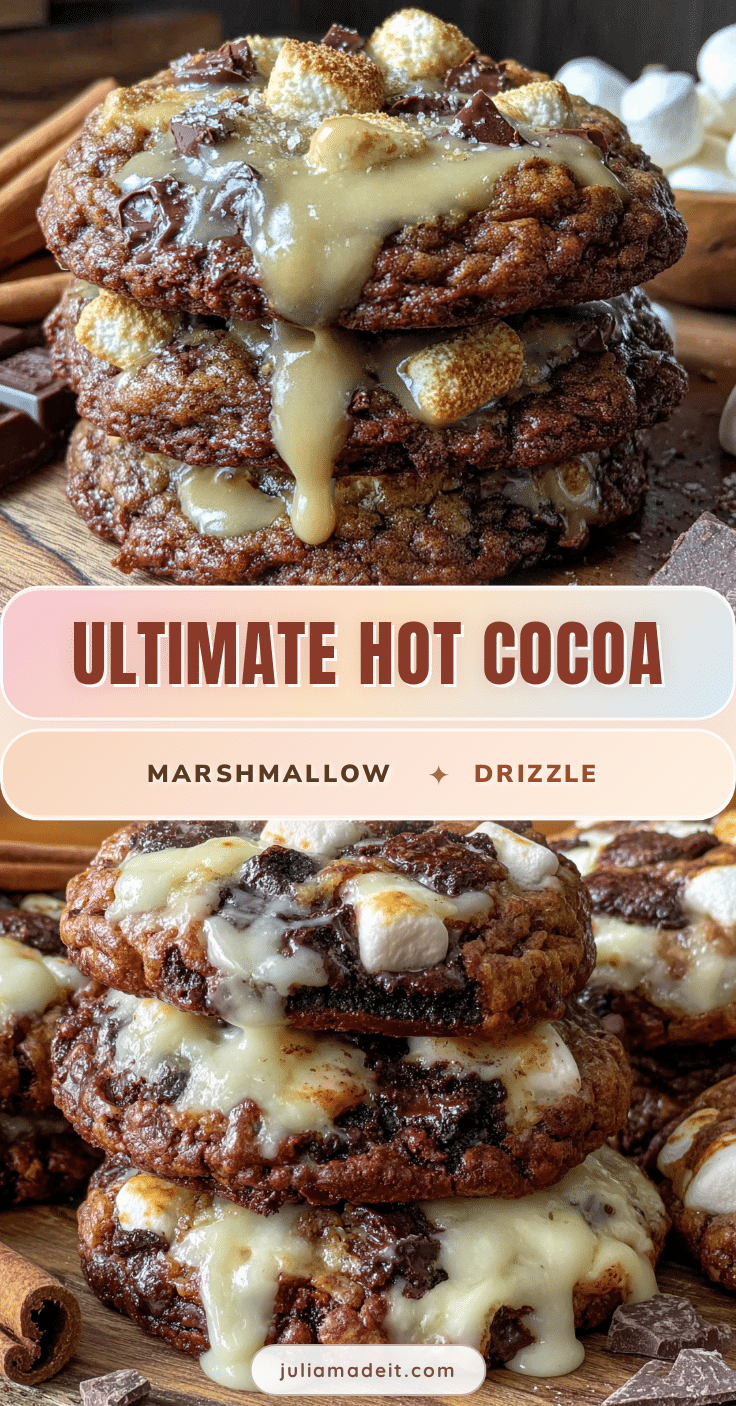
Ultimate Hot Cocoa Bar Cookies with Marshmallow Drizzle
These Ultimate Hot Cocoa Bar Cookies with Marshmallow Drizzle are thick, fudgy, and packed with gooey marshmallow pockets and a satisfying crunch from crushed candy canes or sprinkles. They’re the cookie version of curling up by the fire with your favorite mug of hot cocoa.
- Prep Time: 30 minutes
- Cook Time: 12 minutes
- Total Time: 1 hour 12 minutes (including chilling)
- Yield: 18-20 cookies 1x
- Category: Dessert
- Cuisine: American
Ingredients
- 1 cup (2 sticks) unsalted butter, softened to room temperature
- 1 cup granulated sugar
- 1 cup packed light brown sugar
- 2 large eggs, room temperature
- 2 teaspoons vanilla extract
- 2 ½ cups all-purpose flour
- ½ cup unsweetened cocoa powder (Dutch-processed recommended)
- 1 teaspoon baking soda
- ½ teaspoon salt
- 1 cup semi-sweet chocolate chips
- ½ cup marshmallow fluff (or 12–15 mini marshmallows per cookie) for filling
- ½ cup marshmallow fluff for drizzle
- 1–2 teaspoons milk
- Optional toppings: crushed candy canes, festive sprinkles, mini chocolate chips, or powdered sugar
Instructions
- Prep your ingredients: Take butter and eggs out of the refrigerator about 30 minutes before baking. In a medium bowl, whisk together flour, cocoa powder, baking soda, and salt. Set aside.
- Cream the butter and sugars: In the bowl of a stand mixer (or large bowl with a hand mixer), beat softened butter, granulated sugar, and brown sugar on medium speed for 3-4 minutes until light, fluffy, and pale. Scrape down the sides halfway through.
- Add the eggs and vanilla: Add eggs one at a time, beating well after each addition. Mix in vanilla extract. The mixture may look curdled; that’s normal.
- Mix in the dry ingredients: With mixer on low speed, gradually add the flour mixture. Mix just until flour disappears. Fold in chocolate chips with a spatula.
- Chill the dough: Cover the bowl with plastic wrap and refrigerate for at least 30 minutes (up to 48 hours).
- Preheat and prep: Preheat oven to 350°F (175°C). Line two baking sheets with parchment paper. Let dough sit at room temperature for 5 minutes.
- Assemble the cookies: Using a 2-tablespoon cookie scoop, scoop a ball of dough and flatten slightly in your palm. Place about 1 teaspoon of marshmallow fluff (or 3-4 mini marshmallows) in the center. Scoop another ball of dough, flatten, and place on top. Gently press edges together to seal marshmallow inside. Roll into a smooth ball. Repeat for 18-20 cookies.
- Bake: Place cookie balls 2 inches apart on prepared baking sheets. Bake for 10-12 minutes. Cookies will look slightly puffed with set edges and soft centers. Do not overbake.
- Cool completely: Let cookies cool on baking sheet for 5 minutes, then transfer to a cooling rack to cool completely.
- Make the marshmallow drizzle: In a small microwave-safe bowl, combine remaining ½ cup marshmallow fluff with 1 teaspoon milk. Microwave for 10-15 seconds, then stir. Add more milk if needed to reach a thick but pourable consistency. Transfer to a small piping bag or zip-top bag with a tiny corner snipped off.
- Drizzle and decorate: Once cookies are completely cool, drizzle marshmallow mixture over tops in a zigzag pattern. Immediately sprinkle with chosen toppings. Let drizzle set for 10-15 minutes before serving.
Notes
Chilling the dough is crucial to prevent spreading. Seal marshmallow completely inside dough to avoid leaks. Use a light-colored baking sheet to prevent over-browning. Rotate baking sheets halfway through baking. Let cookies rest on the pan for 5 minutes before transferring. For the drizzle, less is more. Optionally, toast the marshmallow drizzle with a kitchen torch for a smoky flavor.
Nutrition
- Serving Size: 1 cookie
- Calories: 245
- Sugar: 21
- Sodium: 115
- Fat: 12
- Saturated Fat: 7
- Carbohydrates: 33
- Fiber: 2
- Protein: 3
Keywords: hot cocoa cookies, marshmallow cookies, chocolate cookies, holiday cookies, cookie swap, fudgy cookies, marshmallow fluff cookies