Third time in six days and I finally stopped futzing with the heat. The first batch came out looking like fried leather—golden on the outside, sure, but dry enough to use as a coaster. The second time I got nervous and flipped them too early, tearing the skin and leaving pale, sad patches that no amount of butter could fix. But this third round? The pan hissed exactly right. The garlic hit the butter at that split second before it burns, and the smell—honestly, it hung around my kitchen for two full days. I didn’t mind one bit.
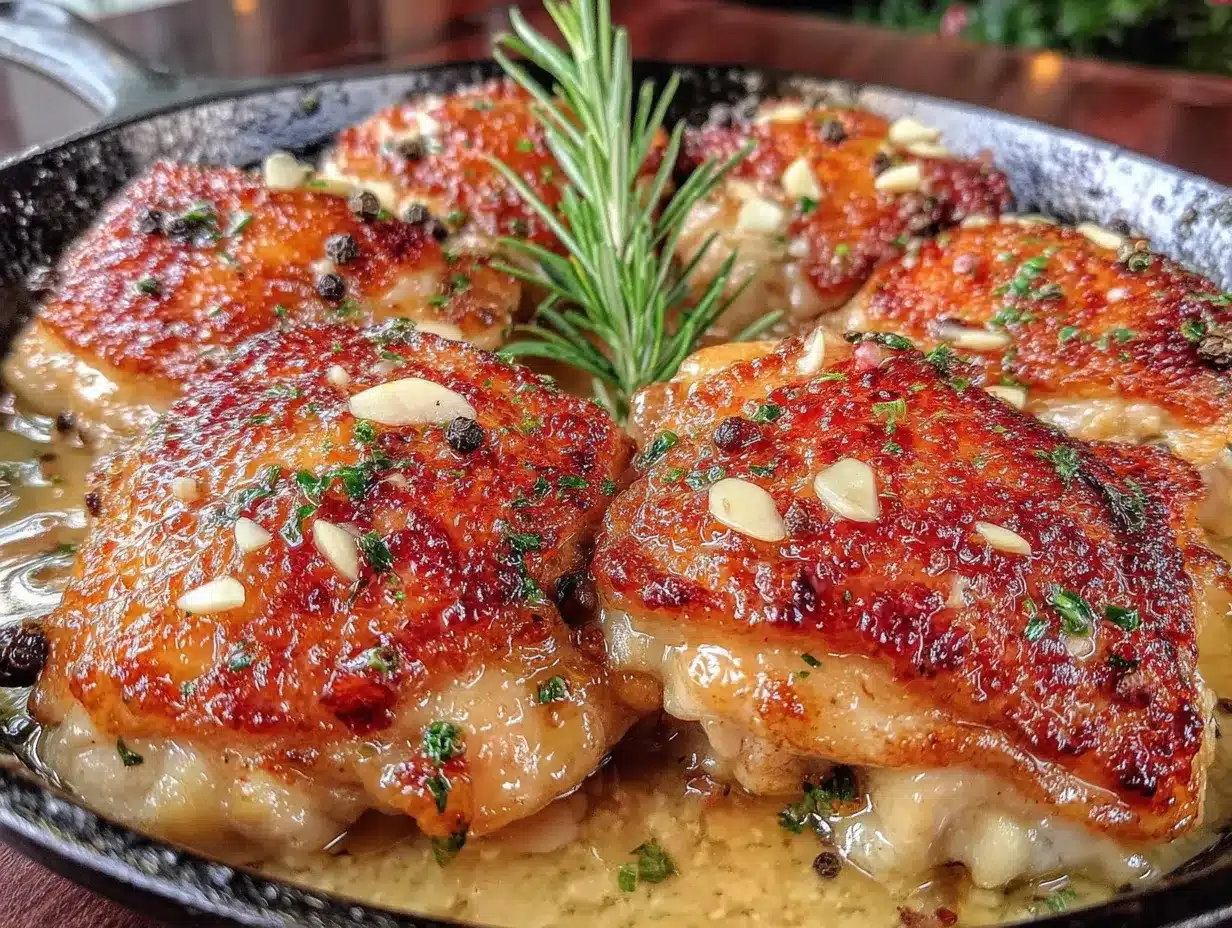
These crispy one-pan garlic butter chicken thighs have become my weeknight white whale. Not because they’re complicated—they’re not, that’s the whole point—but because perfect crispy skin on bone-in chicken thighs feels like a tiny victory every single time. The kind of dinner that makes you forget you were tired five minutes ago. The kind where you catch yourself picking at the crispy bits straight from the pan before anyone else gets to the table.
What finally clicked was understanding that patience isn’t passive. You have to let the chicken sit in that hot pan without touching it, without peeking, without that nervous urge to poke and prod. The skin tells you when it’s ready—it pulls away from the pan on its own, releasing with a sound that’s almost a sigh. That’s the moment. That’s when you know dinner’s going to be good.
This recipe has become my go-to for those nights when I want something that feels special but takes almost no real effort. Just good ingredients, a hot pan, and a little bit of faith.
Why You’ll Love This Recipe
I’ve tested this recipe more times than I care to admit, tweaking the heat levels, the butter quantity, the garlic timing. After all that trial and error, here’s what makes this version stand out—and why I think you’ll come back to it again and again.
- Crispy Skin Every Time : The secret is starting skin-side down in a cold pan and letting the fat render slowly. No flipping too early, no soggy spots. That crackle when you bite through? It’s non-negotiable here.
- One Pan, Minimal Mess : Everything happens in a single skillet—searing, basting, sauce-making. Less cleanup means more time actually enjoying your dinner instead of scrubbing dishes.
- Bold Garlic Butter Flavor : We’re not shy with the garlic here. It gets slightly caramelized in the butter, mellowing out into something rich and nutty rather than sharp or bitter. The butter sauce coats every bite like a warm blanket.
- Budget-Friendly : Chicken thighs cost a fraction of breasts or wings, but they pack way more flavor and stay juicy no matter what. This is the kind of meal that makes you feel like you’re eating luxury on a weekday budget.
- Comes Together in Under 40 Minutes : From fridge to table in about 35 minutes. No marinating overnight, no complicated steps. Just good food fast.
- Pairs with Almost Anything : Serve it with rice, roasted veggies, crusty bread, or a simple salad. The garlic butter sauce works with everything—I’ve even spooned leftovers over scrambled eggs the next morning.
Honestly, this is the kind of recipe that makes you look like a rockstar without actually working that hard. The kind your family will request by name. The kind you’ll memorize after making it twice because it’s just that simple.
What Ingredients You Will Need
This recipe relies on simple, pantry-friendly ingredients that come together to create something far greater than the sum of their parts. No exotic finds, no specialty stores—just good staples treated right.
For the Chicken
- 4 bone-in, skin-on chicken thighs (about 1.5–2 lbs total) — The bone keeps the meat juicy during cooking, and the skin is what gets that gorgeous crispy crust. Look for thighs with the skin still attached and intact. If you can only find skinless, this recipe won’t work the same way—the fat from the skin is essential for both texture and flavor.
- 1 teaspoon kosher salt — I prefer Diamond Crystal for its clean taste and easy pinch-ability. If using table salt, reduce to ¾ teaspoon.
- ½ teaspoon black pepper, freshly ground — Pre-ground works in a pinch, but fresh makes a real difference here.
- ½ teaspoon garlic powder — Not the same as fresh garlic. This adds a subtle background note that complements the fresh garlic later.
- ½ teaspoon paprika — Regular or smoked, your call. Smoked paprika adds a lovely depth that makes the chicken taste like it cooked all day.
For the Garlic Butter Sauce
- 3 tablespoons unsalted butter — Salted butter works too, just reduce the added salt slightly. I like using a good European-style butter here (Kerrygold is my go-to) because the higher fat content means less splattering and richer flavor.
- 6 cloves garlic, thinly sliced — Not minced. Thin slices caramelize in the butter without burning, giving you little crispy garlic bits that are honestly the best part. Feel free to use more if you’re a garlic lover—I won’t judge.
- 1 tablespoon fresh lemon juice — About half a lemon. This brightens the butter sauce and cuts through the richness. Bottled lemon juice works in an emergency, but fresh really does taste better.
- 2 tablespoons chicken broth — Helps deglaze the pan and keeps the sauce from being pure butter (though that wouldn’t be the worst thing). Low-sodium is best so you control the salt level.
- 1 tablespoon fresh parsley, chopped (optional but recommended) — Adds color and a fresh finish. Dried parsley won’t do this recipe any favors, so skip it if you don’t have fresh.
Substitution Notes
If you need to make swaps, here’s what I’ve tested and can vouch for. Use ghee instead of butter for a dairy-free option—it browns beautifully and still tastes rich. For a lower-fat version, you can remove some of the rendered chicken fat before adding the butter, but honestly, the butter is what makes this dish sing. If you’re watching sodium, use unsalted butter and low-sodium broth, then season to taste at the end. And if you don’t have fresh garlic (though I really hope you do), 1 teaspoon of garlic paste works in a pinch—just add it later since it burns faster.
Equipment Needed
You don’t need a fancy kitchen to pull this off. Here’s what you’ll want on hand:
- A 10- or 12-inch stainless steel or cast iron skillet — Non-stick works, but you won’t get the same level of browning or crispy skin. Cast iron is my preference because it holds heat evenly and gives that beautiful golden crust. A stainless steel pan with a heavy bottom works great too.
- Tongs — For flipping the chicken without piercing the skin. Silicone-tipped ones are gentle on non-stick pans if that’s what you’re using.
- A sharp chef’s knife — For slicing garlic thin. A dull knife will crush the garlic instead of cutting it, releasing too much moisture and making it steam instead of caramelize.
- A meat thermometer — Not strictly necessary if you’re experienced, but it takes the guesswork out. Chicken thighs are done at 175°F internally (yes, higher than breasts—the dark meat needs that extra heat to break down connective tissue).
- Paper towels — For patting the chicken dry. This is non-negotiable. Wet skin won’t crisp.
- A small bowl — For mixing the dry seasonings before applying them to the chicken.
If you don’t have a meat thermometer, don’t stress. You can test doneness by piercing the thickest part of the thigh—clear juices mean it’s ready. Or just cut into one and check. I’ve done that more times than I’d like to admit, and the chicken never minds.
Preparation Method
Let’s get cooking. This whole process takes about 35 minutes from start to finish, and most of that is hands-off cooking time.
Step 1: Prep the Chicken (5 minutes)
Pull your chicken thighs out of the fridge about 15 minutes before you start cooking so they come closer to room temperature. This helps them cook more evenly. Pat them thoroughly dry with paper towels—I mean really dry, getting into all the crevices. Moisture is the enemy of crispy skin.
In a small bowl, mix together 1 teaspoon kosher salt, ½ teaspoon black pepper, ½ teaspoon garlic powder, and ½ teaspoon paprika. Sprinkle this mixture evenly over both sides of the chicken thighs, rubbing it in gently. Don’t skip the underside—even though it won’t get crispy, it still needs flavor.
Step 2: Start in a Cold Pan (10 minutes)
Place your skillet on the stovetop and arrange the chicken thighs skin-side down in the cold pan. Yes, cold. This is the trick that changed everything for me. Starting cold allows the fat under the skin to render slowly, melting away and leaving behind thin, crispy skin that’s almost translucent. If you start with a hot pan, the skin tightens up too fast and traps the fat underneath, giving you chewy, rubbery skin.
Turn the heat to medium-low and let the chicken cook undisturbed for 8–10 minutes. You’ll hear a gentle sizzle, not a violent spatter. The fat will slowly pool around the chicken. Resist every urge to peek or move them. Trust the process.
After about 8 minutes, check the skin by gently lifting a corner with tongs. It should be deep golden brown and crispy, releasing easily from the pan. If it sticks, give it another minute or two. Patience here pays off in crunch.
Step 3: Flip and Finish Cooking (12–15 minutes)
Once the skin is perfectly crispy, flip each thigh over using your tongs. The skin side should be beautifully browned—if it’s not, let it go another minute. Now add 2 tablespoons of the butter to the pan, letting it melt around the chicken. Add the sliced garlic cloves, spreading them out so they cook evenly.
Increase the heat to medium and cook for another 10–12 minutes, basting the chicken occasionally with the melted butter. Spoon that garlic butter right over the tops of the thighs—it keeps the meat moist and infuses every bite with flavor. The garlic will start to turn golden and crispy. Keep an eye on it; burnt garlic turns bitter fast.
If you’re using a meat thermometer, check the thickest part of a thigh. You’re looking for 175–185°F. Chicken thighs are forgiving, so don’t panic if they go a bit over—they’ll stay juicy thanks to all that lovely fat.
Step 4: Make the Sauce (2 minutes)
Once the chicken is cooked through, transfer the thighs to a plate and tent loosely with foil. Don’t wipe out the pan—all those browned bits are flavor gold. Add the remaining 1 tablespoon butter, the chicken broth, and the lemon juice to the pan. Scrape up any browned bits from the bottom with a wooden spoon. Let it bubble for about a minute until slightly thickened. Taste and adjust seasoning—maybe a pinch more salt or another squeeze of lemon.
Spoon the garlic butter sauce over the chicken, sprinkle with fresh parsley, and serve immediately.
Cooking Tips & Techniques
After making this recipe more times than I can count, here are the things I wish someone had told me from the start.
Don’t overcrowd the pan. If you’re cooking more than 4 thighs, use two pans or cook in batches. Crowding traps steam, and steam is the enemy of crispy skin. The thighs need space to breathe and render properly.
Patience with the skin is everything. The first time I made this, I flipped the chicken after 4 minutes because I got anxious. The skin tore, stuck to the pan, and I ended up with a mess. Now I set a timer and walk away. The skin will release when it’s ready—forcing it never ends well.
Watch the garlic like a hawk. Garlic goes from golden to burnt in about 30 seconds. Once it starts turning color, keep moving. If you’re multitasking and get distracted, you’ll end up with bitter garlic that ruins the whole dish. I learned this the hard way (twice).
Let the chicken rest. I know it’s tempting to dig in right away, but letting the chicken rest for 5 minutes under foil allows the juices to redistribute. Cut into it too soon and all that goodness runs out onto the plate instead of staying in the meat.
Use the rendered fat wisely. After the chicken cooks, you’ll have a couple tablespoons of rendered chicken fat in the pan. Don’t discard it all—leave a little in when you make the sauce. It adds incredible depth. You can also save the extra fat for roasting potatoes later. Trust me on this one.
Variations & Adaptations
This recipe is wonderfully flexible. Here are some ways I’ve adapted it depending on what I have on hand or who I’m cooking for.
Herb Butter Version : Add 1 teaspoon fresh thyme leaves and ½ teaspoon rosemary (finely chopped) to the butter along with the garlic. The herbs infuse the oil and make the whole kitchen smell like a fancy restaurant. I do this when I’m trying to impress someone.
Spicy Kick : Add ½ teaspoon red pepper flakes along with the garlic, or stir a teaspoon of sriracha into the butter sauce at the end. The heat cuts through the richness beautifully. My husband requests this version every time.
Lemon-Herb Variation : Increase the lemon juice to 2 tablespoons and add a teaspoon of lemon zest along with the garlic. Throw in some fresh oregano or basil at the end. This version feels brighter and lighter—perfect for spring or summer dinners.
Dairy-Free Adaptation : Substitute the butter with a high-quality vegan butter or ghee (if you tolerate it). The flavor changes slightly, but the texture remains nearly identical. I’ve tested this with Miyoko’s European-style cultured vegan butter and it worked beautifully.
Oven-Finished Method : If you’re nervous about stovetop cooking, sear the chicken skin-side down in an oven-safe skillet, then flip and transfer the pan to a 400°F oven for 15–20 minutes. The oven heat is more forgiving and still gives you crispy skin. Add the garlic and butter halfway through baking so the garlic doesn’t burn.
Serving & Storage Suggestions
This chicken is versatile enough to anchor a whole meal or star on its own. Here’s how I like to serve it and what to do with leftovers.
What to Serve With It : The garlic butter sauce begs for something to soak it up. Mashed potatoes are my top choice—they catch every drop of that golden sauce. Buttered egg noodles, crusty bread, or a simple side of steamed rice work beautifully too. For vegetables, I love roasted asparagus, sautéed green beans, or a crisp arugula salad with lemon vinaigrette. The acidity cuts through the richness perfectly. If you’re looking for something heartier, try serving it alongside creamy tomato basil bisque for a soup-and-sandwich-style dinner that feels extra cozy.
Storage : Store leftover chicken in an airtight container in the refrigerator for up to 4 days. The skin will lose its crispiness, but the flavor only gets better. I actually love cold leftover chicken thighs sliced over a salad the next day.
Reheating : To bring back some of that crispy skin, reheat in a 375°F oven for 10–12 minutes, or in an air fryer at 375°F for 5–6 minutes. Microwaving works in a pinch but will make the skin soggy. If you’re reheating the sauce separately, add a splash of broth or water to thin it out.
Freezing : These thighs freeze beautifully for up to 3 months. Cool completely, then wrap individually in plastic wrap and place in a freezer bag. Thaw overnight in the fridge before reheating. The sauce can be frozen separately in a small container.
Nutritional Information & Benefits
Here’s the approximate nutritional breakdown per serving (1 chicken thigh with sauce):
- Calories: 410
- Protein: 32g
- Fat: 30g (12g saturated)
- Carbohydrates: 3g
- Fiber: 0g
- Sugar: 0g
- Sodium: 590mg
Chicken thighs are a fantastic source of high-quality protein, iron, and zinc—nutrients that support muscle health and immune function. The skin provides healthy fats that help your body absorb fat-soluble vitamins. Garlic is known for its anti-inflammatory properties and may support heart health. While this dish is higher in fat than chicken breast, the fat comes primarily from the skin and butter, so you can easily adjust portions to fit your dietary needs. For a lighter meal, serve with extra vegetables and skip any starchy sides.
If you’re looking for a lighter option, try serving these thighs alongside a big fresh cowboy caviar for a balanced plate that’s packed with veggies and fiber.
Conclusion
This crispy one-pan garlic butter chicken thighs recipe has become a staple in my kitchen for good reason. It’s the kind of dinner that feels like a treat but takes almost no real effort—just a little patience and a hot pan. The skin crackles when you bite into it, the meat stays juicy and tender, and that garlic butter sauce is honestly good enough to drink (I won’t tell anyone).
What I love most about this recipe is how forgiving it is. You don’t need to be a professional chef to nail it. You just need to trust the process, resist the urge to fuss, and let the chicken do its thing. Once you get that first perfect batch, you’ll understand why I made it three times in one week.
I’d love to hear how yours turns out. Did you add extra garlic? Serve it with something unexpected? Burn the garlic and have to start over? (Been there.) Drop a comment below and let me know—your adaptations might inspire someone else’s dinner tonight. And if you’re looking for another quick weeknight winner, don’t miss my crispy boneless skinless chicken thighs with zesty lemon herb sauce—it’s the perfect companion to this recipe.
Happy cooking, friends. Your pan is waiting.
Frequently Asked Questions
Can I use boneless, skinless chicken thighs for this recipe?
You can, but you’ll miss out on the crispy skin that makes this dish special. Boneless thighs cook faster (about 8–10 minutes total) and won’t need the long rendering time. If you go this route, skip the cold pan start and just sear them in a hot pan for 3–4 minutes per side. The garlic butter sauce will still be delicious, but the texture will be different.
Why did my chicken skin turn out chewy instead of crispy?
This usually happens for one of two reasons: either you didn’t dry the skin well enough before seasoning, or you started with a hot pan. Moisture creates steam, which softens the skin. And starting in a hot pan causes the skin to tighten too quickly, trapping fat underneath. Next time, pat the chicken bone-dry with paper towels and start in a cold pan over medium-low heat. Give it the full 8–10 minutes before flipping.
Can I make this recipe dairy-free?
Absolutely. Substitute the butter with a high-quality vegan butter or ghee (if you tolerate it). I’ve had great results with Miyoko’s European-style cultured vegan butter. The flavor changes slightly—less rich, a bit more neutral—but the texture stays nearly identical. Just be aware that vegan butter can burn faster, so keep an eye on the garlic.
How do I prevent the garlic from burning?
Add the garlic after you flip the chicken, not before. And keep the heat at medium, not high. Thinly sliced garlic cooks quickly, so watch it closely once it starts turning golden. If you’re nervous, you can add the garlic halfway through the second cooking phase—about 5 minutes after flipping. You’ll still get that lovely caramelized flavor without the risk of bitterness.
Can I use chicken breasts instead of thighs?
You can, but I don’t recommend it for this specific recipe. Chicken breasts cook faster and dry out more easily, especially with the longer rendering time needed for crispy skin. If you must use breasts, butterfly them to an even thickness, skip the cold pan start, and cook over medium heat for about 5–6 minutes per side. Use a meat thermometer and pull them at 160°F—they’ll carry over to 165°F as they rest.
Pin This Recipe!

Crispy One-Pan Garlic Butter Chicken Thighs

Perfectly crispy skin, juicy meat, and a rich garlic butter sauce come together in one pan for an easy weeknight dinner that feels special. Ready in under 40 minutes with minimal cleanup.
- Prep Time: 5 minutes
- Cook Time: 30 minutes
- Total Time: 35 minutes
- Yield: 4 servings 1x
- Category: Main Course
- Cuisine: American
Ingredients
- 4 bone-in, skin-on chicken thighs (about 1.5–2 lbs total)
- 1 teaspoon kosher salt
- ½ teaspoon black pepper, freshly ground
- ½ teaspoon garlic powder
- ½ teaspoon paprika (regular or smoked)
- 3 tablespoons unsalted butter, divided
- 6 cloves garlic, thinly sliced
- 1 tablespoon fresh lemon juice
- 2 tablespoons chicken broth (low-sodium)
- 1 tablespoon fresh parsley, chopped (optional)
Instructions
- Pull chicken thighs out of the fridge 15 minutes before cooking. Pat thoroughly dry with paper towels.
- In a small bowl, mix salt, black pepper, garlic powder, and paprika. Sprinkle evenly over both sides of chicken.
- Place a 10- or 12-inch skillet on the stovetop and arrange chicken skin-side down in the cold pan. Turn heat to medium-low and cook undisturbed for 8–10 minutes until skin is deep golden brown and crispy.
- Flip chicken using tongs. Add 2 tablespoons butter to the pan and sliced garlic. Increase heat to medium and cook for 10–12 minutes, basting occasionally with melted butter, until internal temperature reaches 175–185°F.
- Transfer chicken to a plate and tent loosely with foil. Add remaining 1 tablespoon butter, chicken broth, and lemon juice to the pan. Scrape up browned bits and let bubble for about 1 minute until slightly thickened. Taste and adjust seasoning.
- Spoon garlic butter sauce over chicken, sprinkle with fresh parsley, and serve immediately.
Notes
Start chicken in a cold pan for the crispiest skin. Pat chicken very dry before seasoning. Watch garlic closely as it burns quickly. Let chicken rest 5 minutes before serving. For dairy-free, use vegan butter or ghee. Leftovers keep 4 days in the fridge; reheat in oven or air fryer to restore crispiness.
Nutrition
- Serving Size: 1 chicken thigh with
- Calories: 410
- Sodium: 590
- Fat: 30
- Saturated Fat: 12
- Carbohydrates: 3
- Protein: 32
Keywords: crispy chicken thighs, garlic butter chicken, one-pan chicken, easy chicken dinner, weeknight chicken, bone-in chicken thighs