My accountant, Mr. Henderson, is the last person I’d expect to give me a recipe. I mean, the man wears the same gray cardigan every single day and keeps a calculator on his desk that’s older than I am. But there I was, sitting in his office last October, waiting for him to finish reviewing my quarterly taxes, when he just starts talking about squash. Not the weather, not my deductions—squash. “You know,” he said, without looking up from his papers, “the key to a good honeynut squash is browning the butter first. My wife’s family has been doing it for years. It’s the only thing I bring to Thanksgiving.”
Honestly, I almost laughed. But something about the way he said it—so matter-of-fact, like he was telling me the capital of Vermont—made me pay attention. He scribbled the method on a sticky note and handed it over. “Don’t overcook it,” he said. “And use good salt.” That was it. No measurements, no fuss. Just a sticky note and a strange, quiet confidence.
I made it that very weekend, mostly out of curiosity. And let me tell you—I was not prepared. The smell alone, that nutty, toasty butter hitting the sweet, caramelizing squash, had my whole apartment smelling like a fancy restaurant kitchen. The first bite? Honestly, it was one of those moments where you just stop chewing and stare at the pan. I’ve been making it ever since, and it’s become my secret weapon for every dinner party and holiday gathering. Mr. Henderson’s sticky note is still taped to my fridge, slightly splattered but completely non-negotiable. It’s proof that the best recipes come from the most unexpected places.
Maybe you’ve had a moment like that—where someone completely random hands you a kitchen gem and you know, instantly, it’s going to be a staple. This is that recipe for me. And now, I’m passing it on to you.
Why You’ll Love This Recipe
This isn’t just another roasted squash recipe. It’s the one that will make your guests ask for the recipe before they’ve even finished their first bite. I’ve tested it at least a dozen times, tweaking the temperature, the thickness of the slices, and the amount of sage. This version is the winner—the one that balances sweetness, saltiness, and that irresistible nutty depth from brown butter.
- Quick & Easy: Comes together in about 35 minutes with minimal prep. Perfect for busy weeknights or when you’re juggling multiple dishes for a dinner party.
- Simple Ingredients: You only need a handful of pantry staples—butter, squash, sage, salt, and pepper. No fancy grocery store runs required.
- Perfect for Hosting: This dish scales beautifully for a crowd. You can easily double or triple the recipe without any extra effort.
- Crowd-Pleaser: I’ve served this to everyone from picky toddlers to my uncle who “doesn’t eat vegetables,” and it disappears every single time.
- Unbelievably Delicious: The brown butter takes this from a simple side dish to something that feels special. It’s the kind of flavor that makes people close their eyes after the first bite.
What makes this recipe different from all the other roasted squash recipes out there? It’s the method. Instead of just tossing the squash in oil, you take the extra three minutes to brown the butter first. That small step changes everything. The butter develops these deep, toasty, almost caramel notes that cling to every slice of squash. It’s not just a side dish—it’s a conversation starter.
This is the recipe you bring to a potluck when you want to show off without actually trying that hard. It’s comfort food reimagined—simple enough for a Tuesday, impressive enough for a holiday table. And honestly, it’s the kind of dish that makes you feel like a really good cook, even if you’re just following directions.
What Ingredients You Will Need
This recipe uses simple, wholesome ingredients that you can find at any grocery store. The magic is in how they come together. Here’s everything you’ll need:
- Honeynut squash (2 medium, about 1 lb each) — Look for squash that feels heavy for its size with firm, unblemished skin. Honeynuts are smaller and sweeter than butternut, with a thinner skin that doesn’t need peeling. If you can’t find them, butternut squash works too—just peel it first.
- Unsalted butter (4 tablespoons, 1/2 stick) — I prefer Kerrygold or any European-style butter for browning because it has a higher fat content and lower water content, which means it browns more evenly and develops a richer flavor. You can use salted butter, just reduce the added salt.
- Fresh sage leaves (8-10 leaves) — Fresh sage is non-negotiable here. Dried sage just won’t give you the same aromatic, slightly peppery flavor that makes this dish sing. Look for leaves that are bright green and fragrant.
- Maple syrup (1 tablespoon, plus more for drizzling) — Use real maple syrup, not pancake syrup. The grade doesn’t matter much here—I usually use Grade A for its lighter flavor, but Grade B (or dark amber) will give you a more intense, robust sweetness.
- Flaky sea salt (1 teaspoon, plus more for finishing) — Maldon is my go-to for finishing, but any flaky salt will work. It adds that little crunch and burst of saltiness that balances the sweet squash. Regular kosher salt works for the initial seasoning.
- Black pepper (1/2 teaspoon, freshly ground) — Freshly ground pepper makes a noticeable difference here. It adds a subtle warmth that complements the brown butter and sage.
- Optional garnish: Toasted pepitas (pumpkin seeds) or pomegranate arils for color and crunch. I love adding these when I’m serving this for a holiday dinner—it makes the dish look even more festive.
One thing I’ve learned from making this so many times: the quality of your butter really matters. I know it sounds fussy, but trust me on this. When you’re browning butter, you’re concentrating its flavor, so any off-notes in a lower-quality butter will become more pronounced. Spend the extra dollar on good butter—your squash will thank you.
Equipment Needed
You don’t need a lot of fancy equipment for this recipe, which is part of what makes it so great. Here’s what you’ll need:
- Large rimmed baking sheet (18×13 inch or similar) — A rimmed sheet is important because it catches any butter that might bubble over and prevents a mess in your oven. I use my trusty Nordic Ware half-sheet pan for everything.
- Parchment paper — This makes cleanup a breeze and prevents the squash from sticking. I’ve tried making this without it, and let me tell you, scrubbing caramelized sugar off a baking sheet is not fun.
- Small skillet or saucepan (for browning the butter) — A light-colored pan is ideal because it lets you see the butter change color. I use my stainless steel skillet for this. Avoid dark nonstick pans—they make it harder to judge the color.
- Chef’s knife — A sharp one. Honeynut squash are small, but they’re still dense. A dull knife is a recipe for a trip to the emergency room, honestly.
- Cutting board — Any sturdy board will do.
- Measuring spoons — For the maple syrup and salt.
- Spatula or tongs — For flipping the squash halfway through roasting.
- Pastry brush (optional but helpful) — For brushing the brown butter mixture onto the squash. You can also just drizzle it, but brushing gives you more even coverage.
If you don’t have a pastry brush, don’t worry. Just use a spoon to drizzle the butter mixture over the squash. It won’t be quite as even, but it’ll still taste amazing. I’ve done it both ways, and honestly, the difference is minimal.
Preparation Method
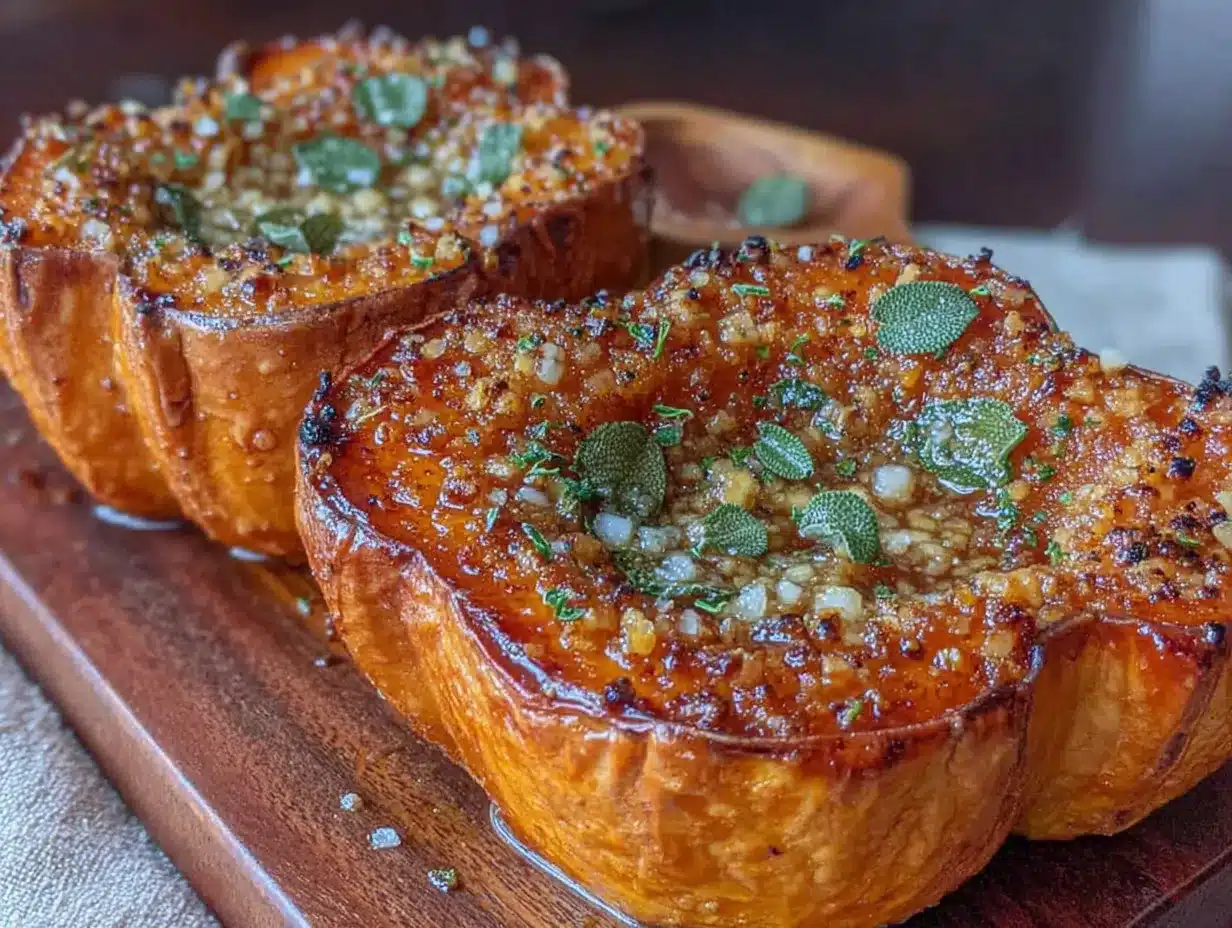
- Preheat your oven to 400°F (200°C). Line a large rimmed baking sheet with parchment paper. Getting the oven hot is important—it helps the squash caramelize properly instead of steaming.
- Prepare the squash. Using a sharp chef’s knife, carefully cut each honeynut squash in half lengthwise. Scoop out the seeds and stringy pulp with a spoon. You can save the seeds and roast them later if you want, but I usually just toss them. Cut each half crosswise into 1/2-inch thick slices. The slices should be relatively uniform so they cook evenly. Don’t worry if they’re not perfect—rustic is fine.
- Arrange the squash on the baking sheet. Lay the slices in a single layer on the prepared baking sheet. Make sure they’re not overlapping, or they’ll steam instead of roast. If they’re crowded, use two baking sheets. Trust me on this—crowding is the enemy of caramelization.
- Start browning the butter. Place the butter in a small skillet or saucepan over medium heat. Let it melt completely, then continue cooking, swirling the pan occasionally. The butter will start to foam and bubble—that’s normal. Keep a close eye on it. After about 3-4 minutes, the foam will subside and you’ll see golden brown specks forming at the bottom of the pan. The butter will smell nutty and toasty. This is your moment. Immediately remove the pan from the heat.
- Add the sage and maple syrup. Drop the fresh sage leaves into the hot brown butter. They’ll sizzle and crisp up almost instantly—about 15 seconds. Be careful, because the butter is very hot. Then stir in the maple syrup. The mixture will bubble up a bit. Give it a quick stir to combine everything.
- Season and coat the squash. Pour the brown butter mixture over the sliced squash on the baking sheet. Use a spatula, pastry brush, or your hands (careful, it’s warm!) to toss and coat each slice evenly. Sprinkle with 1 teaspoon of flaky sea salt and the freshly ground black pepper.
- Roast for 20 minutes. Place the baking sheet in the preheated oven. Set a timer for 20 minutes. The squash will start to soften and caramelize around the edges.
- Flip and continue roasting. After 20 minutes, remove the baking sheet from the oven. Use tongs or a spatula to carefully flip each slice of squash. Return the sheet to the oven and roast for another 10-15 minutes, until the squash is tender and deeply caramelized. The edges should be golden brown and slightly crispy. A fork should slide easily into the thickest part of a slice.
- Finish and serve. Remove the squash from the oven. Transfer to a serving platter. Drizzle with a little extra maple syrup if you like, and sprinkle with a pinch of flaky sea salt. Garnish with the crispy sage leaves from the pan. If using, add toasted pepitas or pomegranate arils for color and crunch. Serve warm or at room temperature.
A quick note on timing: The sage leaves will be very crispy after roasting. They’re delicious eaten whole or crumbled over the squash. If they get a little too dark, don’t panic—they’ll still taste good, just slightly more intense.
Cooking Tips & Techniques
I’ve made this recipe so many times that I’ve learned a few tricks the hard way. Here are my best tips for getting it right every single time:
Watch the butter like a hawk. Brown butter can go from perfect to burnt in about 30 seconds. The moment you see those golden specks and smell that nutty aroma, pull it off the heat. I’ve ruined more batches than I’d like to admit by walking away for “just a second.” Don’t be me. Stand there and watch it.
Don’t skip the flipping step. I know it’s tempting to just let the squash roast without interruption, but flipping ensures both sides get that beautiful caramelization. The bottom of the squash sits in the butter mixture and gets softer than the top. Flipping evens things out.
Cut the slices evenly. This is one of those things that sounds fussy but actually matters. If some slices are half an inch thick and others are an inch thick, they won’t cook at the same rate. You’ll end up with some perfectly tender pieces and some that are still hard in the middle. Take the extra 30 seconds to make them uniform.
Use room temperature squash. If your squash has been sitting in the fridge, let it come to room temperature for about 20 minutes before cutting and roasting. Cold squash takes longer to cook and won’t caramelize as nicely. I learned this after a particularly frustrating batch that just wouldn’t brown.
Double the sage. Honestly, I always use more sage than the recipe calls for. The crispy sage leaves are everyone’s favorite part of the dish—they eat them like chips. I’ve started adding extra leaves to the butter and even scattering a few raw ones on the sheet before roasting. They get wonderfully crispy and add so much flavor.
Make extra brown butter. If you’re already browning butter, make a little extra and save it. It keeps in the fridge for a week and is amazing drizzled over roasted vegetables, pasta, or popcorn. I keep a small jar in my fridge at all times now.
Variations & Adaptations
One of the best things about this recipe is how flexible it is. Here are some variations I’ve tried and loved:
Spicy Maple Version: Add a pinch of red pepper flakes or a small dried chili to the butter while it browns. The heat cuts through the sweetness of the squash and maple syrup beautifully. I made this for a friend who loves spicy food, and she ate the entire pan by herself.
Herb Swap: If you don’t have sage, try fresh rosemary or thyme. Rosemary gives the dish a more piney, aromatic flavor, while thyme is more subtle and earthy. I’ve also used a combination of all three when I had leftover herbs in the fridge—it was fantastic.
Vegan Version: Use a high-quality vegan butter or coconut oil instead of dairy butter. The flavor won’t be exactly the same, but it will still be delicious. I’ve used Miyoko’s vegan butter with great results—it browns surprisingly well. Add a tablespoon of nutritional yeast for a slightly cheesy, nutty note.
Different Squash: Honeynut is my favorite for this recipe because of its sweetness and thin skin, but butternut squash works beautifully too. Just peel it first and cut it into similar-sized cubes or slices. Acorn squash is another good option—it has a milder flavor that pairs well with the brown butter.
Balsamic Glaze Finish: After roasting, drizzle the squash with a good balsamic glaze or reduction. The acidity cuts through the richness of the butter and adds another layer of complexity. I did this for a dinner party once, and everyone thought I was a culinary genius.
Garlic Lover’s Version: Add 3-4 smashed garlic cloves to the butter while it browns. Remove them before pouring the butter over the squash, or leave them in for a more intense garlic flavor. The roasted garlic cloves become sweet and spreadable—a little treat for the cook.
Serving & Storage Suggestions
This squash is best served warm, fresh from the oven, when the edges are still crisp and the brown butter is glossy. But it’s also surprisingly good at room temperature, which makes it perfect for potlucks and holiday buffets.
Serving Ideas: Arrange the roasted squash slices on a large platter, overlapping slightly, with the crispy sage leaves scattered on top. A sprinkle of flaky sea salt right before serving adds that final touch of elegance. For a holiday table, I love adding a handful of pomegranate arils and toasted pepitas for color and crunch. It makes the dish look festive without any extra effort.
What to Serve Alongside: This squash pairs beautifully with roasted chicken, pork tenderloin, or a seared steak. It’s also wonderful alongside a simple green salad with a tangy vinaigrette to cut through the richness. For a vegetarian main, serve it over a bed of farro or quinoa with crumbled feta cheese on top. I’ve also served it as part of a Thanksgiving spread alongside herb roasted turkey breast and it was the first dish to disappear.
Storage: Leftover squash keeps in an airtight container in the refrigerator for up to 4 days. The texture will soften as it sits, but the flavor actually gets better—the brown butter and maple syrup continue to meld together. I’ve been known to eat the leftovers cold, straight from the fridge, as a snack.
Reheating: To reheat, spread the squash on a baking sheet and warm it in a 350°F oven for 5-7 minutes. This helps restore some of the crispiness. You can also reheat it in a skillet over medium heat for a few minutes on each side. Avoid the microwave—it makes the squash mushy and watery.
Freezing: I don’t recommend freezing this dish. The texture of the squash changes too much after thawing—it becomes watery and loses its caramelized edges. This is one of those recipes that’s best made fresh.
Nutritional Information & Benefits
While this is definitely a treat-yourself kind of dish, it does have some nutritional perks worth mentioning. Here’s a rough estimate per serving (about 1/4 of the recipe):
- Calories: 220
- Fat: 12g
- Saturated Fat: 7g
- Carbohydrates: 28g
- Fiber: 4g
- Sugar: 12g
- Protein: 3g
- Vitamin A: 250% of the Daily Value
- Vitamin C: 30% of the Daily Value
Honeynut squash is packed with vitamin A (from beta-carotene), which is fantastic for eye health and immune function. It’s also a good source of vitamin C, potassium, and fiber. The brown butter adds richness and fat-soluble vitamins, but it’s definitely an indulgence. I like to think of this dish as a way to make vegetables feel like a celebration—something you actually look forward to eating, not just a obligatory side on your plate.
This recipe is naturally gluten-free and can be made dairy-free with a vegan butter substitute. It’s also vegetarian and can be part of a balanced meal when paired with a protein and a green vegetable. If you’re watching your sugar intake, you can reduce or omit the maple syrup—the squash is sweet enough on its own.
Conclusion
I still think about Mr. Henderson every time I make this squash. That sticky note on my fridge has become a little piece of kitchen history in my home—a reminder that good food advice can come from anywhere, even from the most unlikely sources. This recipe is proof that you don’t need complicated techniques or exotic ingredients to make something truly memorable. You just need good butter, a little patience, and the willingness to try something new.
If you make this for your next dinner party or holiday gathering, I promise you’ll be the hero of the table. It’s the kind of dish that makes people lean in and ask, “What’s in this?” And when you tell them it’s just squash, butter, and a few simple ingredients, they won’t believe you. That’s the magic of brown butter—it makes everything taste like you spent hours in the kitchen, even when you didn’t.
I’d love to hear how this turns out for you! Did you add your own twist? Did your guests fight over the last piece? Drop a comment below and let me know. And if you’re looking for another show-stopping side dish, you might enjoy this garlic parmesan roasted broccoli—it’s another one of my go-to recipes for impressing a crowd. Happy cooking!
Frequently Asked Questions
Can I use butternut squash instead of honeynut?
Absolutely! Butternut squash is a great substitute. Just peel it first since the skin is thicker and tougher than honeynut skin. Cut it into similar-sized cubes or slices and follow the same roasting instructions. You might need to add 5-10 minutes to the cooking time since butternut is usually denser.
How do I know when the brown butter is done?
Watch for the butter to turn a golden-amber color with small brown specks forming at the bottom of the pan. It will smell nutty and toasty—like it’s just starting to caramelize. The whole process takes about 3-4 minutes over medium heat. The moment you see those specks and smell that aroma, pull it off the heat. It continues to cook from the residual heat of the pan.
Can I make this dish ahead of time?
You can prep the squash up to a day ahead—just slice it and store it in an airtight container in the fridge. You can also brown the butter and store it separately. When you’re ready to serve, just toss everything together and roast. The squash is best served fresh from the oven, but it’s still delicious at room temperature if you’re bringing it to a potluck.
What if I can’t find fresh sage?
Fresh sage really is the best for this recipe because it gets crispy and adds so much flavor. But if you can’t find it, try fresh rosemary or thyme instead. Dried sage won’t crisp up the same way, but you can sprinkle about 1 teaspoon of dried sage over the squash before roasting for a similar flavor profile.
How do I prevent the squash from getting soggy?
The key to crispy, caramelized squash is making sure the slices are in a single layer on the baking sheet with space between them. If they’re crowded, they’ll steam instead of roast. Also, don’t skip the flipping step—it ensures both sides get exposed to the heat evenly. And make sure your oven is fully preheated to 400°F before you put the squash in.
Pin This Recipe!
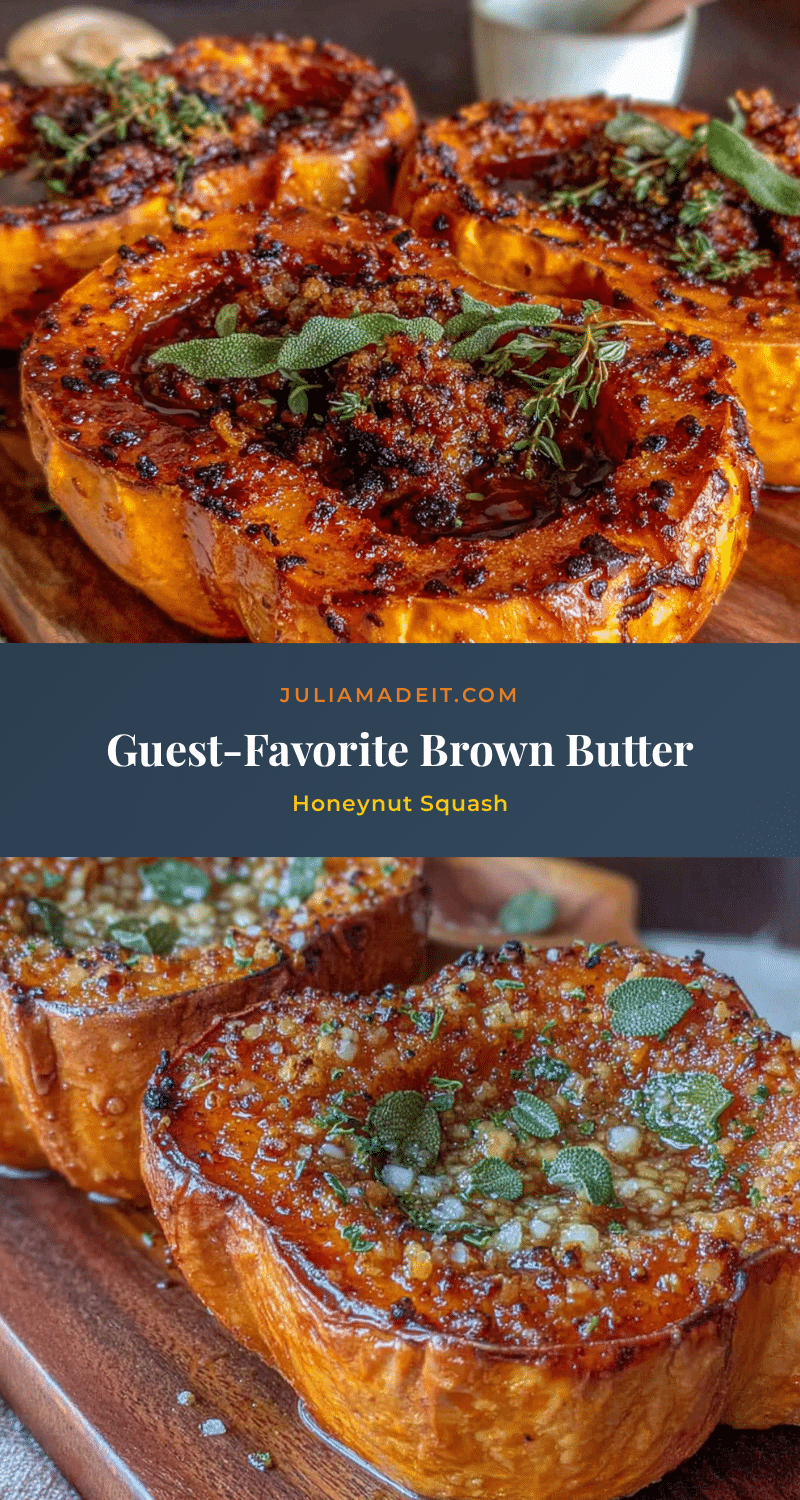
Perfect Brown Butter Honeynut Squash (Easy Side)

This roasted honeynut squash is tossed in nutty brown butter, crispy sage, and a touch of maple syrup for a sweet and savory side dish that’s quick, easy, and perfect for weeknights or holiday gatherings.
- Prep Time: 10 minutes
- Cook Time: 30-35 minutes
- Total Time: 40-45 minutes
- Yield: 4 servings 1x
- Category: Side Dish
- Cuisine: American
Ingredients
- 2 medium honeynut squash (about 1 lb each)
- 4 tablespoons unsalted butter (1/2 stick)
- 8–10 fresh sage leaves
- 1 tablespoon maple syrup, plus more for drizzling
- 1 teaspoon flaky sea salt, plus more for finishing
- 1/2 teaspoon freshly ground black pepper
- Optional garnish: toasted pepitas or pomegranate arils
Instructions
- Preheat your oven to 400°F (200°C). Line a large rimmed baking sheet with parchment paper.
- Using a sharp chef’s knife, carefully cut each honeynut squash in half lengthwise. Scoop out the seeds and stringy pulp with a spoon. Cut each half crosswise into 1/2-inch thick slices.
- Arrange the squash slices in a single layer on the prepared baking sheet, making sure they are not overlapping.
- Place the butter in a small skillet or saucepan over medium heat. Let it melt completely, then continue cooking, swirling the pan occasionally. After about 3-4 minutes, the butter will foam and then subside, with golden brown specks forming at the bottom. Immediately remove from heat.
- Drop the fresh sage leaves into the hot brown butter; they will sizzle and crisp up in about 15 seconds. Stir in the maple syrup.
- Pour the brown butter mixture over the sliced squash. Use a spatula, pastry brush, or your hands to toss and coat each slice evenly. Sprinkle with 1 teaspoon flaky sea salt and the black pepper.
- Roast for 20 minutes.
- Remove the baking sheet from the oven. Use tongs or a spatula to carefully flip each slice of squash. Return to the oven and roast for another 10-15 minutes, until the squash is tender and deeply caramelized.
- Transfer to a serving platter. Drizzle with extra maple syrup if desired, and sprinkle with a pinch of flaky sea salt. Garnish with the crispy sage leaves and optional pepitas or pomegranate arils. Serve warm or at room temperature.
Notes
Watch the butter carefully—it can go from perfect to burnt in about 30 seconds. Cut squash slices evenly for uniform cooking. For best results, use room temperature squash. Double the sage if desired; crispy sage leaves are a favorite. Leftovers keep in the fridge for up to 4 days; reheat in a 350°F oven for 5-7 minutes.
Nutrition
- Serving Size: 1/4 of recipe
- Calories: 220
- Sugar: 12
- Sodium: 580
- Fat: 12
- Saturated Fat: 7
- Carbohydrates: 28
- Fiber: 4
- Protein: 3
Keywords: honeynut squash, brown butter, roasted squash, sage, maple syrup, easy side dish, Thanksgiving side, fall recipe